 I’ve gotten over the culture shock of the ZBRush Interface. It grows on you after a while. Or so I keep telling myself.
The emphasis in ZBrush is about sculpting 3D models – something I’m not really into. I want to use ZBrush as a texturing tool and paint existing 3D objects, so I jumped right ahead and took a good look at something called Spotlight. This is ZBrush’s image editing and painting feature.
Everything needs some funky name, usually beginning or containing the letter Z. I’m surprised they didn’t call this Zpotlight.
What is Spotlight?
Spotlight is Zbrush’s image editor. You can add images to Spotlight, then use them to “rub” them onto a 3D model. The interface is much different from other image editors, sporting a “dial” that serves as a selection and positioning tool. Here’s what it looks like:
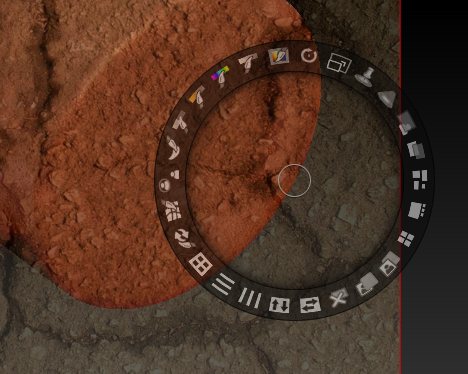
Hover over the icons to display what each cryptic hieroglyph does. You things like crop, colour correct, mirror, smudge and blend images. It’s powerful and casual.
Once I got the hang of it I was flying around Spotllight – that was great. But three days later I had already forgotten how to get to a stage where I could use it – so here are some notes.
How to start Spotlight
I had hoped for a button that would launch the interface – but of course that’s not how it works. We must follow these rather unintuitiuve steps instead:
- in a new ZBrush session (CMD+N), add a 3D Object
- make sure you’re in Edit mode
- turn the object into a Polymesh 3D if necessary so you can paint on it (that’s in the Tool menu)
- find the Texture menu and select or import an image
- in the same menu click on the +/- button to “add the image to Spotlight”
- Spotlight opens automatically
- so does Lightbox with many other images – which we didn’t ask for, so make sure you close it
- you may now see a dimmed image, as well as the Spotlight Dial
If you already had images in Spotlight, you’ll see those dimmed out on the screen, seemingly scattered rather randomly. If they don’t appear dimmed, find the Opacity option in the dial and tweak them to your liking.
Opacity here does not mean the image will less opaque when you use it – you’ll control that with the brush setting. Opacity is just for the image appears to you, the artist, on the screen during your painting session. It’s a personal preference so that you can see where your underlying 3D object is.
How to paint a texture onto a 3D object
Now comes the fun part: position the image over the 3D object any way you like, and rub it on. Select RGB to only paint texture, or MRGB if you’d also like to paint surface detail.
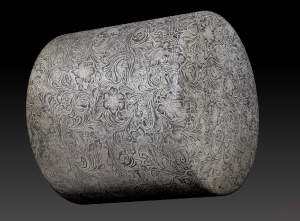
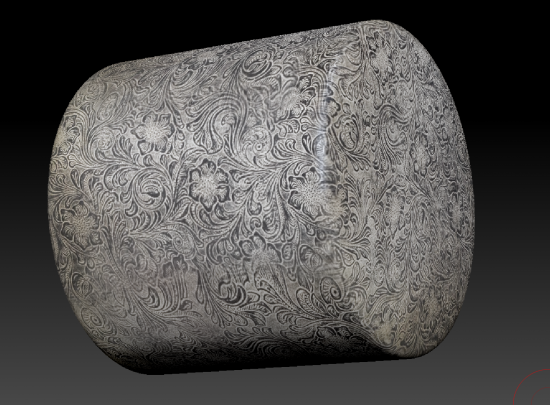
Spotlight does a great job at blending your brush strokes too. Take a look at this cylinder I’ve painted from a simple picture I’ve taken of my balcony director’s chair:
Position the small inside dial over the 3D part you’d like to paint. Move the image itself by dragging outside that inside circle, but inside the dial. Hit Z to start painting, then Z again to bring back the Dial. To move the 3D object, hit SHIFT+Z to disable Spotlight. Bring it back with SHIFT-Z.
Sounds a bit random I know, but that’s the gist of it. I’ll explain this in more detail below.
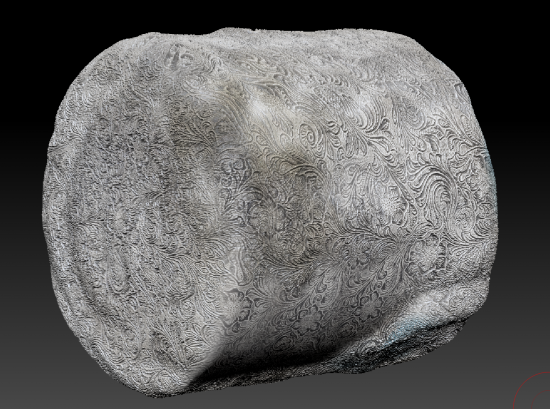
What if it’s all blurry?
One of the pitfalls of ZBrush is that your 3D Model needs to have enough polygons to that your paintings can be accurately mapped. Remember the Pixols I was talking about in my earlier article? We’re working directly with points on the surface of the model rather than a texture map.
If your brush strokes are blurry, and you find that your image looks extremely low-rez when rubbed onto the model, hit CMD-D a few times to subdivide your geometry. Alternatively head over to Tool – Geometry – Divide. On this occasion you can select if you’d like to apply smoothing to a model or not.
Spotlight Shortcuts
Operating Spotlight requires some intimate knowledge of keyboard shortcuts to be effective. Here are some guide rules:
- When the Dial is displayed, you’re in Image Editing mode.
- Hit Z to switch to “rubbing on” mode (Dial disappears), and hit Z again to go back into editing mode (brings back the Dial). Either way, Spotlight is active.
- You can also press SHIFT+Z to disable Spotllight. Hit SHIFT+Z again to re-activate Spotlight.
If no images are loaded, Spotlight does not appear to display itself. Hence, pressing SHIFT-Z may not yield a result.
Instead of SHIFT+Z, you can also use the Texture menu at the top, then find the icon with a dial and +/- on it. That will switch Spotlight on and off.
Using Lightbox
Lightbox appears to be an image browser. I don’t know much about it other than it exists and often pops up when you don’t want it, but I never had to really use it.
I know however that you can add textures via Lightbox to Spotlight. There are many images included in the Textures section, and all of them look better when viewed without Lightbox. I guess those are suggestions, and it goes to show that you do not have to paint with an accurately or colour corrected image. Any image will do as long as it contains what you want to paint with (such as a brick wall).
Here’s how to add a texture to Spotlight using Lightbox:
Make sure Spotlight is on (SHIFT+Z if it isn’t). Now hit the Lightbox button, head to the Texture section and double click an image of your choice. Nothing happens. Double click the image again and it’ll be added as your working texture. So I guess “quadruple click” is what you need to do.
To add more images to the appealing looking Lightbox, technically you’d have to copy those into the ZBRush Applications folder, into the ZTextures subfolder. On a Mac this is /Applications/Zbrush4R6/ZTextures. On Windows your folder will be located in Program Files. Likewise, if you find you will never use 3 variations of a water spouting gargoyle, feel free to delete them from this folder.
I’m not a big fan of copying images into such folders though. If the app is updated, you’ll have to copy all your content to a new location. A much better way is to keep your images somewhere else, then create a shortcut to this folder inside ZTextures.
- On Windows, it’s as simple as creating a desktop shortcut (right click, Create Shortcut, define source folder).
- On Mac you’ll have to create a link via the command line (ln -s /source /destination).
Gee, I wonder why Lightbox is so unpopular…
Further Reading
Still confused? I know I am. Pick up a copy of Eric Keller’s Introducing ZBrush, and also take a look at the Texturing Section in ZClassroom for some free screencasts.
Note to self:
I know Zbrush can do great things. It’s a giant puzzle to figure out how. Therein lies the adventure.