 Using Blender with the integrated Magic Trackpad on my MacBook works a treat – it’s intuitive even! It’s a nice surprise in the otherwise daunting user experience Blender has to offer.
Here’s how to navigate a 3D scene using gestures:
- Rotate using two-finger swipe
- Zoom using two-finger pinch, or the PLUS and MINUS keys
- Pan by holding SHIFT and use two-finger swipe
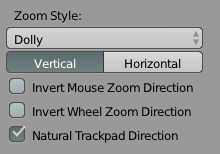
If this happens to work the wrong way round for your brain, it’s easy to invert this behaviour: head over to File – User Preferences – Input and find the option that reads “Natural Trackpad Direction”. Tick it and save the preferences to make it survive an app restart.
While you’re here, consider ticking the box labelled Emulate Numpad – this is handy on a MacBook but also when using the standard Mac Bluetooth Keyboard. Blender makes extensive use of the numeric keys, and without this option they won’t work well on a Mac.
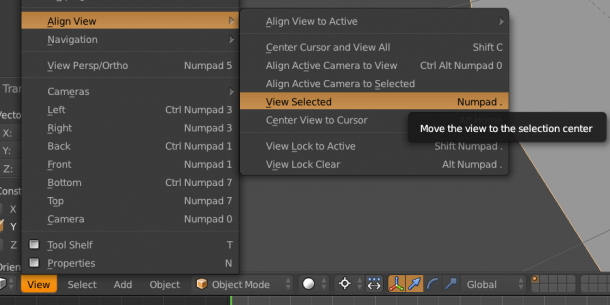
By default Blender will rotate around the centre of the scene. To rotate around an object instead, select it first by right-clicking it (or two-finger tapping the object), then choose View – Align View – View Selected.
To revert back to rotating around the scene centre, either hit SHIFT-C or select “Centre Cursor and View All”, followed by “Centre View to Cursor” from the same menu.
Mouse Navigation
Although Blender works just fine with a Magic Trackpad, modelling is a little easier and faster with a cheaply to come by 3-button mouse. At times I’m using a Logitech M325, available for as little as $14 (or more if you like stylish designs).
Mouse navigation is a little different:
- orbit using the Middle Mouse Button (hold and drag)
- pan using SHIFT + Middle Mouse Button
- zoom using the Mouse Scroll Wheel
With the option “Emulate 3 Button Mouse” enabled, the middle mouse button click is emulated using the ALT key. Hence, ALT + LEFT CLICK (and drag) is the same as Middle Mouse Button click.
Any chance we can change that abysmally tiny font to something along the lines of “usable”?
Say no more – I feel your pain: head over to File – User Preferences – System and you can do two things to ease the pain.
Either change the DPI to something higher (the default is 72). This will increase the font size. Or switch Virtual Pixel Mode to Double, doubling the font and icon sizes. It’s meant for higher resolution displays I guess. Works a treat!
