Time to get the screw driver out
Once the system is shut down (obviously) turn over your Mac and take out all the screws at the bottom. I used a small Phillips screwdriver for this, one that came in a back of others from Wick’s for a tenner. Best investment ever several years ago, comes in handy for all kinds of things.
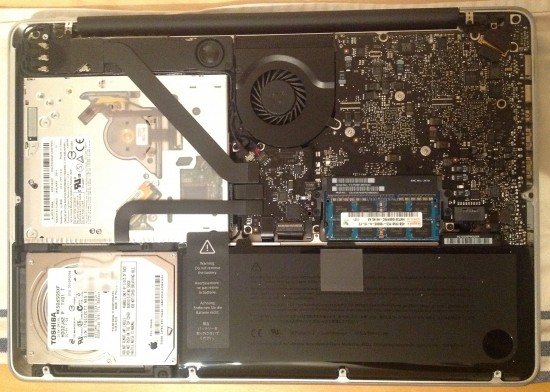
Not all screws have the same length so make a note which hole you’ve taken each one out. Once you’re done you’ll see something like this:
 Secret Workings of a MacBook Pro
Now I understand how they can build a Raspberry Pi – the actual board of mt laptop isn’t much bigger, albeit a tad more powerful I’d imagine… or is it?
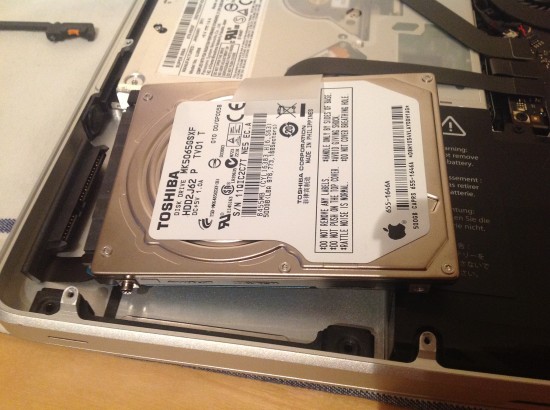
See the Toshiba drive at the bottom left? We’re going to replace this with the SSD drive shortly. The existing drive has a clear plastic sticker attached to it so it’s easier to lift it out – that’s how Steve would have liked it (sniff)! But before we do that we need to loosen a couple of other screws here.
Just above the hard drive sits a bracket. Take it out with the same Phillips as before. The at the bottom of the drive are two screws that just need to be loosed a little. Once done lift the drive out CAREFULLY – those SATA wires aren’t all that long, we don’t want you to rip them…

Slide off the SATA connector slowly and have a look at the existing drive. It has four screws attached which held it in place so it doesn’t jiggle around when you travel with your MacBook. Let’s take them off with a small TORX (not the Phillips… it’ll ruin everything). We’ll add those to the Crucial SSD drive next so it too won’t jiggle around.
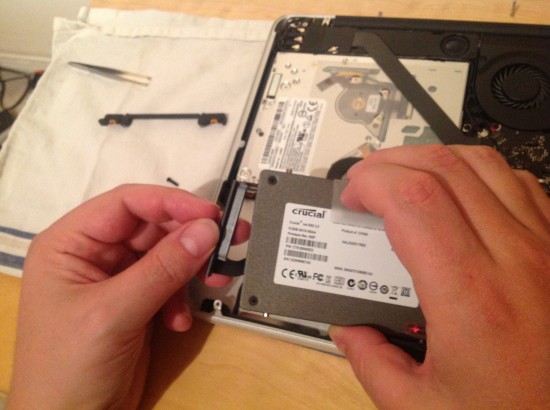
Once the screws are in place, make sure to take the plastic sheet off the existing drive and add it to your new one – you’ll thank yourself if you need to lift this out in the future. It’s just glued on so it comes off easy.
Next add the SATA connectors to the SSD and replace it in its slow carefully. You know what, just do EVERYTHING here carefully and you’ll be fine…

Now put the bracket back in place, tightening the screws in it as well as the bottom. That’s all the hardware changes we need to make. Replace the bottom of your MacBook, put the screws back and you’re ready for Prime Time.
If you can’t remember which screws were the long ones, it’s the top right three. All the other ones are the short ones.
Starting up with your new SSD
There are a couple of things you need to be aware of once the new guy is in place. Nobody usually tells you this so I will. Bear with me here.
I had foolishly assumed that the SSD would turn my machine into an instant-on super computer. Sadly that’s not the case, especially upon first boot. Even though the BIOS detects the new SSD without a hitch, the system knows it’s a physically different device so it can take a moment longer than we’d expect here. No biggie. If all goes well your MacBook should boot up fine and you’ll see the desktop as you’ve left it.
Since I was using my system while I made the copy most applications I had running at that time came back up as I left them. That’ll be different on subsequent boots of course, but this is one of the nasty surprises I was talking about earlier.
I’ve noticed that one single text file with a cryptic name was set to be opened at boot time with TextEdit (even though TextEdit couldn’t do it and gave me a permissions error). This is easily fixed by going to System Preferences – Users and Groups – Startup Items. Untick the ones you don’t want – thanks to John Hopkins for this tip 😉
Having used my SSD for a couple of weeks now I’ve noticed something slightly annoying: as fast as it has made my Mac, every now and again I get the spinning rainbow wheel for 10-20 seconds, making my machine unresponsive. Wasn’t like that before of course. This happens mainly when a lot of data is being shifted (i.e. working with iPhoto or Premiere).
Doing some research on this topic I gather it’s a well known issue with Early 2011 Mac Books: the SATA cable connecting the hard drive to the mother board isn’t made for data throughput of 6Gbps. Apparently the cable isn’t shielded enough and occasional interference can ruin the data bring pushed to the bus. Dang!
I have no solution to this issue yet. People say “just wrap aluminium foil around the cable” but I can’t see me doing this. Another option is to tell Apple and ask them to replace the cable with something more adequate.
I’ll report back when I have this fixed. In the meantime I’ll live with it – it’s nothing that puts me off using my machine.
Hi. After reading this I did a little research on the internet and discovered that MacBook Pro EFI Firmware Update 2.2 should have corrected any problem you have with a 6Gbps SSD. Do you have this update/ are you still having these issues? I’m looking to upgrade to SSD very soon and was wondering if I should go with 6Gbps or 3Gbps due to these issues. Thanks.
Hi Brandon,
yes I had the EFI 2.2 installed already and still encountered the problem. I made an appointment with an Apple Genius and they agreed that it’s probably the flex cable connecting the SDD to the motherboard. They kindly replaced it free of charge and now it works without a hitch. I have Apple Care so this was free, but without it the invoice read it was £11 for the cable and about £12 for labour.
I’m on 6Gbps I believe and with that new and improved flex my Mac is extremely happy. It has indeed turned into the instant-on machine we know and love from the MacBook Air.
Cool. Thanks.