 Bryce 7.1 doesn’t reliably run under OS X, but it works fine in both Windows 7 and Windows 10. Being the Mac User and avid 3D enthusiast that I am, and having a bit of time on my hands, I thought I’d give Bryce another go. And thanks to Parallels Desktop I can run it in a virtual Windows installation. Nice!
I’m only getting started with Bryce, but the first thing I’ve noticed was that many of the mouse controls didn’t work as expected. For example, dragging a slider up or down only works in one direction, and much too erratic to be useful. Imagine how awkward camera and positioning controls are! Anything that has to do with leaving the left mouse button clicked while dragging up/down/left/right is affected.
The Problem
I’m using Apple’s Magic Trackpad, and those controls need to be translated by Parallels Desktop and given to Windows as Mouse Controls. This works fine out of the box in most Windows applications – but not with Bryce. Don’t ask me why.
So I thought, how am I going to make this work? Fiddle with Windows Mouse Settings (has no effect), fiddle with Parallels Desktop Settings (also has no effect), install Snow Leopard or Windows on an external partition? Ah, let’s just not go there.
But there is something surprisingly simple that came to me this morning: connect a dedicated input device directly to the Windows VM, rather than have Parallels Desktop translate the controls. And hey presto: it works a treat!
Let me show you how to do it in this article.
My Setup
I’m using Parallels Desktop 11 on a Mac Mini, running El Capitan 10.11.6. Connected to my Mac are a Thunderbolt Display and a Magic Trackpad. Bryce 7.1 Pro is installed inside the Windows VM (I have one for Windows 7 and one for Windows 10). I’m writing this article in August 2016.
The Solution
All we need is a dedicated input device of our choice – for example, a cheap and simple USB mouse. I’m using a funky wireless Logitech M325 with a purple flower pattern. It has a wireless USB receiver, which when plugged into my Mac, makes it spring into action.
The first thing I’ve tried is use it in my virtual Windows “as is”, meaning the mouse is connected to both my Mac and Windows and works in both operating systems (just like the trackpad, which works in addition to that). However, in Bryce it shows exactly the same erratic behaviour as the trackpad does. That’s to be expected, because it’s controls are translated by Parallels Desktop in the same way as those of the trackpad.
The solution to this puzzle is to tell Parallels Desktop to connect disconnect the mouse from the Mac, and connect it directly to Windows instead. This may sound like crazy talk, because of course the little USB dongle needs to physically stay connected to the Mac. But what we’re doing is to ask the Mac to ignore this device, and plug it straight into the virtual Windows environment.
And here’s how to do it:
At the top of your running Windows VM, slide your mouse to the very top of the screen. This brings up the Parallels Desktop context menu. Head over to Devices – External Devices and check out the list of all available devices that your VM can see.
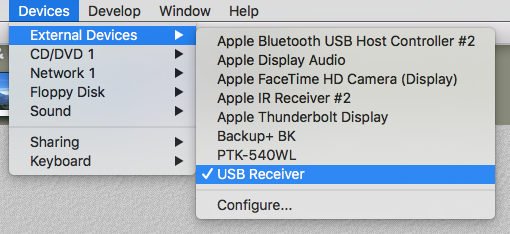
Depending on the device you want to connect, it’ll come up with its own unique (and sometimes unidentifiable name) in that list. Mine is just called “USB Receiver”. If you’re not sure what yours is called, unplug it and see which item is missing from the list. Don’t forget to plug it back in though…
Now select your (hopefully connected) device from the list, and as if by magic, Parallels Desktop will virtually remove it from your Mac and plug it straight into your Windows VM. Since this is probably new hardware, you’ll see the corresponding “installing driver” dialogue in Windows.
And that’s it: moving your mouse will no longer work on your Mac, but as soon as you switch to Windows it works just fine, and Windows will now receive the direct mouse controls rather than the translated values from Parallels Desktop. Just what we want.
Open Bryce and try it out: sanity has been restored to the user interface. Camera controls and sliders work as expected. Bliss!
CPU and Memory Recommendations
Slightly off topic, but while I’m on the subject of running Bryce via Parallels Desktop:
To get the maximum usage out of your hardware, configure your VM to use all available processor cores. This will speed up render times. If you want to use your Mac for other things during long renders, consider leaving one or two cores for tasks such as email and web browsing if the system slows down.
Give your VM at least 4GB of RAM, or 8 if your system has the resources. You need to leave some RAM for your Mac to work. I have 16GB on my system, so I give half to Windows and leave the other half for OS X.
Bryce 7.1 is still a 32-bit application. So no matter if you’re running a 32-bit or 64-bit version of Windows, Bryce will work just fine. However, it’ll work just a tad finer if you’re running a 64-bit version of Windows with more than 4GB of RAM. I mention this because there’s a trick that can make Bryce work a little better, by making it Large Address Aware. Let me explain what that means.
Making Bryce Large Address Aware
See, 32-bit operating systems have one major drawback: they can only address a maximum RAM of 4GB. This means that back in the day, both the whole operating system, and the applications running on top of it would have to fit into these 4GB. By default an application was only allowed to use 2GB maximum and save the rest for the OS.
64-bit operating systems don’t have that limitation, and as a result applications can use as much RAM as is available on your system. If a 32-bit application runs on a 64-bit operating system, it can be configured to make use of more than 2GB. Such applications are known to be “Large Address Aware”, meaning they know that they don’t have to share the addressable 4GB with the operating system.
Bryce is not Large Address Aware by default, but thanks to a small patch it can be tweaked that way. This allows us to load larger scenes and textures without crashes. Download a small tool from the TechPowerUp Forums (courtesy of FordGT90Concept – kudos and thank you!)
And many thanks to Horo for explaining this concept to me 😉