![]() I recently had the need to encode several audio clips I had edited in Adobe Premiere Pro CS 5.5. That’s easy if you export one timeline at a time, by selecting the sequence, then click File – Export – Media.
I recently had the need to encode several audio clips I had edited in Adobe Premiere Pro CS 5.5. That’s easy if you export one timeline at a time, by selecting the sequence, then click File – Export – Media.
But this principle doesn’t work if you have several sequences that need to be exported.
An article in the Adobe Forums suggests how to do this using After Effects as an intermediary, but it seemed very convoluted and a total hack. Besides, I don’t have After Effects so that’s not really a solution.
Convinced that there had to be a better way, I had a quick fiddle – and lucky for me I’ve discovered an easy workaround that I’ll share with you here. I’m using Premiere Pro CS 5.5, so I’m assuming it’ll work in later versions too.
Priming Media Encoder
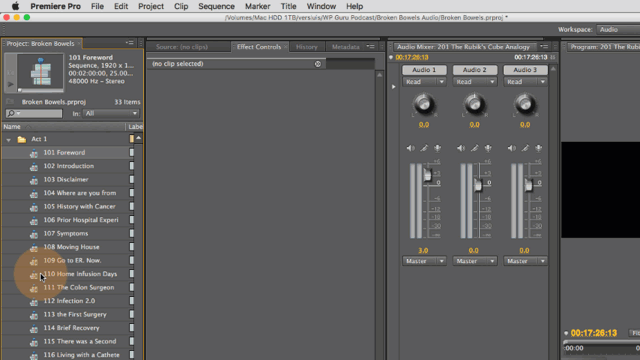
We have several edited sequences, all of which need to be transcoded into a new folder. Rather than having to File – Export – Media several hundred times, we do it only once, namely with the first file we’d like to transcode.
Let’s send it to our friend the Media Encoder.

We’ll have to do that because Media Encoder relies on Premiere to give him the transcoding settings. In a moment we’ll simply drag several timelines directly into Media Encoder, but we have to send the first one over from Premiere to begin with, otherwise Media Encoder won’t know the correct export settings for future clips.
Transferring Multiple Sequences at once
With that bit out of the way, I suggest you make both the Premiere and Media Encoder windows a little bit smaller, so that both applications fit onto the same screen.
In Premiere, select multiple sequences you’d like to send to Media Encoder. Use SHIFT to select several, or drag a rectangle around the clips/sequences in question. You can even drag a whole bin across.
Wait a second for Media Encoder to create a queue entry for each sequence.
Huzza – we’ve passed the first hurdle successfully: several clips are now ready to be encoded, and we didn’t have to press CMD+M followed by RETURN millions of times.
Tweaking the Encoding Settings
Notice that Media Encoder may not have chosen the correct encoding preset.
It will have probably chosen the correct format in the first column (MP3 in my case, rather than a video format), but it has not chosen the correct settings. In my case, I wanted an MP3 with 256 kbps rather than 128 kbps.
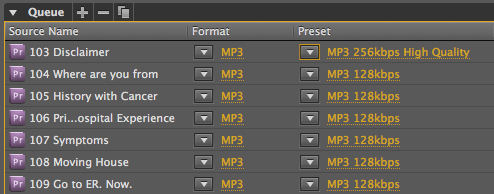
Let’s change that!
Simply select all affected clips in the queue (using SHIFT again, or that rectangle trick), then pick a different present from the list. You can pick your own presets here too of course – you can create them in Premiere, when you’re exporting a single sequence.
![]()
Changing the Output File Location
Right now it looks like Media Encoder would save the transcoded output next to the original file location. Quite obviously not what we want. Fret not, there is an easy way to change this.
In Media Encoder, head over to Preferences – General, and in the Output section, select Specify output file destination. Now browse to a folder of your choice and every clip that you add to Media Encoder from now on will be saved to this location.
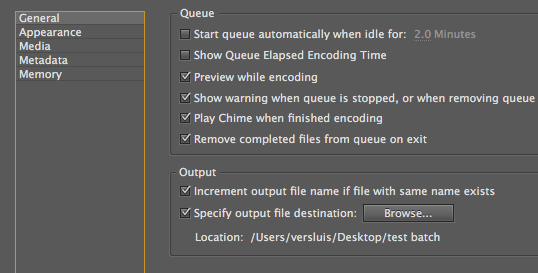
This means that all files that are currently in your queue will not use this location. To update them, select them all, then remove them, and drag the sequences over again from Premiere.
That’s it!
All that remains to be done is to hit the big tiny Encode button, and Bob’s your uncle.
Happy transcoding!
1 thought on “How to export multiple timelines at once in Premiere”