This is a slightly longer than usual story, but I thought I’d share it nonetheless – maybe it’ll help someone who’s in a similar situation than I was in April 2019, just about to file my tax return in the US. Grab a coffee and take a trip around some Intuit products that helped me transform the way Julia and I do our taxes.
Why we started using TurboTax (2018)
Ever since our arrival in the US in 2012, we’ve had a wonderful accountant to take care of all our tax needs. Phil was his name, and he was unique in that he was accredited both in the UK and in the US. He uniquely understood out tax situation and helped us for a number of years… until he unexpectedly retired in 2017.
At that point he recommended a colleague who charged three times his fee, and while I never questioned the man’s qualifications, we simply couldn’t afford him. We asked Phil for another recommendation, and in so doing he suggested TurboTax, an online self-filing system available in the US and many other Commonwealth countries (Canada, UK, Australia I believe).
I had been self-filing taxes ever since I started going freelance in the UK in 2000, so I was used to the British system of doing so online, without the help of any other tools. HMRC have a great website, and filing is a breeze – if you have up-to-date accounts. I never had a problem with it.
The US tax system however is so different from what I was used to that I was hesitant to try my hand at self-filing at first. I had just survived cancer, and understandably my mind was elsewhere. Yet with no other choice, and nothing else to lose on such short notice, we gave TurboTax Online a go in 2018 (to file for 2017).
How it works (in a nutshell)
For those of you who don’t know, Turbo Tax is a web-based system that asks a number of simple questions about your situation (i.e. location, legal status, income, expenses, savings, type of business you’re running etc), takes you through some nice looking menus and (for a fee), electronically files your tax return.
Several versions have been in existence for a number of years, but the most common these days is of course the cloud-based variant. It allows you to compile all relevant data and asks you pay a fee before filing the return. You can pay extra for an additional “live” option, which gives you all year round access to tax experts on tap, either via chat, email or phone. That’s great offer, compared to the human accountant Phil had recommended, who wanted to charge us about 10x as much as that.
My Tax Situation
Our tax situation isn’t that complex, but also not simple: we have a Limited Liability Company for our home-based business, which needs a separate return in addition to our jobs. Julia works full time, I work part time, we both get W2 forms in addition to being company directors. Hence, we need to file a company return, and also file a joint personal return.
The latter is very straightforward, but the company return is a little more tricky, because it requires me to collate all my little sources of income, from things like hosting customers, YouTube, Adsense, Patreon, Amazon (et al) with expenses I’ve had for those avenues. Keeping on top of both income and expenses requires a reliable and easy to use tool.
Tracking Income and Expenses
In the past I’ve used Excel to track my income, as well as expenses. This was easy because I wrote a small amount of invoices each year, and I had a record of what income would reach my account. We’re talking perhaps 50 invoices every year. Ever since I’ve moved to the US however, my invoices have become more and more each year, albeit with smaller amounts, and the sources of income have become more various too. It’s about 500 smallish transactions in total every year at a guess. I needed a new tracking tool, as most sources of income are now direct deposits into PayPal or my business bank account.
Tracking expenses felt a bit like that in the past: they were (and still are) small amounts of money, several times every month, many of them automated subscription services. Since 2011 I’ve used an iOS app called Receipts Pro for collecting those. It could save a picture of a paper receipt or email screenshot, then print a report when it was time to do my tax return. It also allowed synchronisation with multiple devices, so both my iPhone and iPad could add receipts to central cloud save (via Dropbox or Google Drive), and both Julia and our (then) business partner could add to the UK company pool too.
While this app has served me well for many years, it hasn’t seen an update in a while and was beginning to struggle syncing multiple devices with one cloud based store file – especially as it grew larger. Exporting receipts to Excel was a mess, and time consuming too. And because I only had to do it once every year, I usually forgot my magic formula of how to do it.
Hence, tax season turned into a nightmare every year. Until we discovered Turbo Tax, thanks to our now retired accountant.
Enter Turbo Tax (Round 1)
Filing on our own US tax return for the first time, right in the middle of my cancer recovery story, well let’s just say it was stress I wish I could have avoided. We left it until the very last day of course, and it was troublesome to even consider thinking about what documents we needed and how to go about filing that return. I didn’t want to get into trouble, but I’ve only just got my life back – hence such concepts like tax returns weren’t something I wanted to think about.
But we had to, and I can’t emphasise enough how easy the Turbo Tax experience made it for us. One evening Julia and I sat down for three hours and explored the web interface on my Mac. We recorded the whole three hour session, just in case we forgot what we did. To my utter surprise, our perseverance paid off and we filed that tax return without issues.
The Turbo Tax web interface isn’t what we’re used to these days on complex cloud services. While a paper tax return looks like a setup to make you fail, the questions the site was asking us were very easy and straightforward. At every step did we have an opportunity to click a little question mark and get clarification should we be unclear.
The best part was when the system was asking for our W2 forms (the US equivalent of a “pink slip”, the one that presents annual taxes paid and income received by an employer): All we had to enter was one scary long number at the top, and only seconds later the system had retrieved everything that was printed on this form from somewhere else. Rad!
Anyway, to cut a long story short, we got a $100 refund when we filed that federal return. We even filed a state return too, which – as we would soon find out – wasn’t actually necessary in Florida. That’s the only thing I found somewhat confusing about this affair: the fact that we weren’t explicitly told a state return wasn’t not necessary for our state, but letting us pay money for it anyway. But even so, one quick call to Intuit’s Customer Service line and we got a refund.
What does Turbo Tax cost?
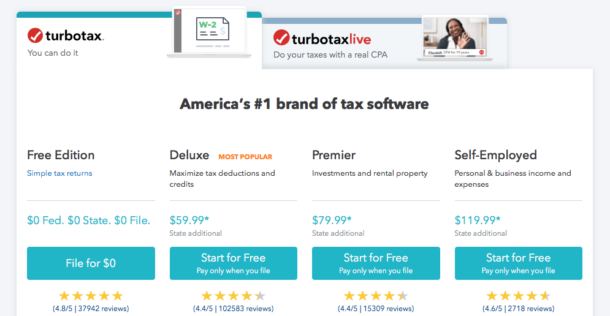
Here’s where things get terribly confusing: how much does Turbo Tax actually cost, and what’s the difference between the plethora of versions that’s on offer? It appears that everything from FREE to $200 is available, online and offline, desktop and mobile. Truth is, every tax situation is different, and I guess depending on what’s necessary for a particular circumstance, you’ll pay different prices.
There’s also the confusion about the “Turbo Tax Online” vs. “CD based versions” of the same software. I can only surmise that the CD version is a relic of how Turbo Tax may have started before transitioning to “the cloud”, and I would assume that the offline version can be run on a computer without an internet connection. Prices seem to be the same, and the CD version appears to have some online capabilities to speak to Intuit’s servers, but I must admit that the online version spoke more to our needs and I never gave the CD version a second look.
So what’s the price tag then? Well I can only tell you what we paid for our own particular tax situation, and what I’m choosing to pay right now. Back when we filed for the first time, using the online version of Turn Tax, we used the Self-Employed option for $120. This includes a federal tax return for self-employed people like myself, as well as those with additional full-time or part-time jobs. I was self-employed at the time, Julia had a part-time job. The self employed option fit our needs, letting us file file a joint tax returns for both Julia and myself, and one for our company.
In addition to the $120, you have to pay an additional $40 for one state return. If you file tax returns in multiple states, it’ll be $40 per state. Some states – like Florida – do not require us to file tax returns, hence it was not necessary for us to purchase this option. However the system let us pay for and file a state return for Florida anyway, but the interface came up creepily blank. Until we researched this on our own, we had no idea if the system had crashed, or if we had encountered a bug, or if it was meant to look like that. As I said, we asked for a refund and duly got one.
Note that any of these fees are due only when filing the return. You can enter all your data without making any payment, keep track of how high your refund might be, collate additional data when necessary and so forth. Your data is saved so you can pick up anytime later should you get tired or wait for other documents to arrive. I think that’s a nice way of demonstrating how Turbo Tax works to people evaluating the system.
By the end of the whole process, just before you file, you enter credit card details and make a payment if necessary – or the system will offer you to take any fees out of your possible tax refund.
Electronic Returns vs Paper Returns
Filing the return electronically incurs an additional $40 by the way, because Intuit don’t actually transfer the data to the IRS. Some other company in California does that, and these people will have to be paid in addition to Intuit. Again, it is offered to deduct this fee from your potential return. You can avoid this fee if you wish by printing out your tax return and mail it to the IRS.
The difference is that electronic filing will take about 8 weeks to process, which means you’ll have to send those documents out in January realistically, otherwise you’ll miss the filing deadline of the April 15th. Besides, there’s the issue with “documents lost in the post” scenario, and avoid this with a courier will incur some costs too.
Being a child of the eighties, I’m super happy to pay that electronic filing fee. Perhaps one day, we’ll be able to submit documents electronically to the IRS directly from our own computers (like we can in the UK).
Optional Extras
Intuit offer something called MAX for an additional $60. Since we no longer have an accountant, this was a valuable thing to invest into. MAX gives us access to a tax advisor all year round in case we have questions, we get something called Audit Defence (i.e. a Turbo Tax representative will be by our side in case we get audited by the IRS), and they throw in Identity Restoration.
You can read more details here if you’re interested. As I said, this is an optional service and there’s no need to buy it. However, if the IRS have questions, you’ll have to speak with them yourself (I’m told it’s not always a pleasure to do so; I can’t confirm or deny this, I never had to do it myself).
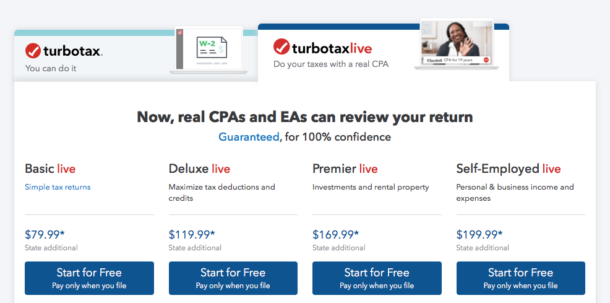
Aside from the regular Turbo Tax, there’s another option called Turbo Tax Live. From what I understand, you’ll submit all your data just as described above, but rather than a computer saying “everything is fine” at the end, a human being will have a look at your paperwork.
Although we did not buy this upfront, it can be purchased in addition even while you file your return. There’s a red button at the top right corner that will connect you with real people who you can talk to (even via video link) and ask questions and get advice. We considered this too, but it turned out the interface was so straightforward that we didn’t have any questions this time – but that button and the option to make use of it was there, without added pressure to make a decision up front. From what I remember, the additional fee was $60 – again very reasonable for an on-demand service.
You can find out more about Turbo Tax Live here, and take a look at the current prices for up-front packages here.
Summary (Round 1)
In summary, for our first Turbo Tax Return Experience, we paid a total of
- $120 Self-Employed package
- $40 Electronic Filing Fee
- $60 MAX Audit Defence
- ==> $260 Total <==
Considering that our accountant was $600, and that our new accountant would have been $1500, we got a pretty good deal in my humble opinion.
Like so many things in my recent past, I was touched that a solution to a big problem in my life was “just there” when I needed it, and I couldn’t have been more grateful how well this system has worked for us. I felt reminded of the Rubik’s Cube Analogy I mentioned in my book Broken Bowels: just because you don’t know the solution to a puzzle, it doesn’t mean there isn’t one. Case in point: accountant retires, we can’t afford a new one, and we have no idea how to file our tax return in a foreign country.
- Do we know the solution? No.
- Is this super scary? Yes!
- And is there a solution? Yes indeed.
Going Forward
Having made such a nice experience for our 2017 tax return, we were almost looking forward to doing it again with Turbo Tax for our 2018 tax return. This time however, I was no longer using that outdated Receipts App that had served me well for so many years.
The main issue I was still having was that when tax season comes, I had to sift through several email accounts and photo folders to drag out receipts and enter them into some kind of Excel spreadsheet, to get an overview of much I’ve spent during the year and tell the IRS. Besides, without my Receipts app, I only had my bank/PayPal account to consult as to how much money was left in the company coffers.
I needed a new solution that would let me take care of receipts all year round, preferably from my mobile device, something that would work with both paper receipts as well as email receipts. Ideally this thing would magically speak to whatever I had to hack into the Turbo Tax interface, so that come tax season, all I would have to do is spend an hour on a website and click “file”.
Enter Quick Books (Round 2)
I know that’s a lot to ask… but it appeared as if an iOS app called Quick Books Self-Employed would tick all those boxes, and go several extra miles:
- Quick Books tells me exactly where my business finances stand every day
- lets me forward an email to their system, reads the data and populates most fields automagically
- lets me upload pictures of paper receipts and PDFs that are automagically machine-read and turned into actual data (works remarkably well)
- notifies me if something needs to be looked at by a humon eye
- integrates with Turbo Tax (made by the same company)
- let’s me work on my receipts anywhere (beach, coffee shop, bed, bus)
- offered a free trial version
That’s exactly what I was looking for. With tax season looming again earlier this month, I decided to give the free trial version a go.
First Impressions
Quick Books works remarkably well for my situation. It uses my Turbo Tax login credentials, so both systems know about one another. They don’t exchange data, but Turbo Tax can request data stored in the cloud from Quick Books (the latter does not speak to Turbo Tax though, so there’s no back-and-forth syncing going on).
I don’t use a car to travel or log mileage, but should I ever start doing so, Quick Books has me covered – thanks to integrated geo tracking. It knows where I live, and everywhere I’d travel during work hours can be counted as mileage automatically. If I were a contractor, that would be a great benefit to have. I work primarily from home and occasionally from a coffee shop so I can’t really make use of this option, but it’s good to know that I could if I wanted to.
I was more interested in the receipts collection function, and the ability to enter my income as it comes in. At first I thought I would have to take a screen grab of each email, then upload those with the app. Once processed, I though I would have to enter a category manually and declare a receipt as an expense or income. That would have been a cumbersome way of working, but hey – that’s what I was used to for many years. Turns out there’s a MUCH better way to handle this.
Quick Books gives me an email address to which I can simply forward receipts instead. It’ll take a moment to process and extract all relevant data (like the date, vendor and total amount), then add it to my list of expenses. All I have to do is check it and add the correct category. For paper receipts, it works much the same way: snap a picture, upload, the end. 9 times out of 10, the system correctly identifies all relevant fields. It’s like MAGIC!
If you’ve seen the Danny DeVito Commercials for this product, you know what mean. While the clips are humorous, this is exactly how Quick Books works. You can watch the whole series here:
However, I was unclear as to how I would add income to my files. If I scanned an invoice, or forwarded one to the system, Quick Books would assume it’s an expense and would always subtract the total from my (not yet existent) income. That’s not what I needed. I even reached out to their customer service, but I’m not sure I was understood properly.
Those situations usually mean that I’m not using the system the way it was designed. Once again, it turns out there’s a much better way to add income to Quick Books.
Bank Account Integration
Quick Books can integrate with online banking services. Every time you spend money, it will have a look if said transaction can be matched up to a receipt. If it’s an expense, it’s a deduction from the bank account; it’ll be income if it’s a deposit. When a transaction is detected for which a receipt has been found (same date, same amount), Quick Books is clever enough to match those things and give you a receipt for a transaction that occurred on your account.
Sweet! That’s the way I could enter income into the system: automatically. No manual hacking. Let the computer figure it out, then review and agree or disagree. That’s 99% of all my transactions sorted already. I still haven’t figured out how to declare cash income though, but since it very rarely happens in my situation, it’s not all that important. It’s an “edge case” as we say in computer programming. If I really wanted to, I guess I’d have to pay said cash into my bank account for the transaction to be visible to Quick Books. If there is an easier way to do this, or a manual way to enter income without a transaction, please let me know.
I have two dedicated business accounts, one is a bank account and one is my PayPal account. Both receive regular payments, and I make purchases from both of them. For each transaction, I can enter a category (computers, communications, transaction fee, software etc) or I can declare it as a personal expense (in which case, the transaction is ignored for tax purposes). I can also choose to split the transaction between business and personal. That’s handy for mobile phone or internet costs.
Quick Books also lets me create rules for certain transactions. They’re not fool proof, but every transaction from Client X can be declared as income, while receipts from Vendor Y can be marked as “software subscription” for example. Should another such transaction happen next moth, it’s categorised automagically.
I now had a system in place that would be up to date with both income and expenses every day of the year. While it was a little tricky to get up to speed with a full year’s worth of income and expenses, and to figure out all this functionality and workflow at the same time, it didn’t take long to collate all my data and turn it into a fileable system on the fly.
Invoices
Quick Books also does invoices, at least the version I tried (more on that below). I have an invoicing app on my iPad, but I’m keen to transition to something that’s in my pocket at all times. My poor iPad is stuck on iOS 9 and isn’t really suitable for 2019 and beyond anymore, so it’s probably best to look for a replacement.
The invoicing tool promises to take payments via Apple Pay (not directly via Intuit, but some third party). I’ll look into that next and give an update when I had a chance to play with it. Needless to say, it’s a welcome addition to the whole package for self-employed people like myself.
How much is Quick Books then?

Excellent question, and not an easy one to answer. Much like with Turbo Tax, there are various options, as well as various ways to buy the software… or should I say “subscribe to the service”? I’ve looked into it, and while I’m not entirely sure how all these different options differ, I can tell you what I’ve decided to buy and what works for me and my needs.
There appears to be a difference between the “online version” and the “app version”. There’s also a “Desktop version”, which I assume is much like the CD version of Turbo Tax, i.e. a standalone app with occasional online connectivity. The other versions are browser and/or API based.
While the online version seems to differ in regards to how many users can access the service, the App Version for either iOS or Android devices works with single user credentials, namely your Turbo Tax account. Since that’s the one I was interested in, I will focus on this version. For more information about the various Quick Books online options, take a look at this summary.
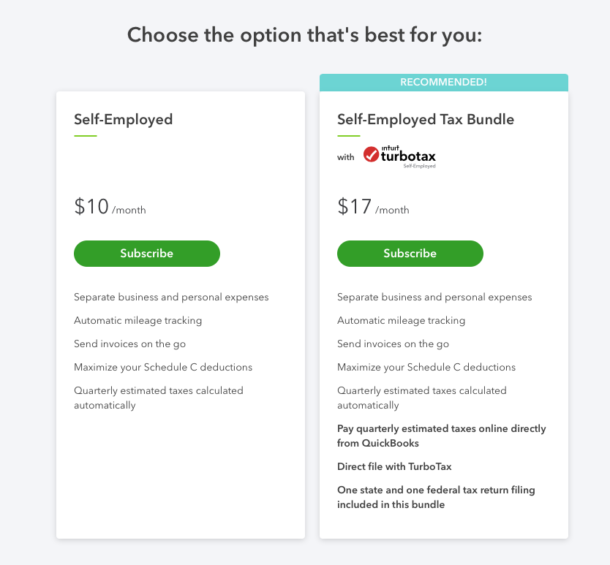
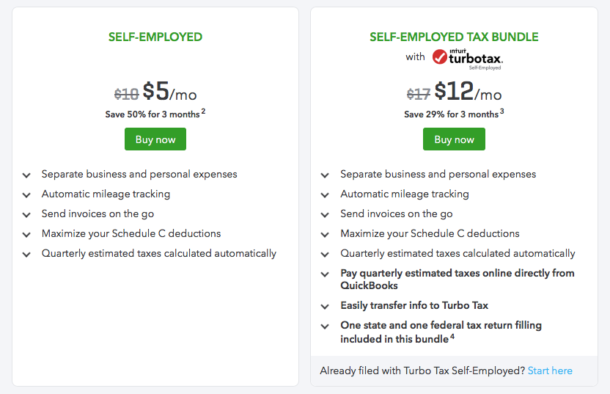
In the Apple App Store we find as many as FIVE different Quick Books apps, and from what I gather, they’re all “interfaces” for particular types of options of the online version (each of which with a separate price tag). The one that’s useful for me is called Quick Books Self-Employed, and it’s available with a 30 day trial, or a monthly subscription with these two options:
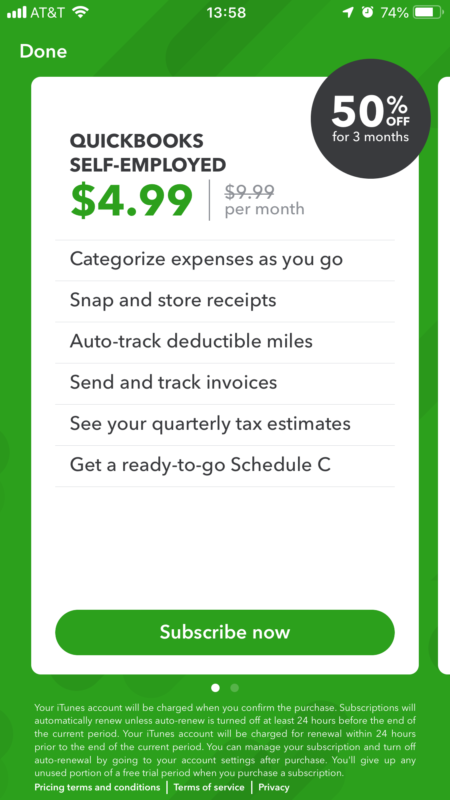
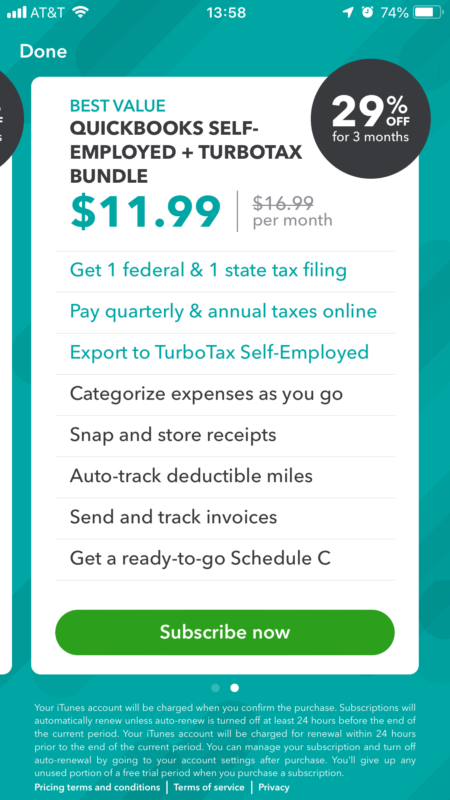
In essence we have two options: subscribe to Quick Books only, then pay for Turbo Tax when it comes to filing taxes; or pay a monthly premium and get Turbo Tax for free with a bundle. Furthermore, the mobile subscription is a little discounted for the first three months (50% and 29% respectively).
Let’s do the maths:
| separately | bundled | |
| Quick Books | 12x $10 = $120 | 12x $17 |
| Turbo Tax | 1x $200 | included |
| TOTAL | $320 | $204 |
For my situation, the monthly Quick Books Self-Employed + Turbo Tax bundle was the cheaper option. However, Self-Employed does not have access to things like payroll or fully-fledged accounting services. Self-Employed is probably designed for one-man-bands like me, rather than small companies with several employees. It’s not applicable in our case, so I can’t comment on additional benefits in more expensive versions. I’m just happy to know that my situation seems to be common enough to have its own bundle 😉
The above offer is available from within the mobile app, as well as for the online version. Online it’s called the “Self-Employed Tax Bundle”. Why these things have different names across different platforms eludes me…
For my situation, this setup is perfect: Julia and I can both use the app via Family Sharing in iOS, we use the same login credentials and both administer the company we share.
Conclusion
I think I’ve found a new and (dare I say it) exciting way to deal with my joint-personal and my company’s finances going forward. Day to day receipt tracking and keeping an eye on both business accounts from a single app (Quick Books Self-Employed), everywhere I go. I get a financial overview of my current situation throughout the year.
With this setup, I no longer have to fear going through a whole year’s worth of receipts, because my expenses are already up to speed when it’s tax season again. With full integration to Turbo Tax, I can seamlessly import those transactions, add our W2 forms and we’re done.
Not bad for $17 a month!
Further Reading
- https://turbotax.intuit.com/personal-taxes/online/
- https://ttlc.intuit.com/questions/2924462-what-is-max
- https://search2.quickbooks.com/get-quickbooks/?cid=ppc_G_e_US_.QB_US_GGL_Brand_Top+Terms_Exact_Search_Desktop._quick%20books_txt&gclid=CjwKCAjwqfDlBRBDEiwAigXUaKJFPtgTF7Ely9fkXys3t8Ng2pgh26OJuU9UdAqokdSAspDq3kZRHBoC-PQQAvD_BwE&gclsrc=aw.ds
- https://quickbooks.intuit.com/oa/selfemployed/?cid=ppc_G_e_US_.QBSE_US_GGL_Brand_Ancillary_Exact_Search_Desktop._quickbooks%20self%20employed%20vs%20online_txt&gclid=CjwKCAjwqfDlBRBDEiwAigXUaGXasx9UI1_uoS9grgbHNhc4jSaWQnqBlXcJXM44GObvknegjT0zJhoCaAUQAvD_BwE&gclsrc=aw.ds
- https://itunes.apple.com/us/app/quickbooks-self-employed/id898076976?mt=8
- https://ttlc.intuit.com/questions/3859448-what-is-turbotax-live
- https://turbotax.intuit.com/personal-taxes/online/live/
Thank you so much for sharing useful content.