The other day I was stumped with what felt like an easy task: create a non-standard video in Premiere Pro, whose final output was supposed to be 1920×120. As wide as 1080p, but only a small strip in height. That should be simple, right?
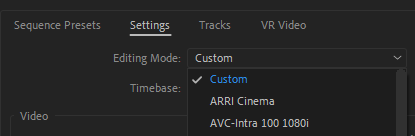
Well technically it is, but as it often happens, the official documentarian isn’t quite correct. Apparently we can change our video size right after creating a new sequence, with File – New Sequence, under the Settings Tab. Notice that the video size is greyed out though. Dang! They didn’t mention that, did they? For them it “just works”. Good for them!
Turns out that not every preset supports aspect ratio changes. So the issue really was that mega scary and ever so slightly excessive menu at the top, listing every camera manufacturer’s (obsolete and proprietary) presets. The only useful ones in here are DNx and Custom. The latter can be found at the very top of the menu, and if we pick that, we can change the video size of our sequence [insert applause].
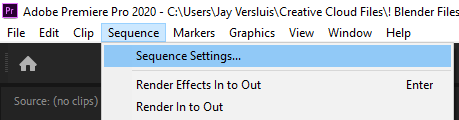
Changing existing sequences
If you already have a sequence whose size you want to tweak, select the sequence in question, then head over to Sequence – Sequence Settings and bring up the menu from there.