
Autodesk have recently introduced a new feature to SketchBook Pro: Radial Symmetry. While we had this feature for a while in Manga Studio, it’s much easier to use in Sketchbook Pro. Here’s how.
Radial Symmetry is available to Pro members only, since version 8.1.0.
From the menu bar, select the symmetry icon and click on the thing that looks like a four petalled flower (the one next to vertical and horizontal symmetry).
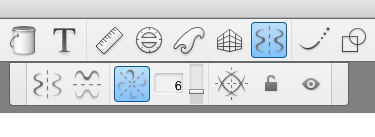 Next to the icon is a number field: choose how many segments you’d like to draw (you can choose up to 16) and see symmetry lines appear on your canvas. You can move and rotate the symmetry helper by using the handles. Click the little lock icon in the menu to make sure the lines can’t move, potentially running your multidimensional masterpiece.
Now draw in any of the segments and see your strokes multiplied automatically in the remaining segments. It feels like magic and can produce lovely patterns very quickly.
Have fun with Radial Symmetry 😉
Can you get this feature on the iPad Pro?
Sadly not Travis, right now this feature is only available in the Windows and OS X versions of SketchBook Pro.