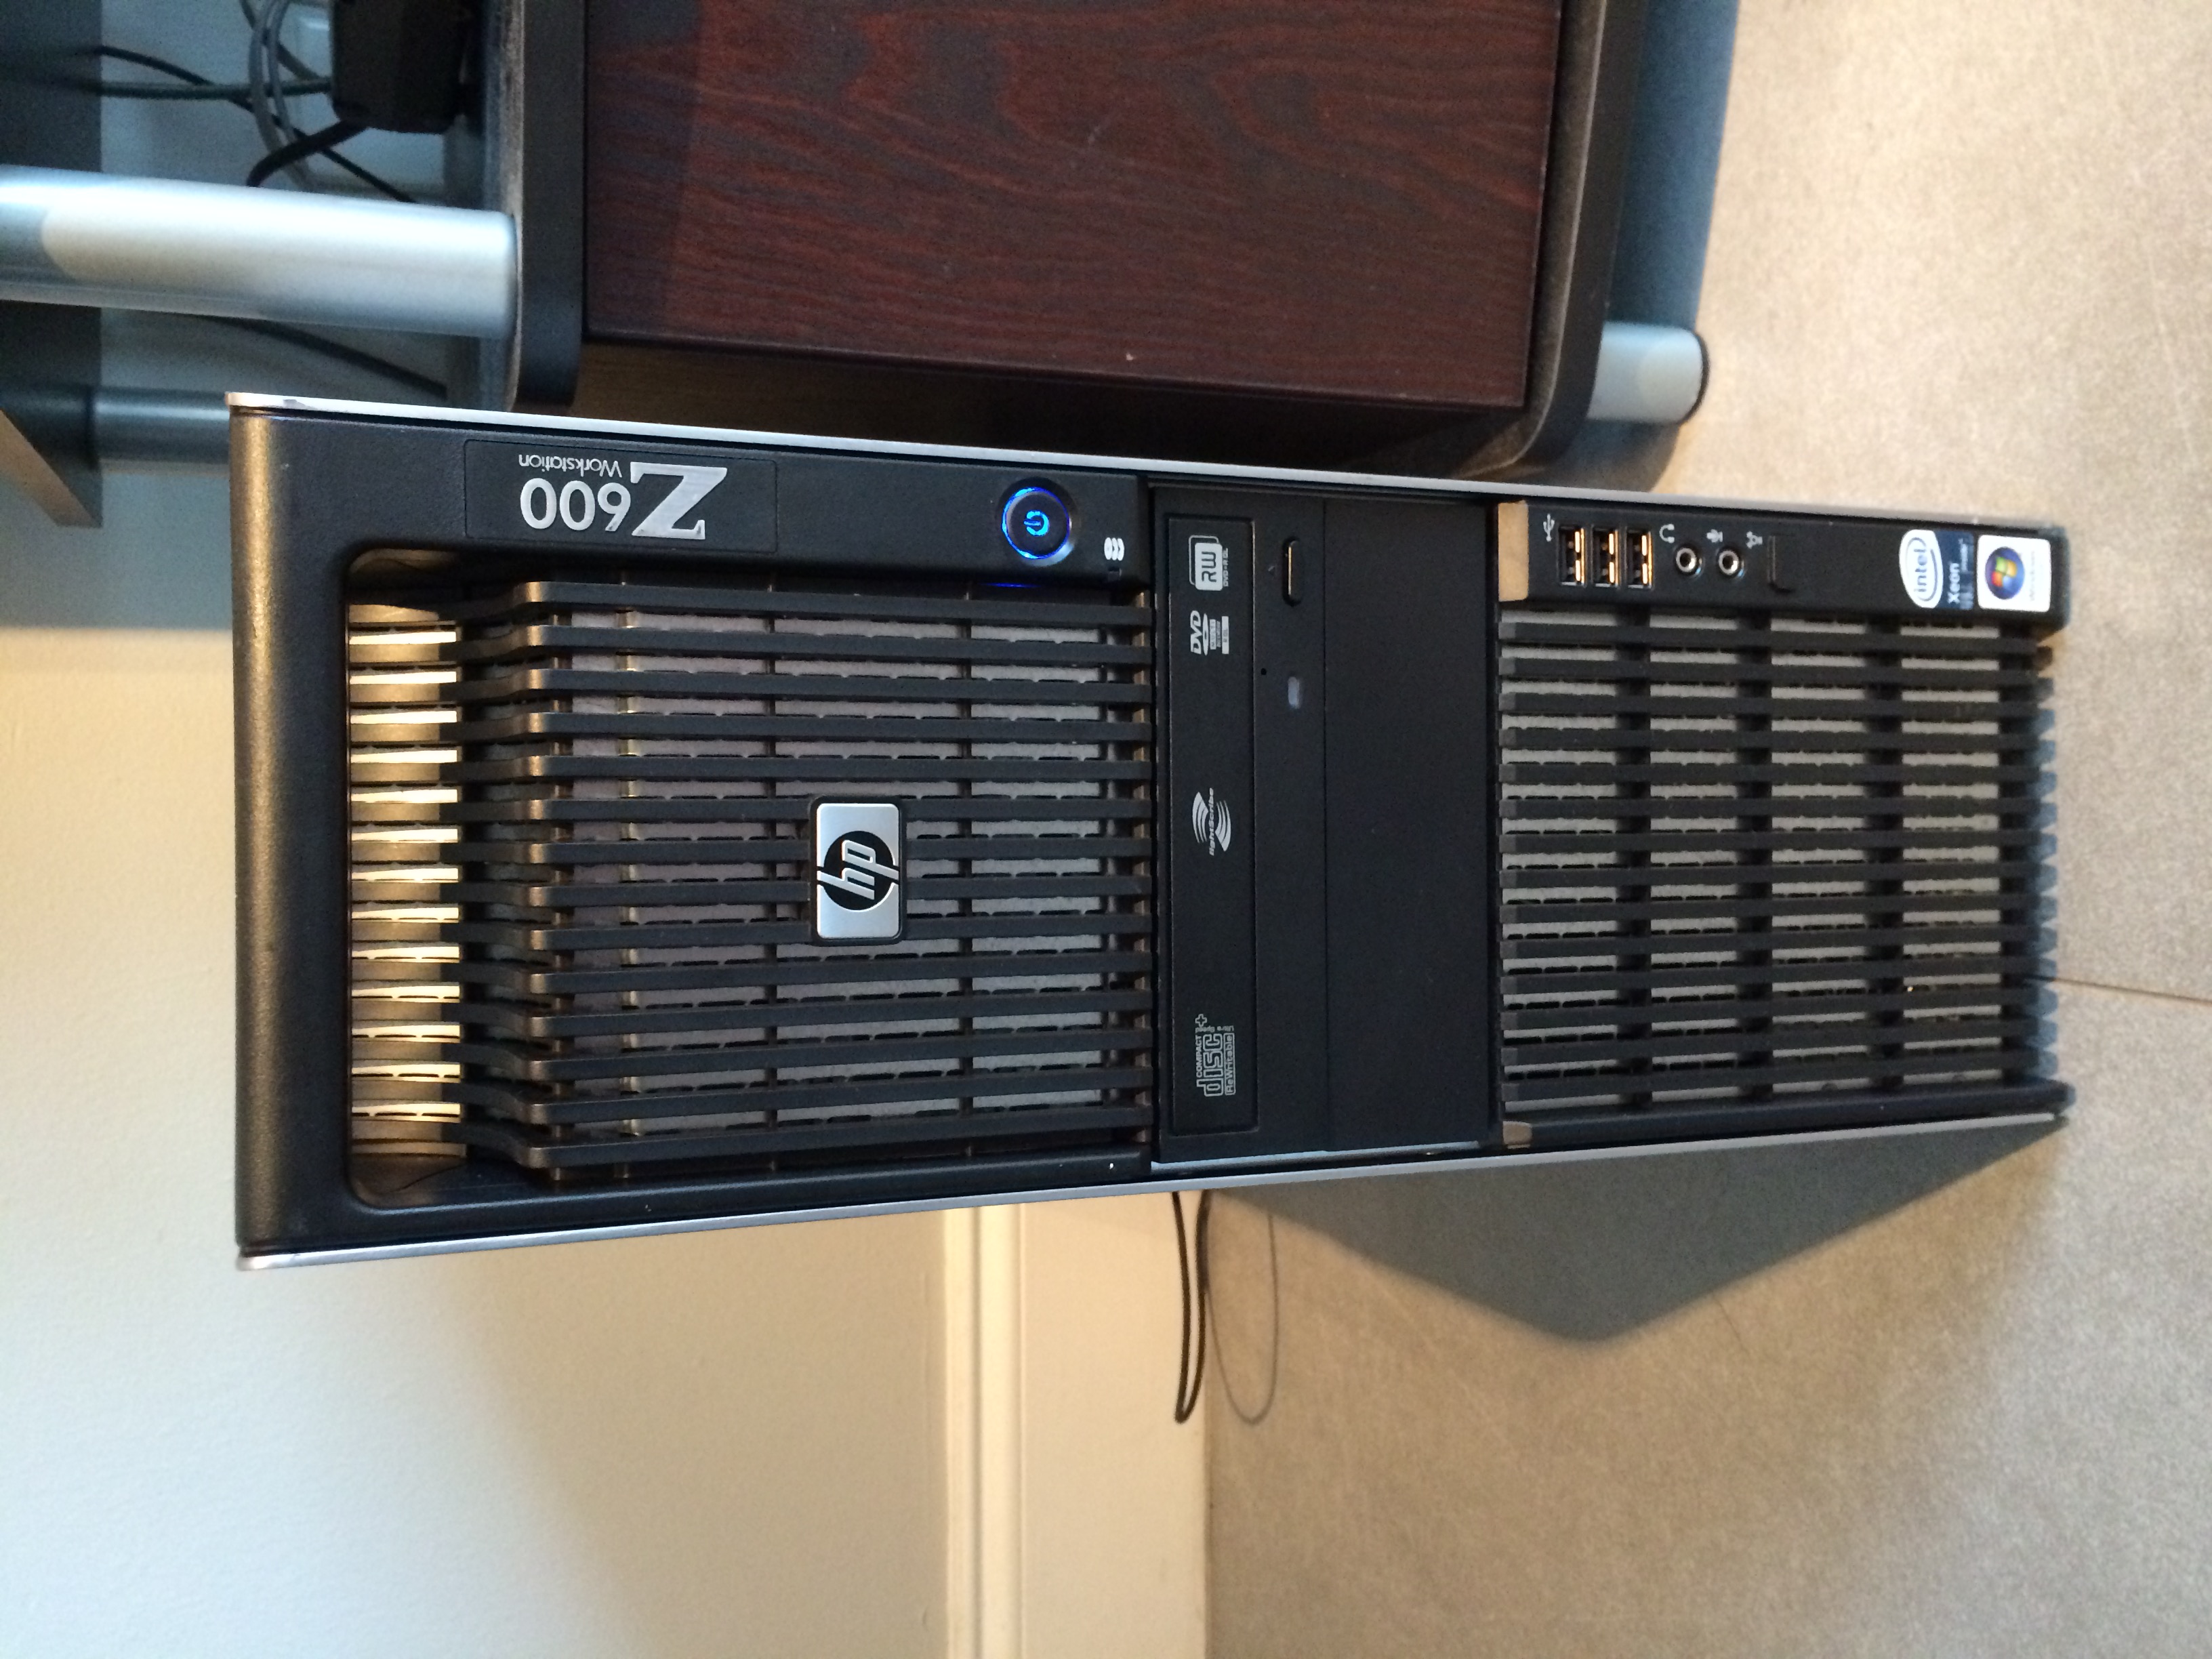
 I’m as excited as a kid in a candy store – because last Monday my new (old) HP Z600 Workstation has arrived! Built and sold to the government in the summer of 2009 for roughly $5000 (give or take a grand), it came to me via an eBay auction for $171 plus postage some seven years later.
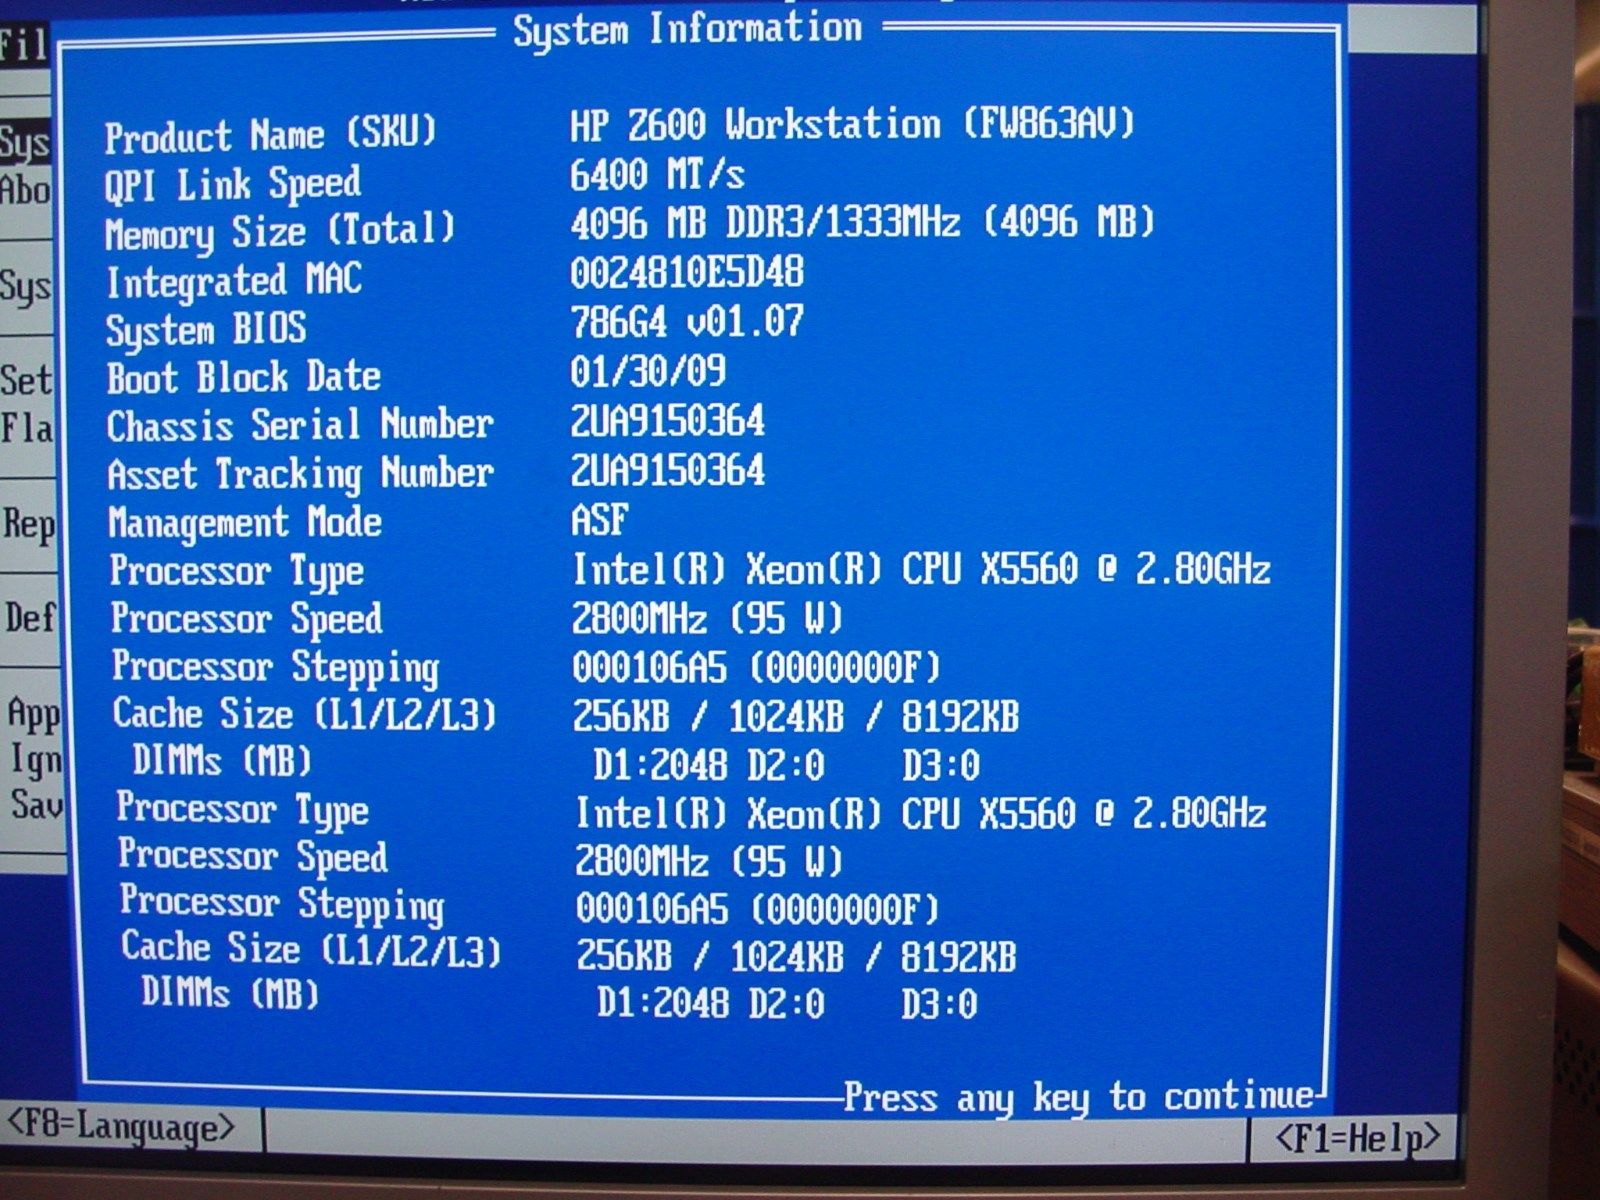
Equipped with two Intel Xeon 5560 processors, no hard drive, 4GB of RAM and only a COA sticker for Windows Vista, I had a little bit of work to do to get it all going:
- get a USB keyboard
- get a power cord
- get a graphics card
- perhaps grab some more RAM
- find a network cable
- download a copy of Windows Vista (not easy to find in 2016)
I wanted to use this machine for 3D rendering in both Carrara and DAZ Studio, so for the latter I decided to buy an NVIDIA GTX 970 graphics card. I had to do a few internal modifications to the machine to make it work – but work it does, and it was a lot of fun to get this rig going.
Without further ado, here’s my Z600 story.
Day 1 (Monday)
Z600: First Impressions
According to the eBay listing, the unit was a bit battered on the outside and had been in government use since 2009. The hard drive had been removed (and presumably incinerated, sadly with the proprietary drive bays you can’t really get by itself), but it showed a screenshot of it booting into the BIOS. I expected the Z600 to look as battered and dusty on the inside as it appeared on the outside from the photos in the listing. So I had my trusty dusting can standing by, as well as some heat sink paste, expecting that I had to do a major overhaul (much like on my Commodore Plus/4 from several decades ago).
When the 40lb heavy package arrived at my door, I unwrapped it immediately to take a closer look. To my very pleasant surprise, the scratches on the outside were barely noticeable – but most importantly, the insides smelt like a brand new machine. No sign of a single dust particle anywhere! Was this thing actually ever in use? All fans looking like new, every shiny bit of metal as shiny as when it had left the US factory back in 2009.
This was a GREAT surprise!

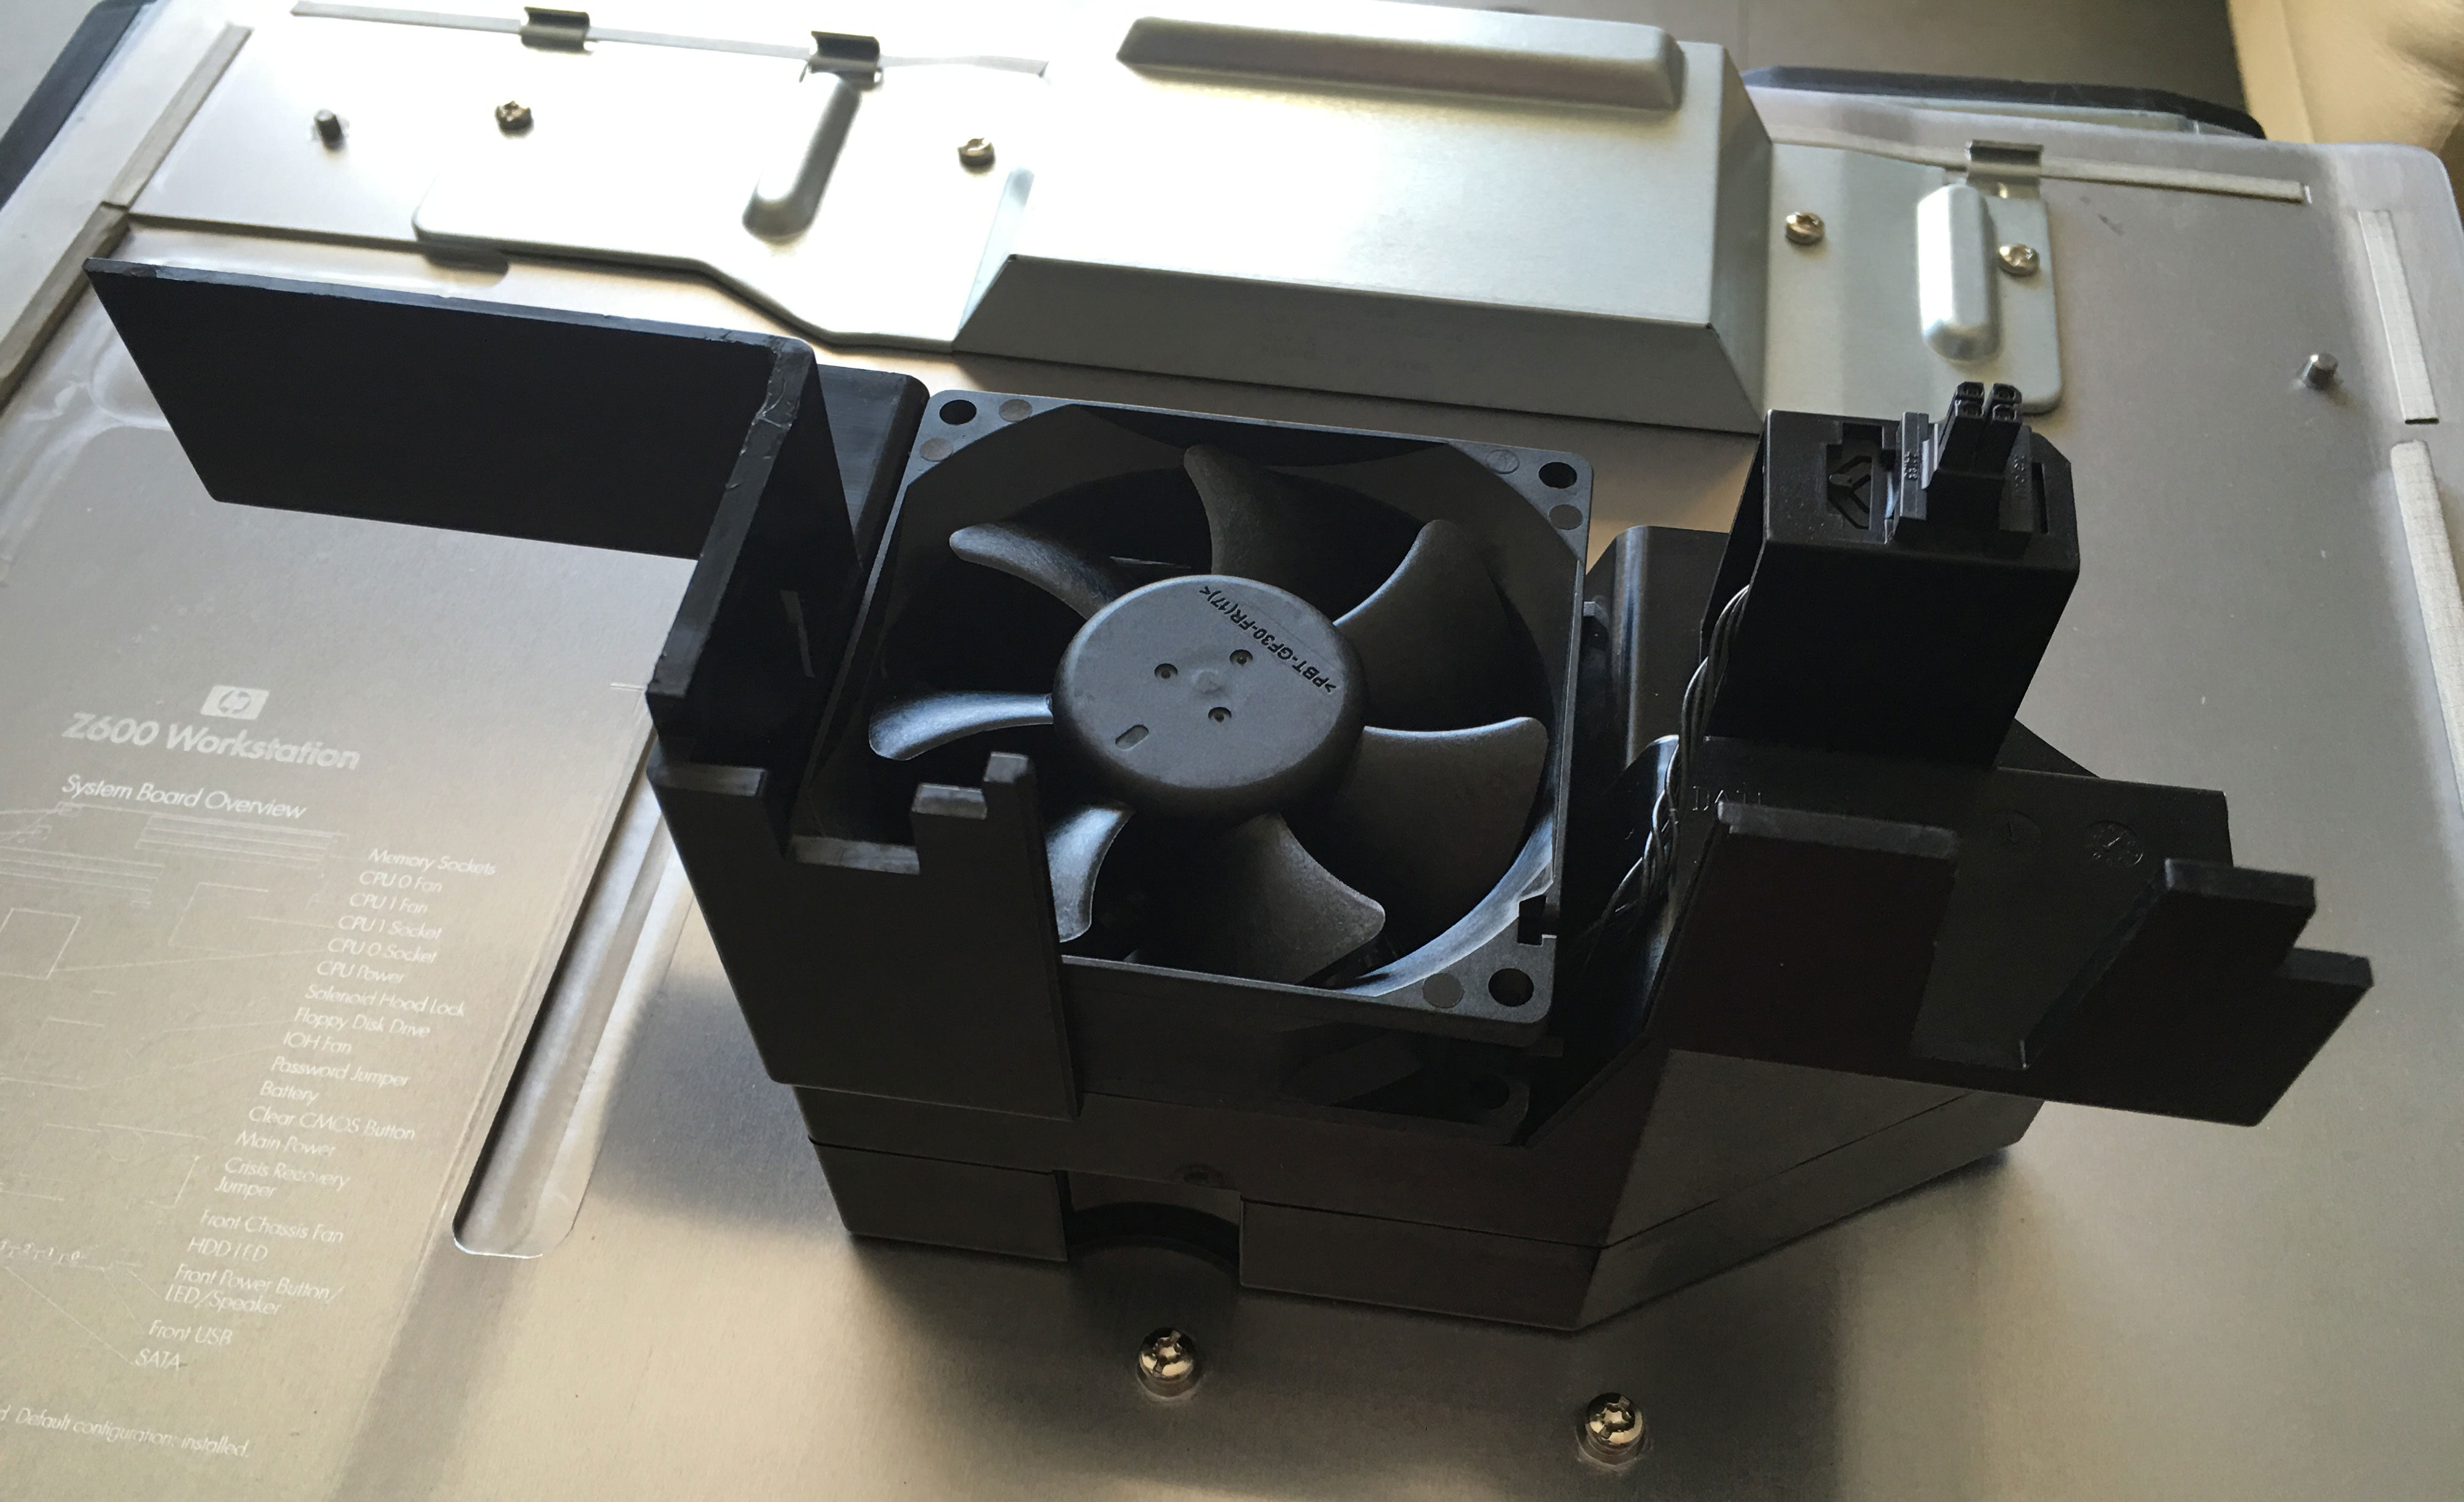
The case of the Z600 is custom designed and no tools are needed to open it. Instead, there are several parts marked in green, which are openable by hand. A lovely touch!
Adding the GTX 970
The Z600 came with an old AMD ATX graphics card. It had an S-Video and a DVI output, none of which I can see with any of the equipment I have to hand. Besides, I wanted something that could do those Iray renders too, so I invested $200 into the cheapest ZOTAC NVIDIA GTX 970 card I could fine on Amazon. There are gaming editions and 4k display versions available for much more coinage, but the differences are lost on me and wouldn’t make a difference on what I want to do with it.
I decided on the GTX 970 rather than the GTX 980 or higher because my research indicates that the 970 has a 6-pin power requirement, whereas the higher cards need an 8-pin plug. The Z600 comes with a custom designed 650W power supply and has a single 6-pin power connector available. Let’s get the card that actually has a chance of working in a 7 year old computer, shall we?
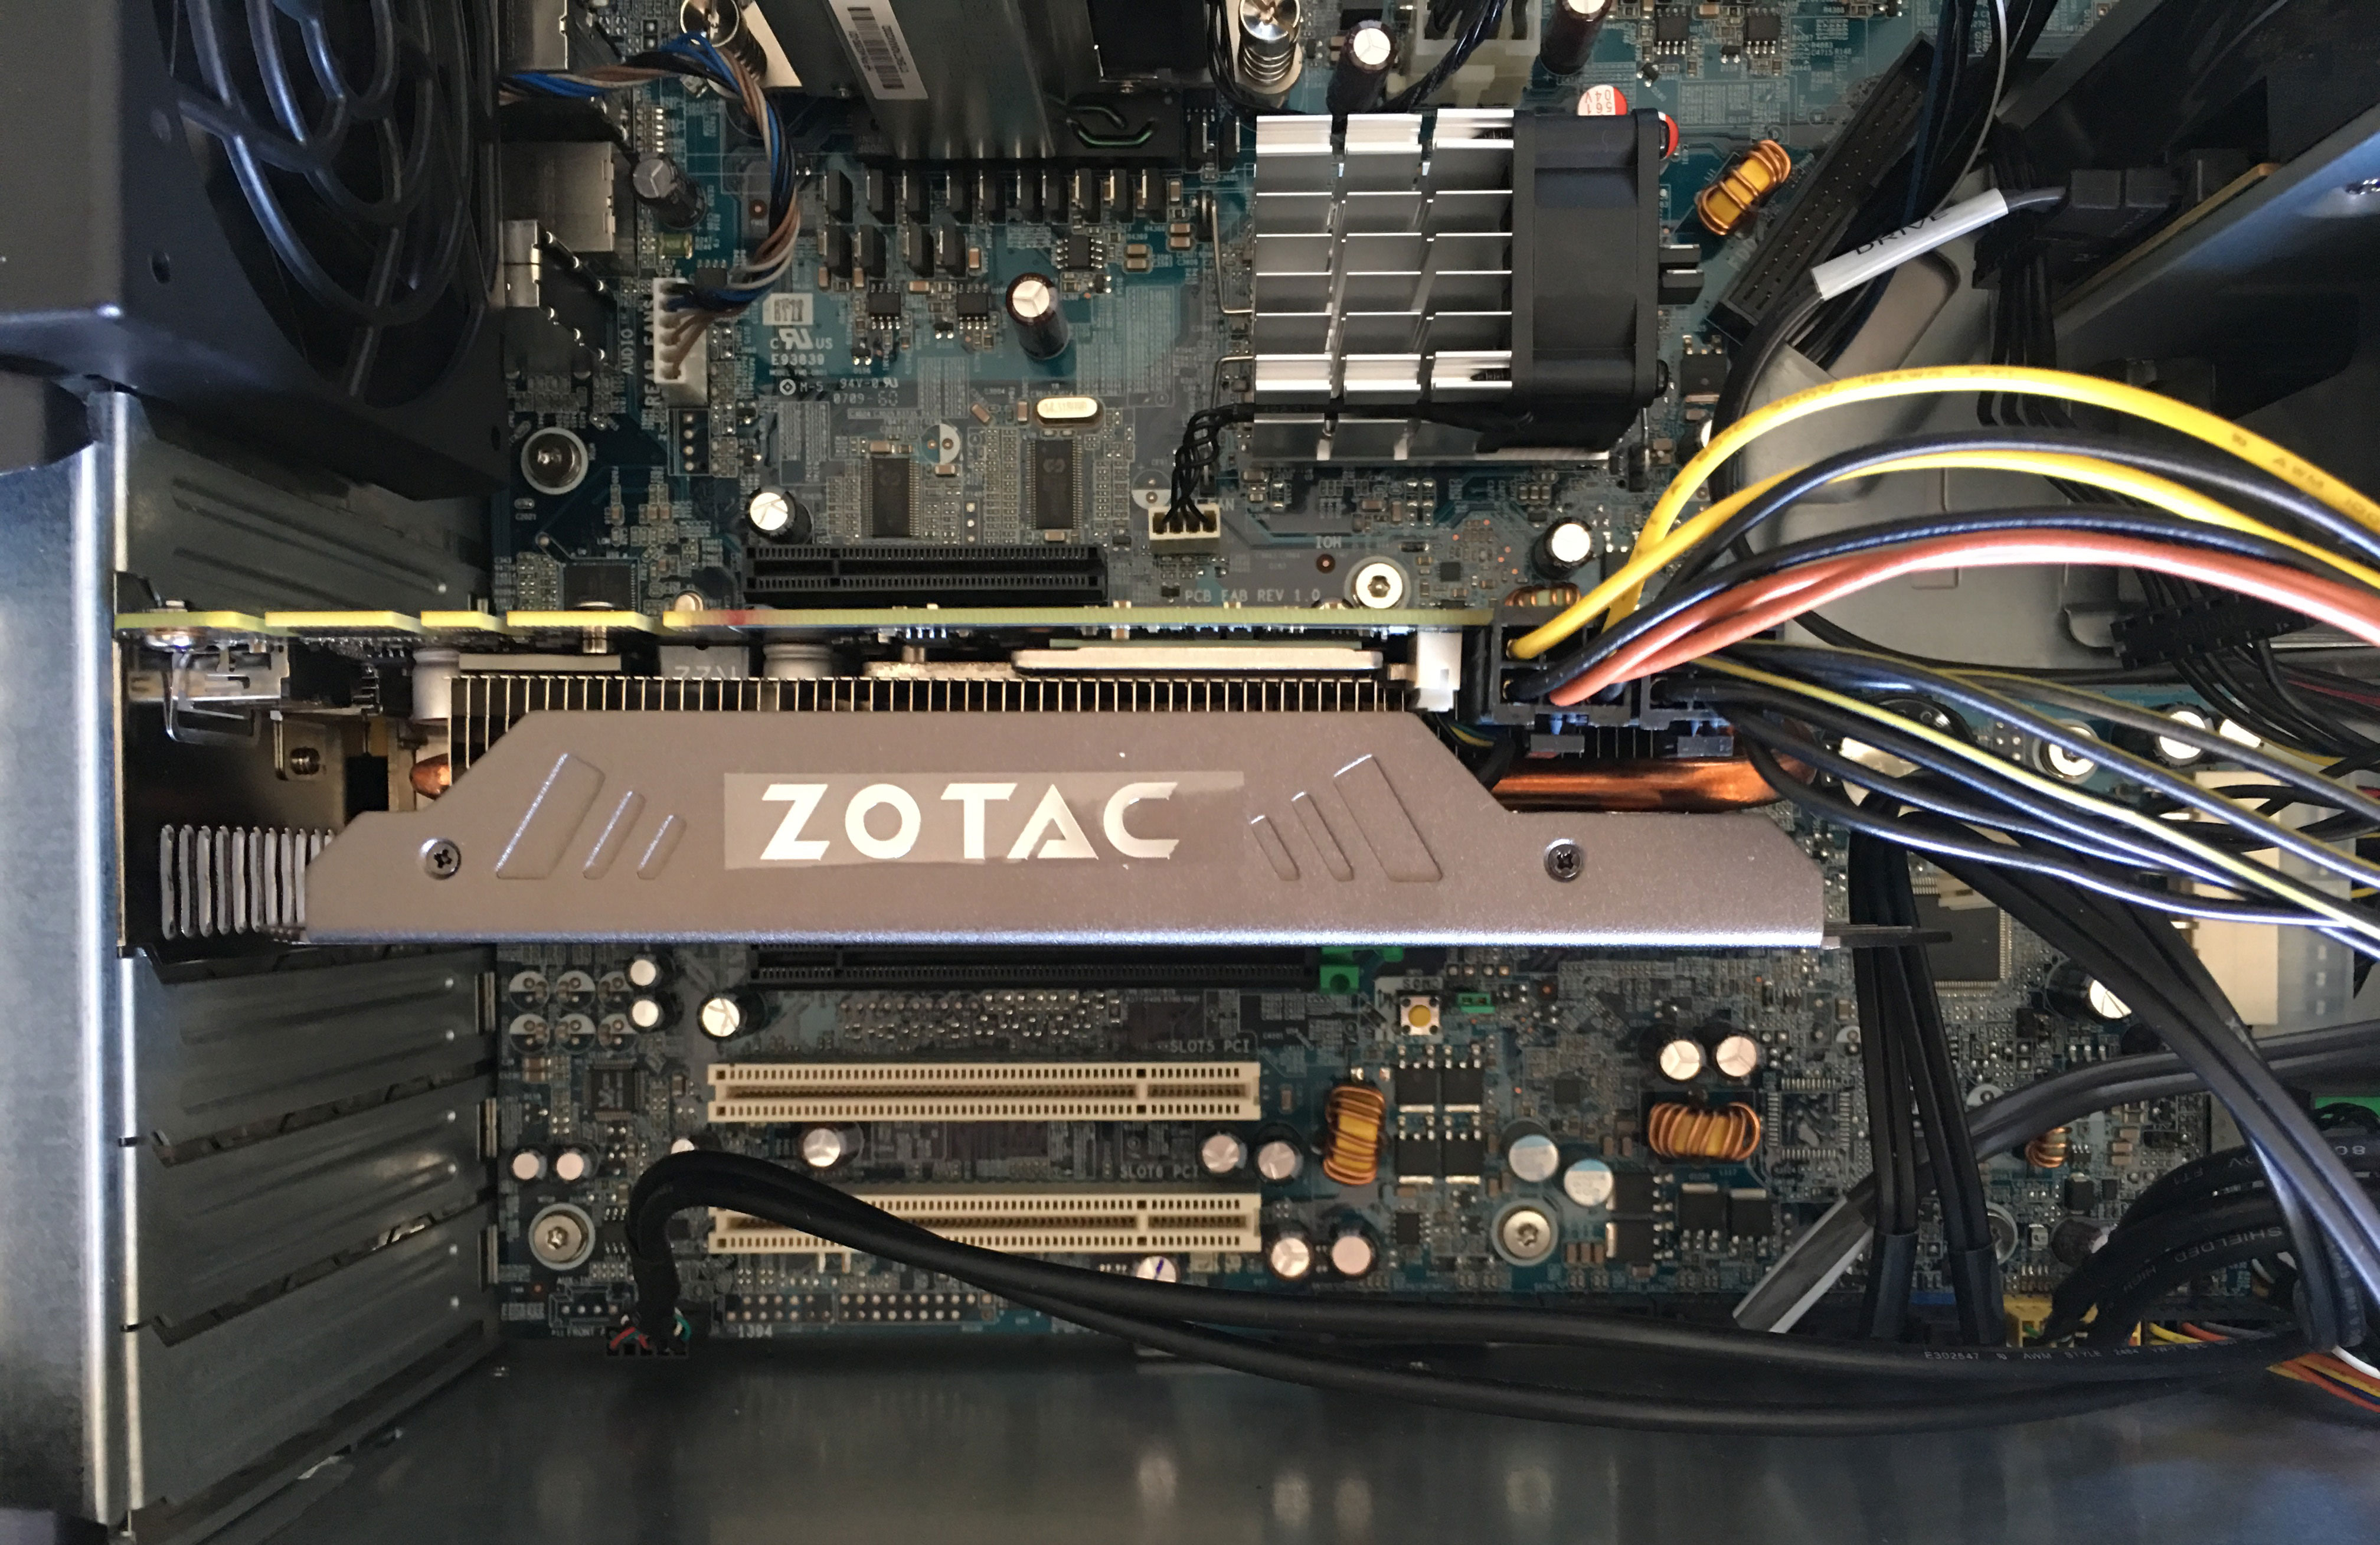
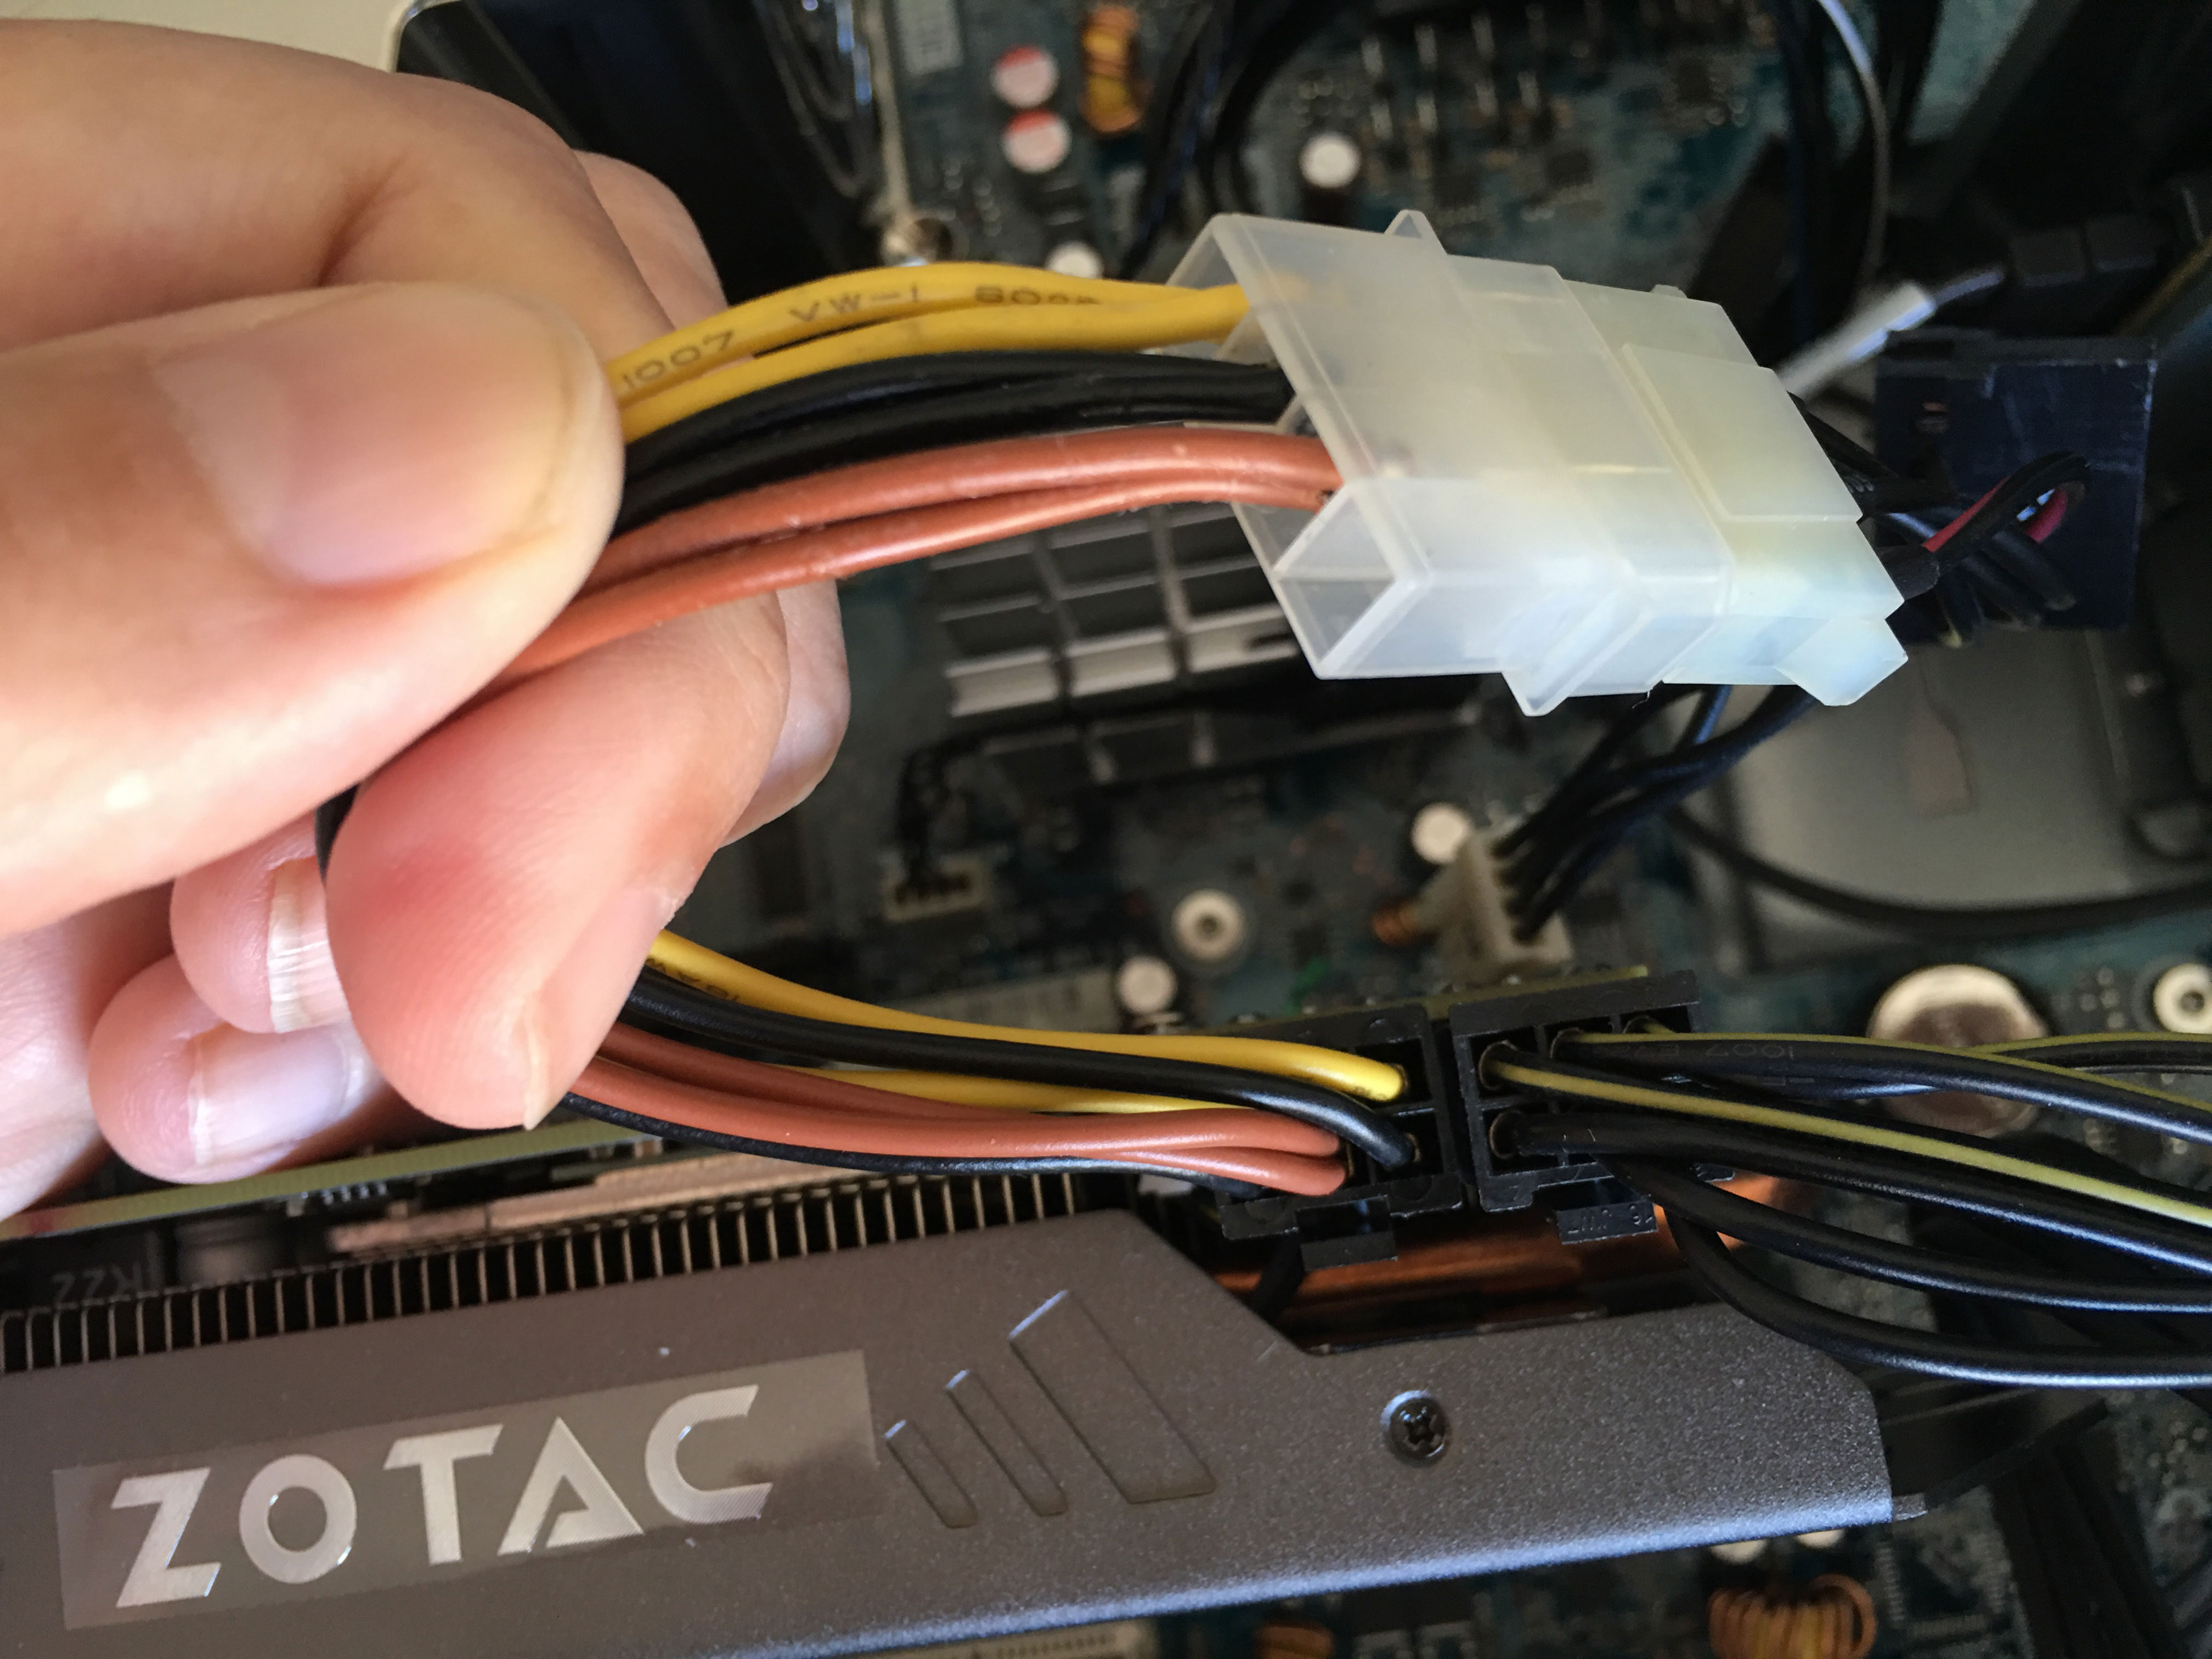
The Z600 has two PCIe 2.0 slots. The GTX 970 supports PCIe 3.0, something I sadly can’t make use of. Both sockets indicate that the card may only draw 75W from the bus, but the clever engineers at ZOTAC just feed the card with two of those aforementioned 6-pin power sockets. The Z600 has one of them available – but lucky for me, the GTX 970 came with two adaptors for such an eventuality: they take two Molex 4-pin power supply sockets and turn them into a 6-pin socket. Nice!
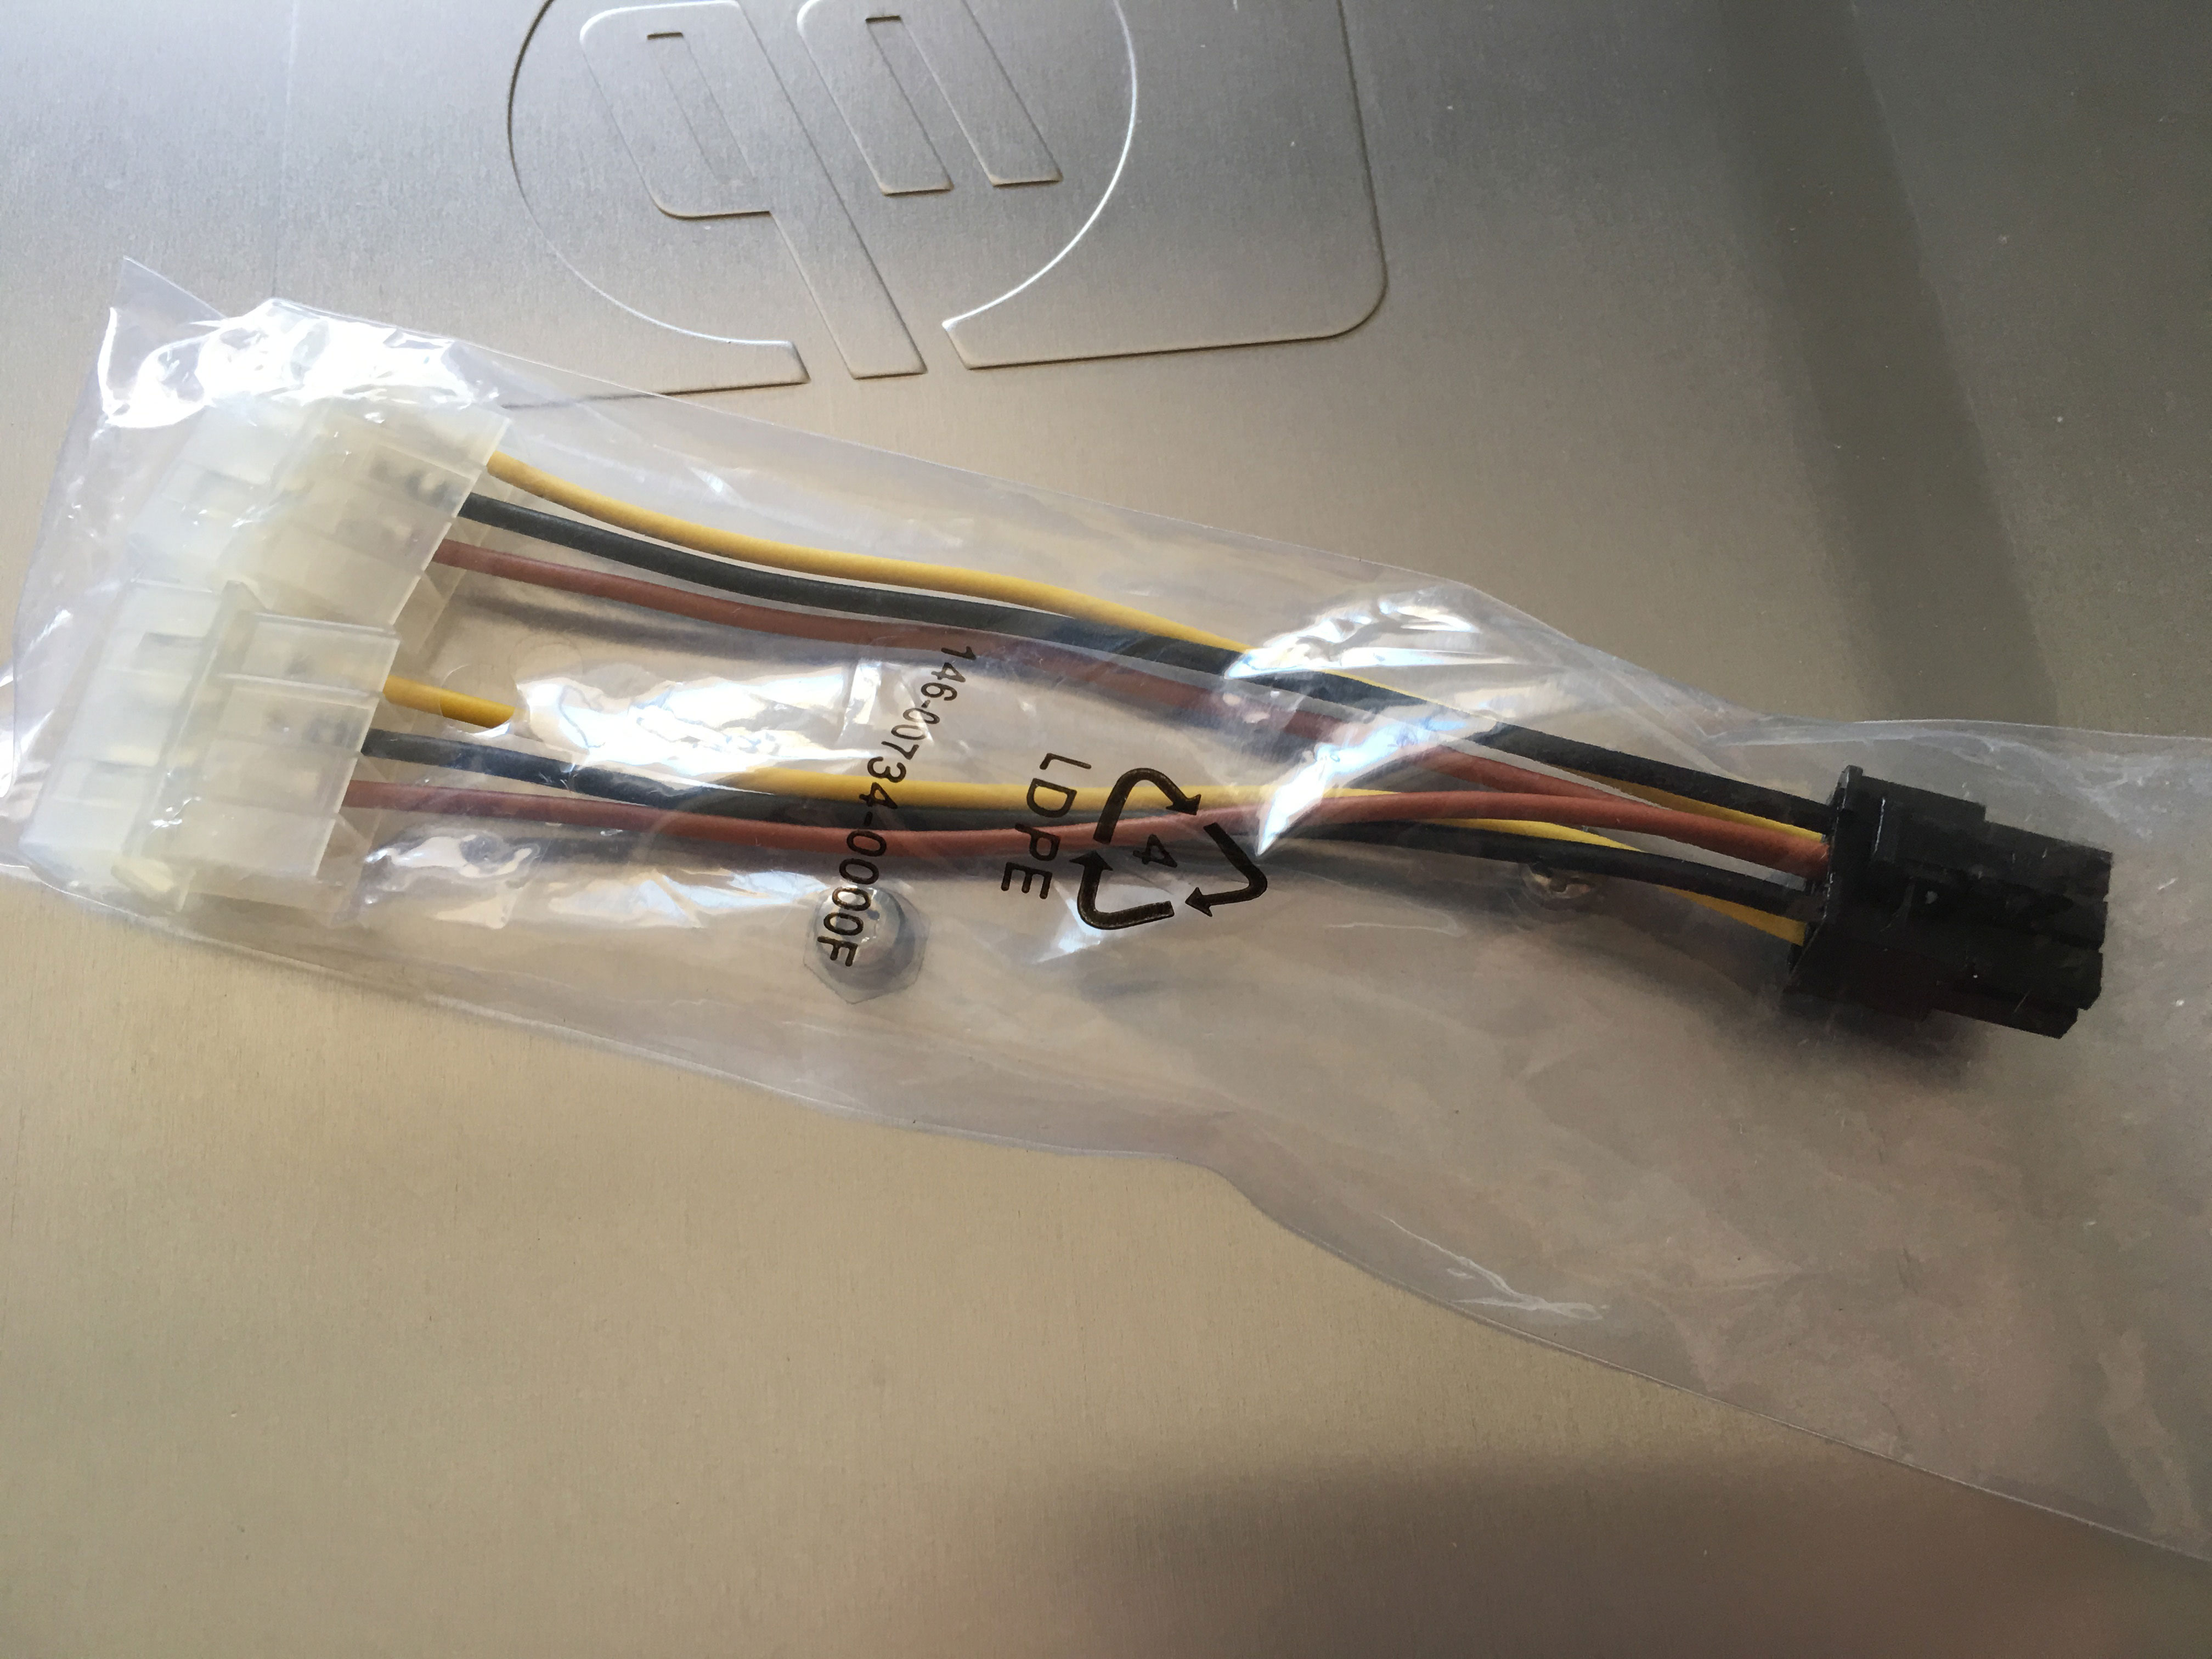
Sadly though, the Z600 also only had a single Molex socket available (hidden in the empty bay underneath the DVD drive). I could either get an adaptor for $5 to turn that Molex into two, then plug those into my two adaptors… or I could whip out my trusty old soldering iron and just make my own, by cutting one Molex from the adaptor off and turn those three cable pairs into one. That’s what I did! Here’s what my home-made adaptor looks like:
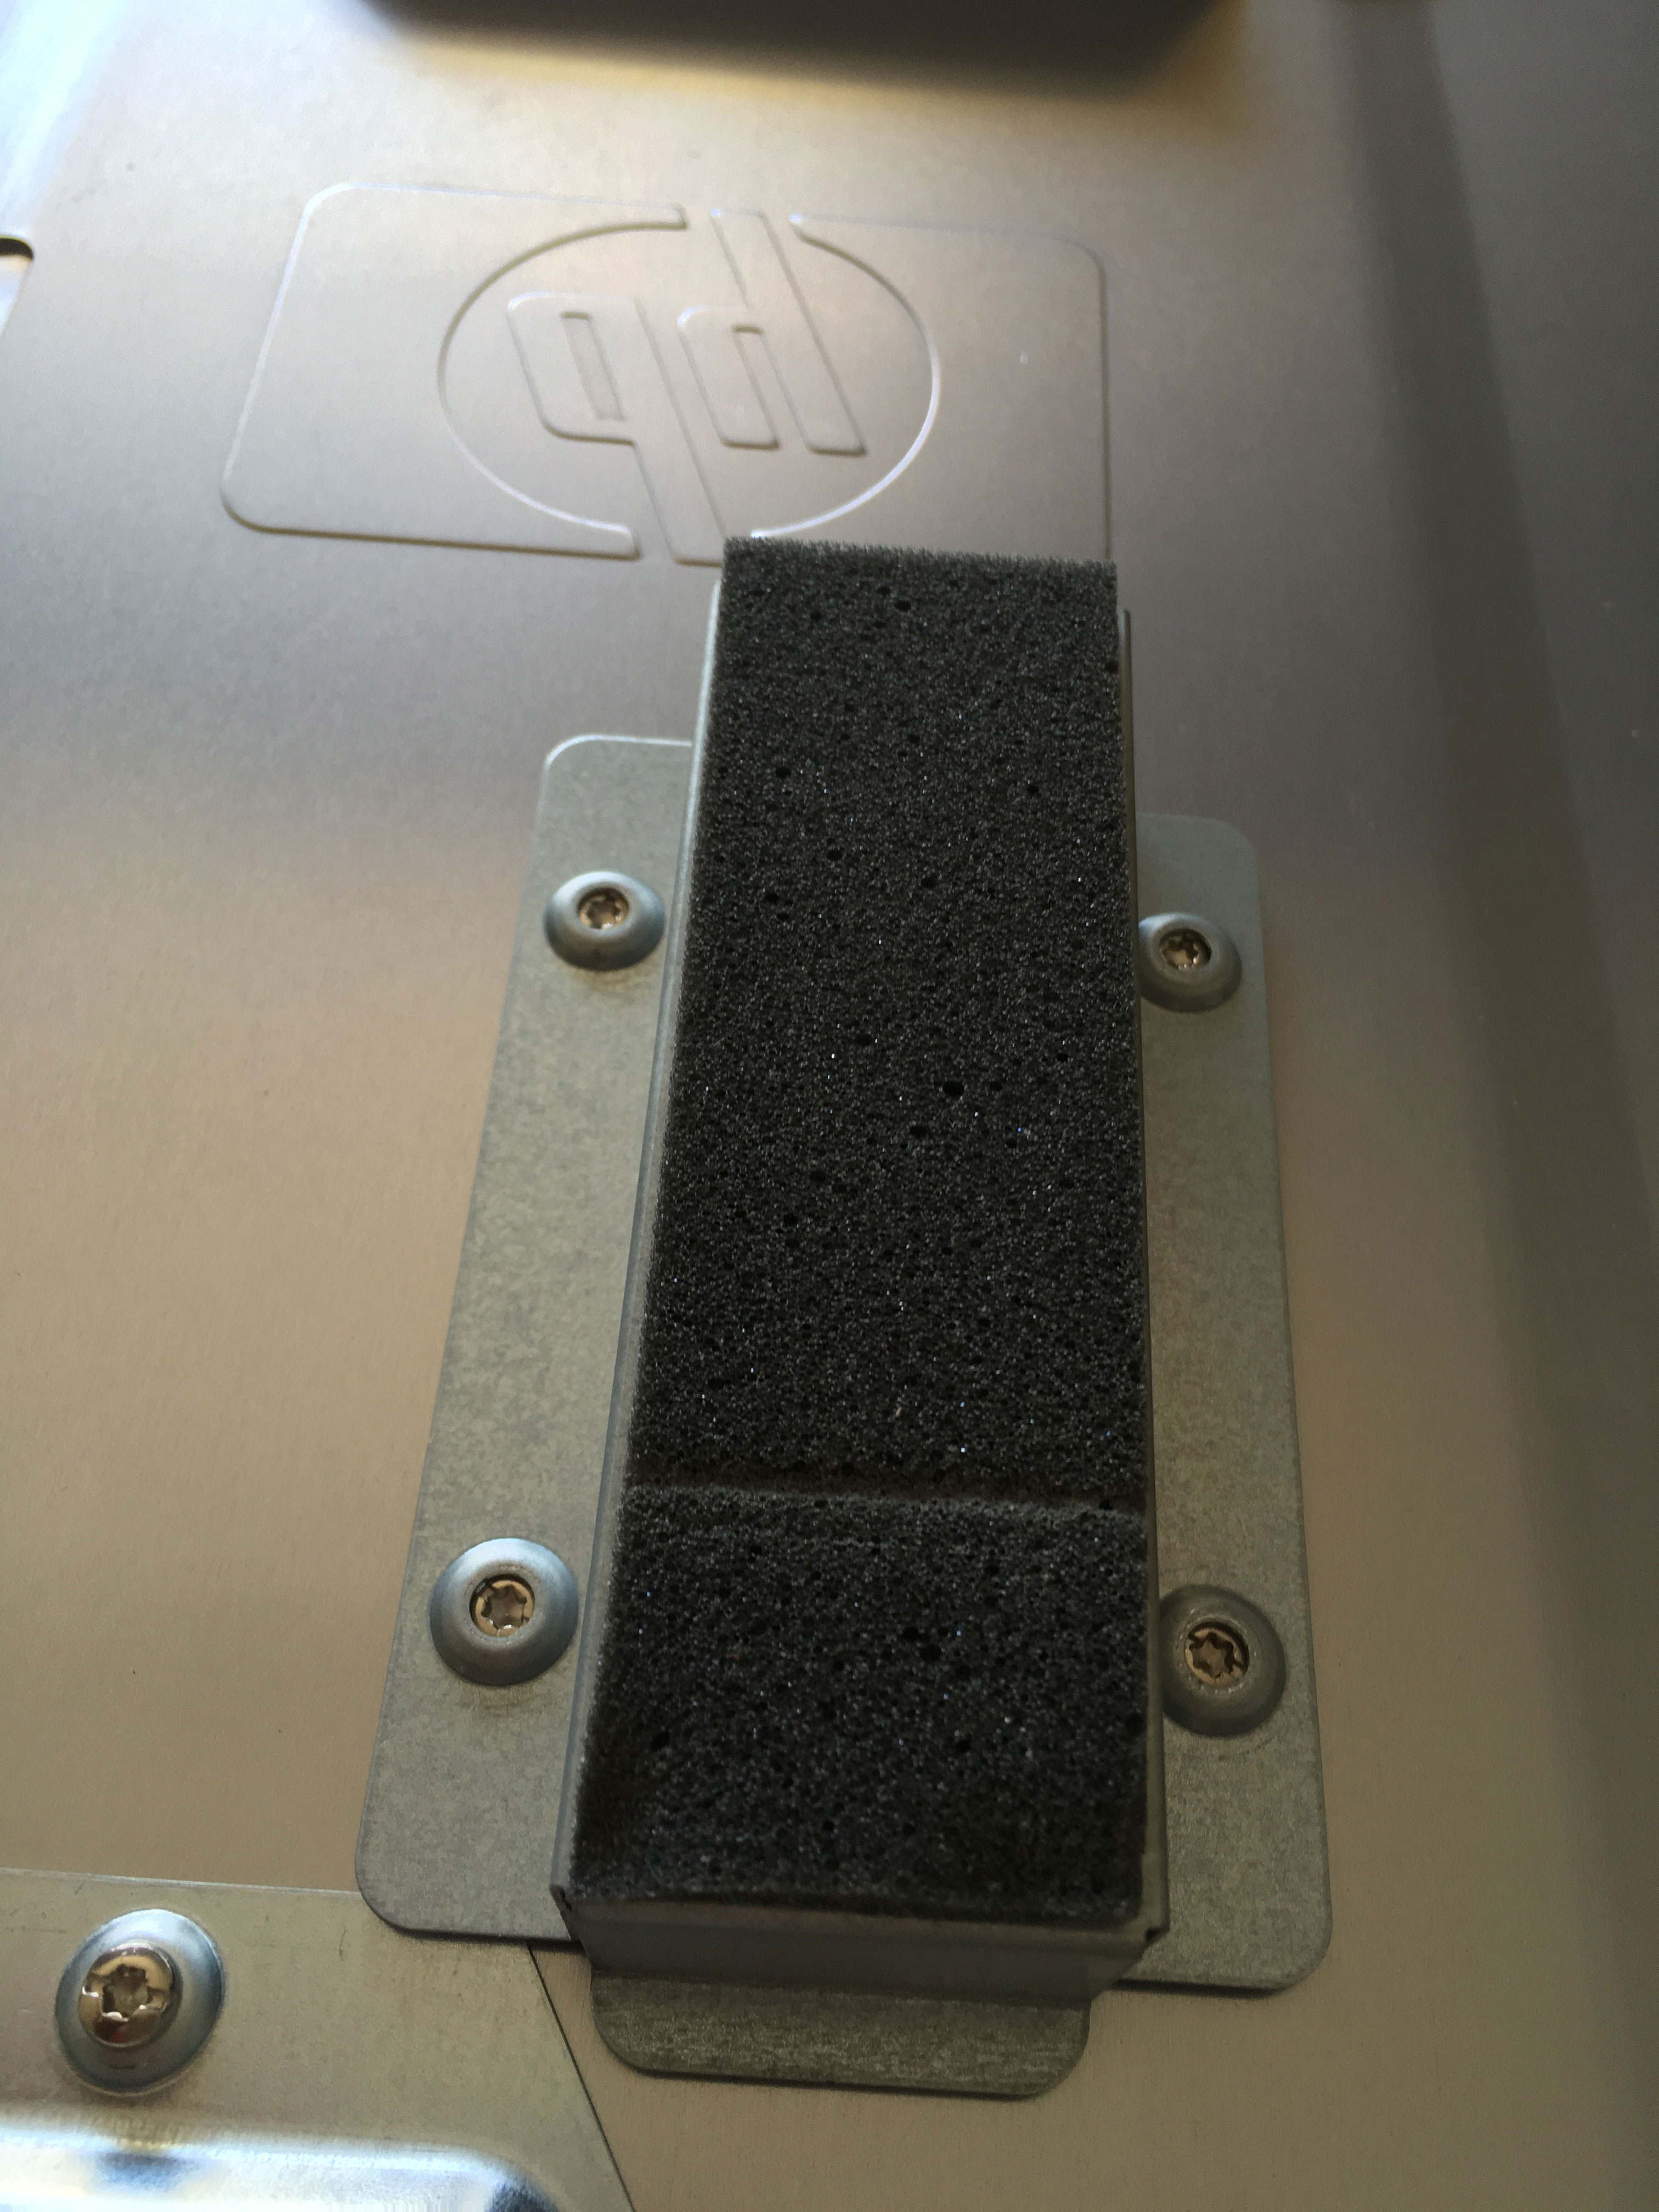
One caveat was fitting the cover back onto the case: there’s a metal block covered with foam somewhere in the middle. This piece is designed to press onto all installed PCI cards and hold them in place. This does not account for the extra cables sticking out at the top of my GTX 970 of course, so the cover no longer fits.
But fret not: said block can be removed with four Torx screws. Then nothing presses on our cards anymore, but at least the cover will fit just fine.
Adding Hard Disks
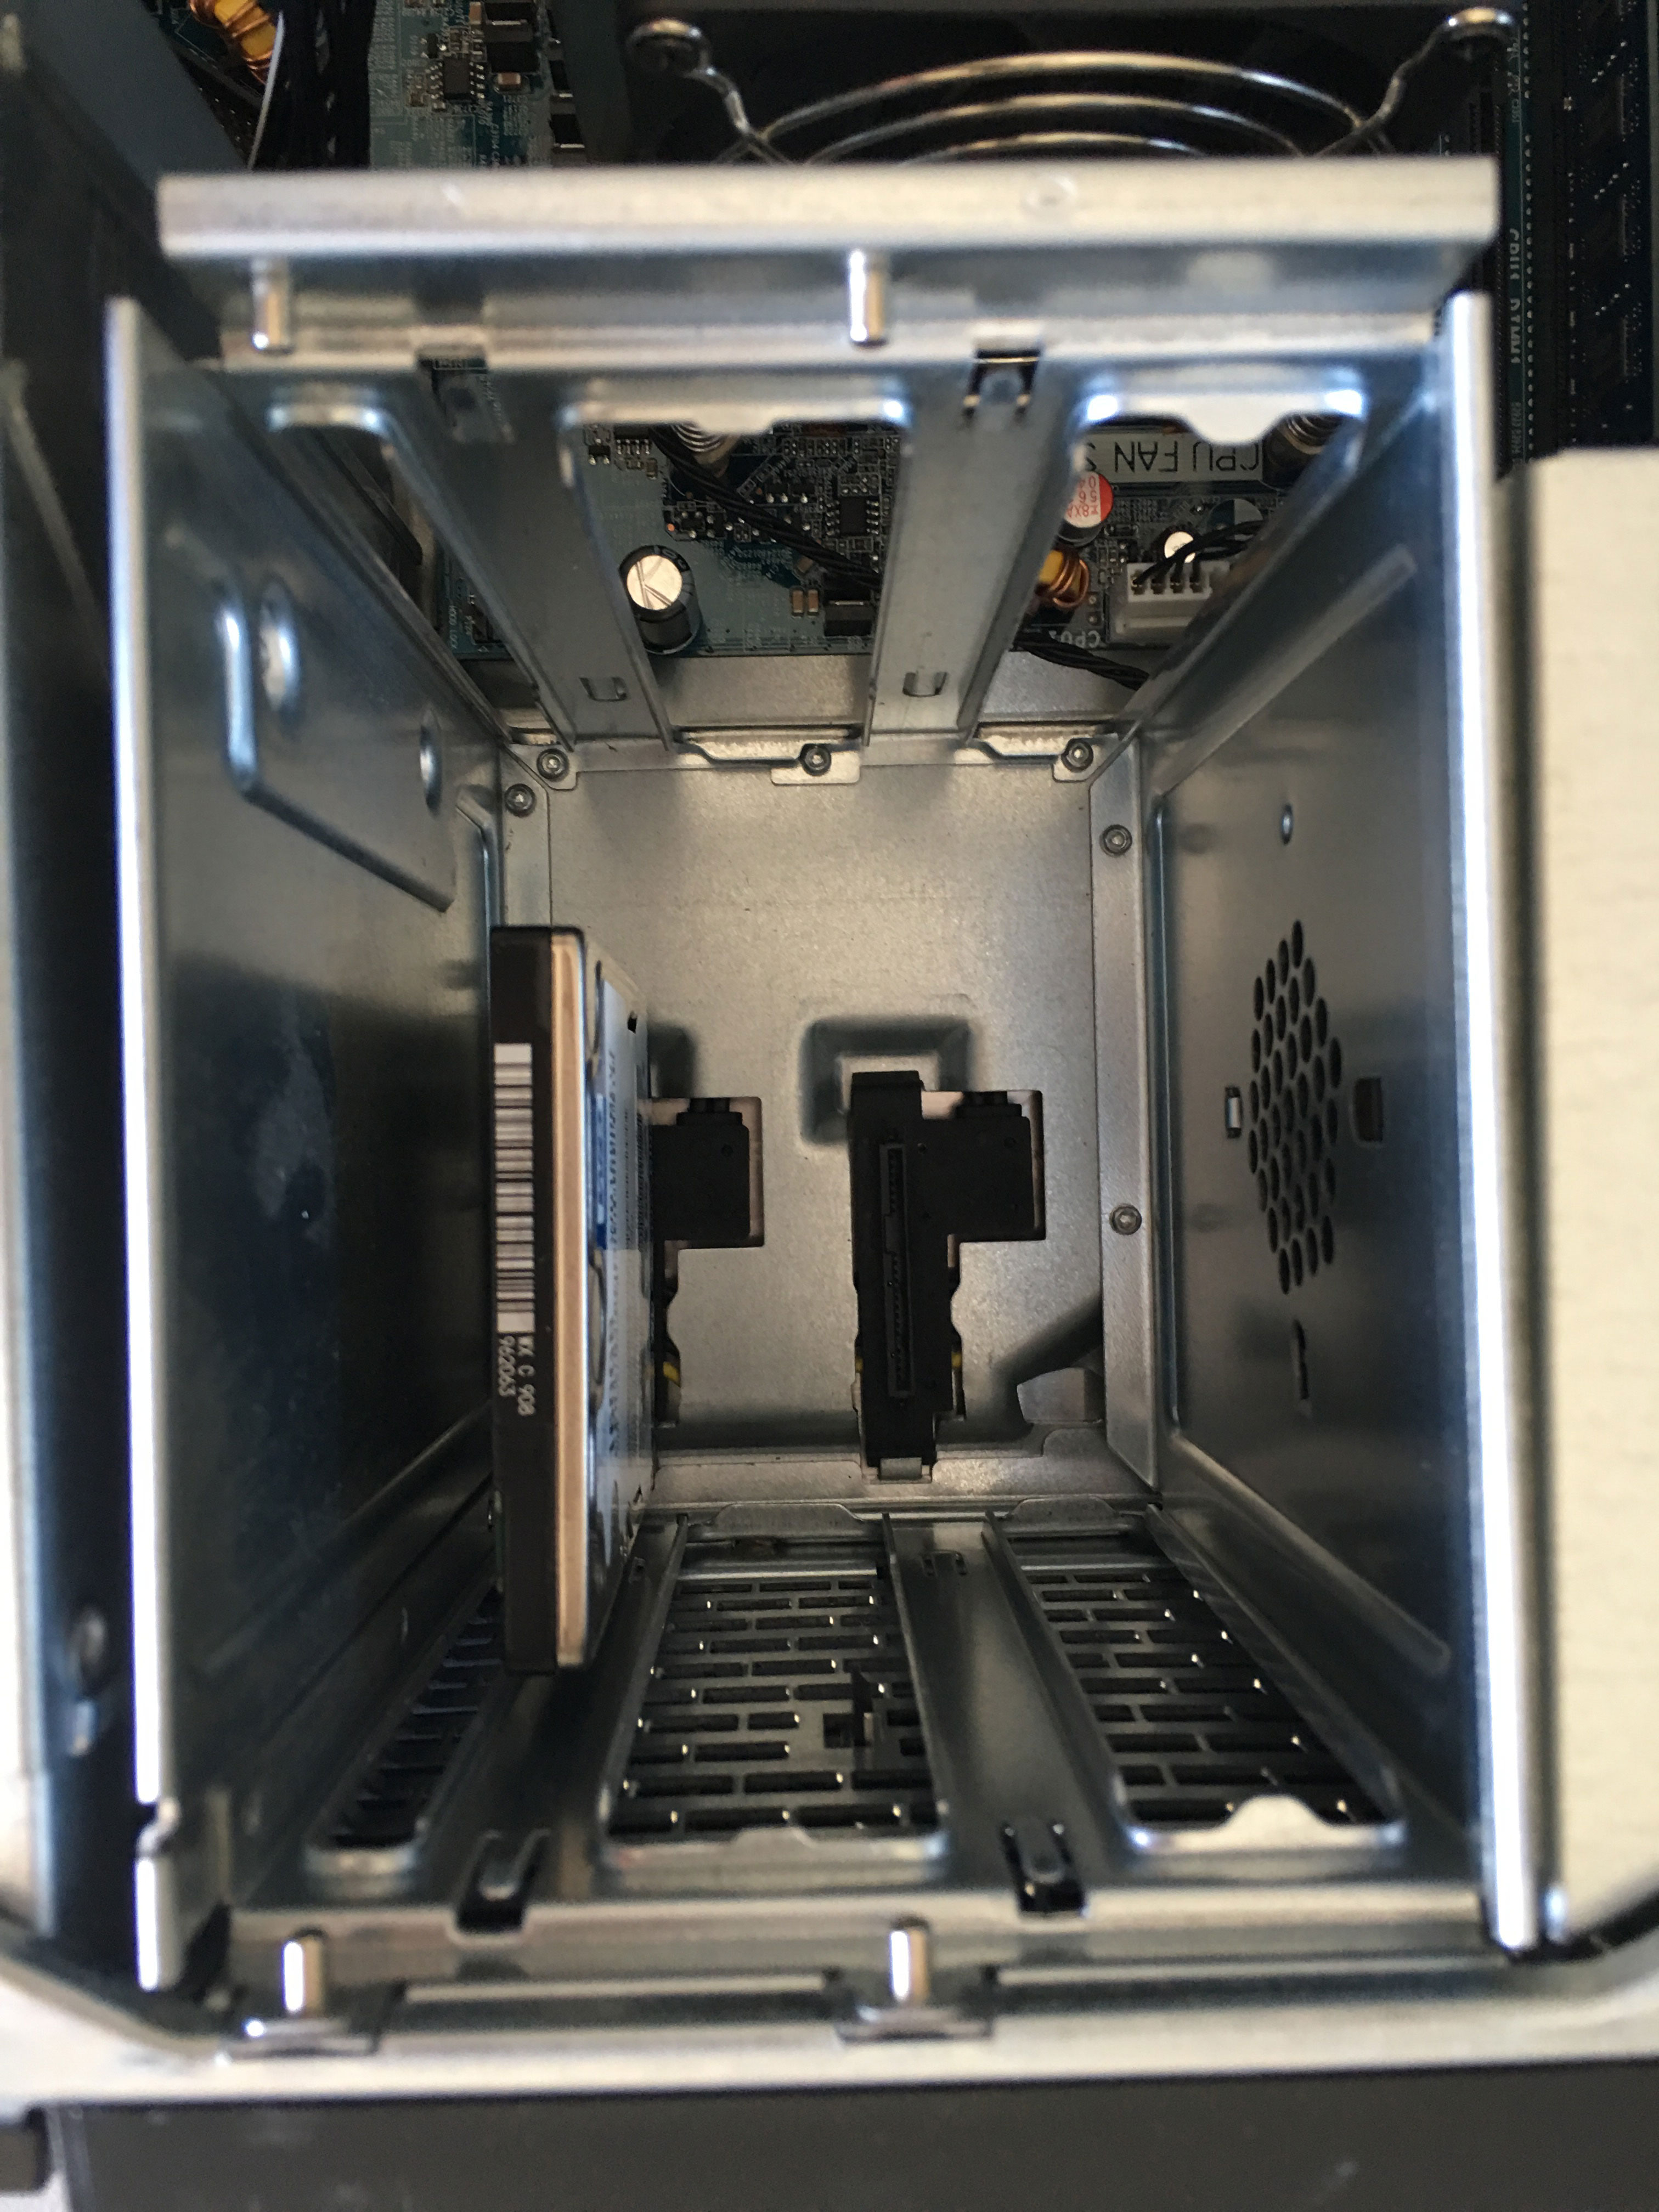
My Z600 didn’t come with hard disk bays – they’re probably still attached to the super secret government agency drives that have long been incinerated.
What I had available were two 2.5″ SATA laptop drives. Thankfully, there are two sockets above the DVD drive into which my drives fit easily. If this thing worked, I thought, I could easily add an SSD later if I wanted to.
One of my drives even had a copy of Windows 7 Home Premium installed on it. Sadly that’s no good for this setup though: while it will work in principle, the Home Editions of Windows only support a single CPU efficiently. Multiple CPUs are only supported with the Pro editions or higher.
Adding extra RAM
I’ve never worked with a proper dual CPU system before, so I didn’t realise that in such a setup, each CPU needs its own RAM. Although the two will talk together, and the RAM will show up as a combined total under Windows, you can’t just install a single stick like you could in single CPU setups.
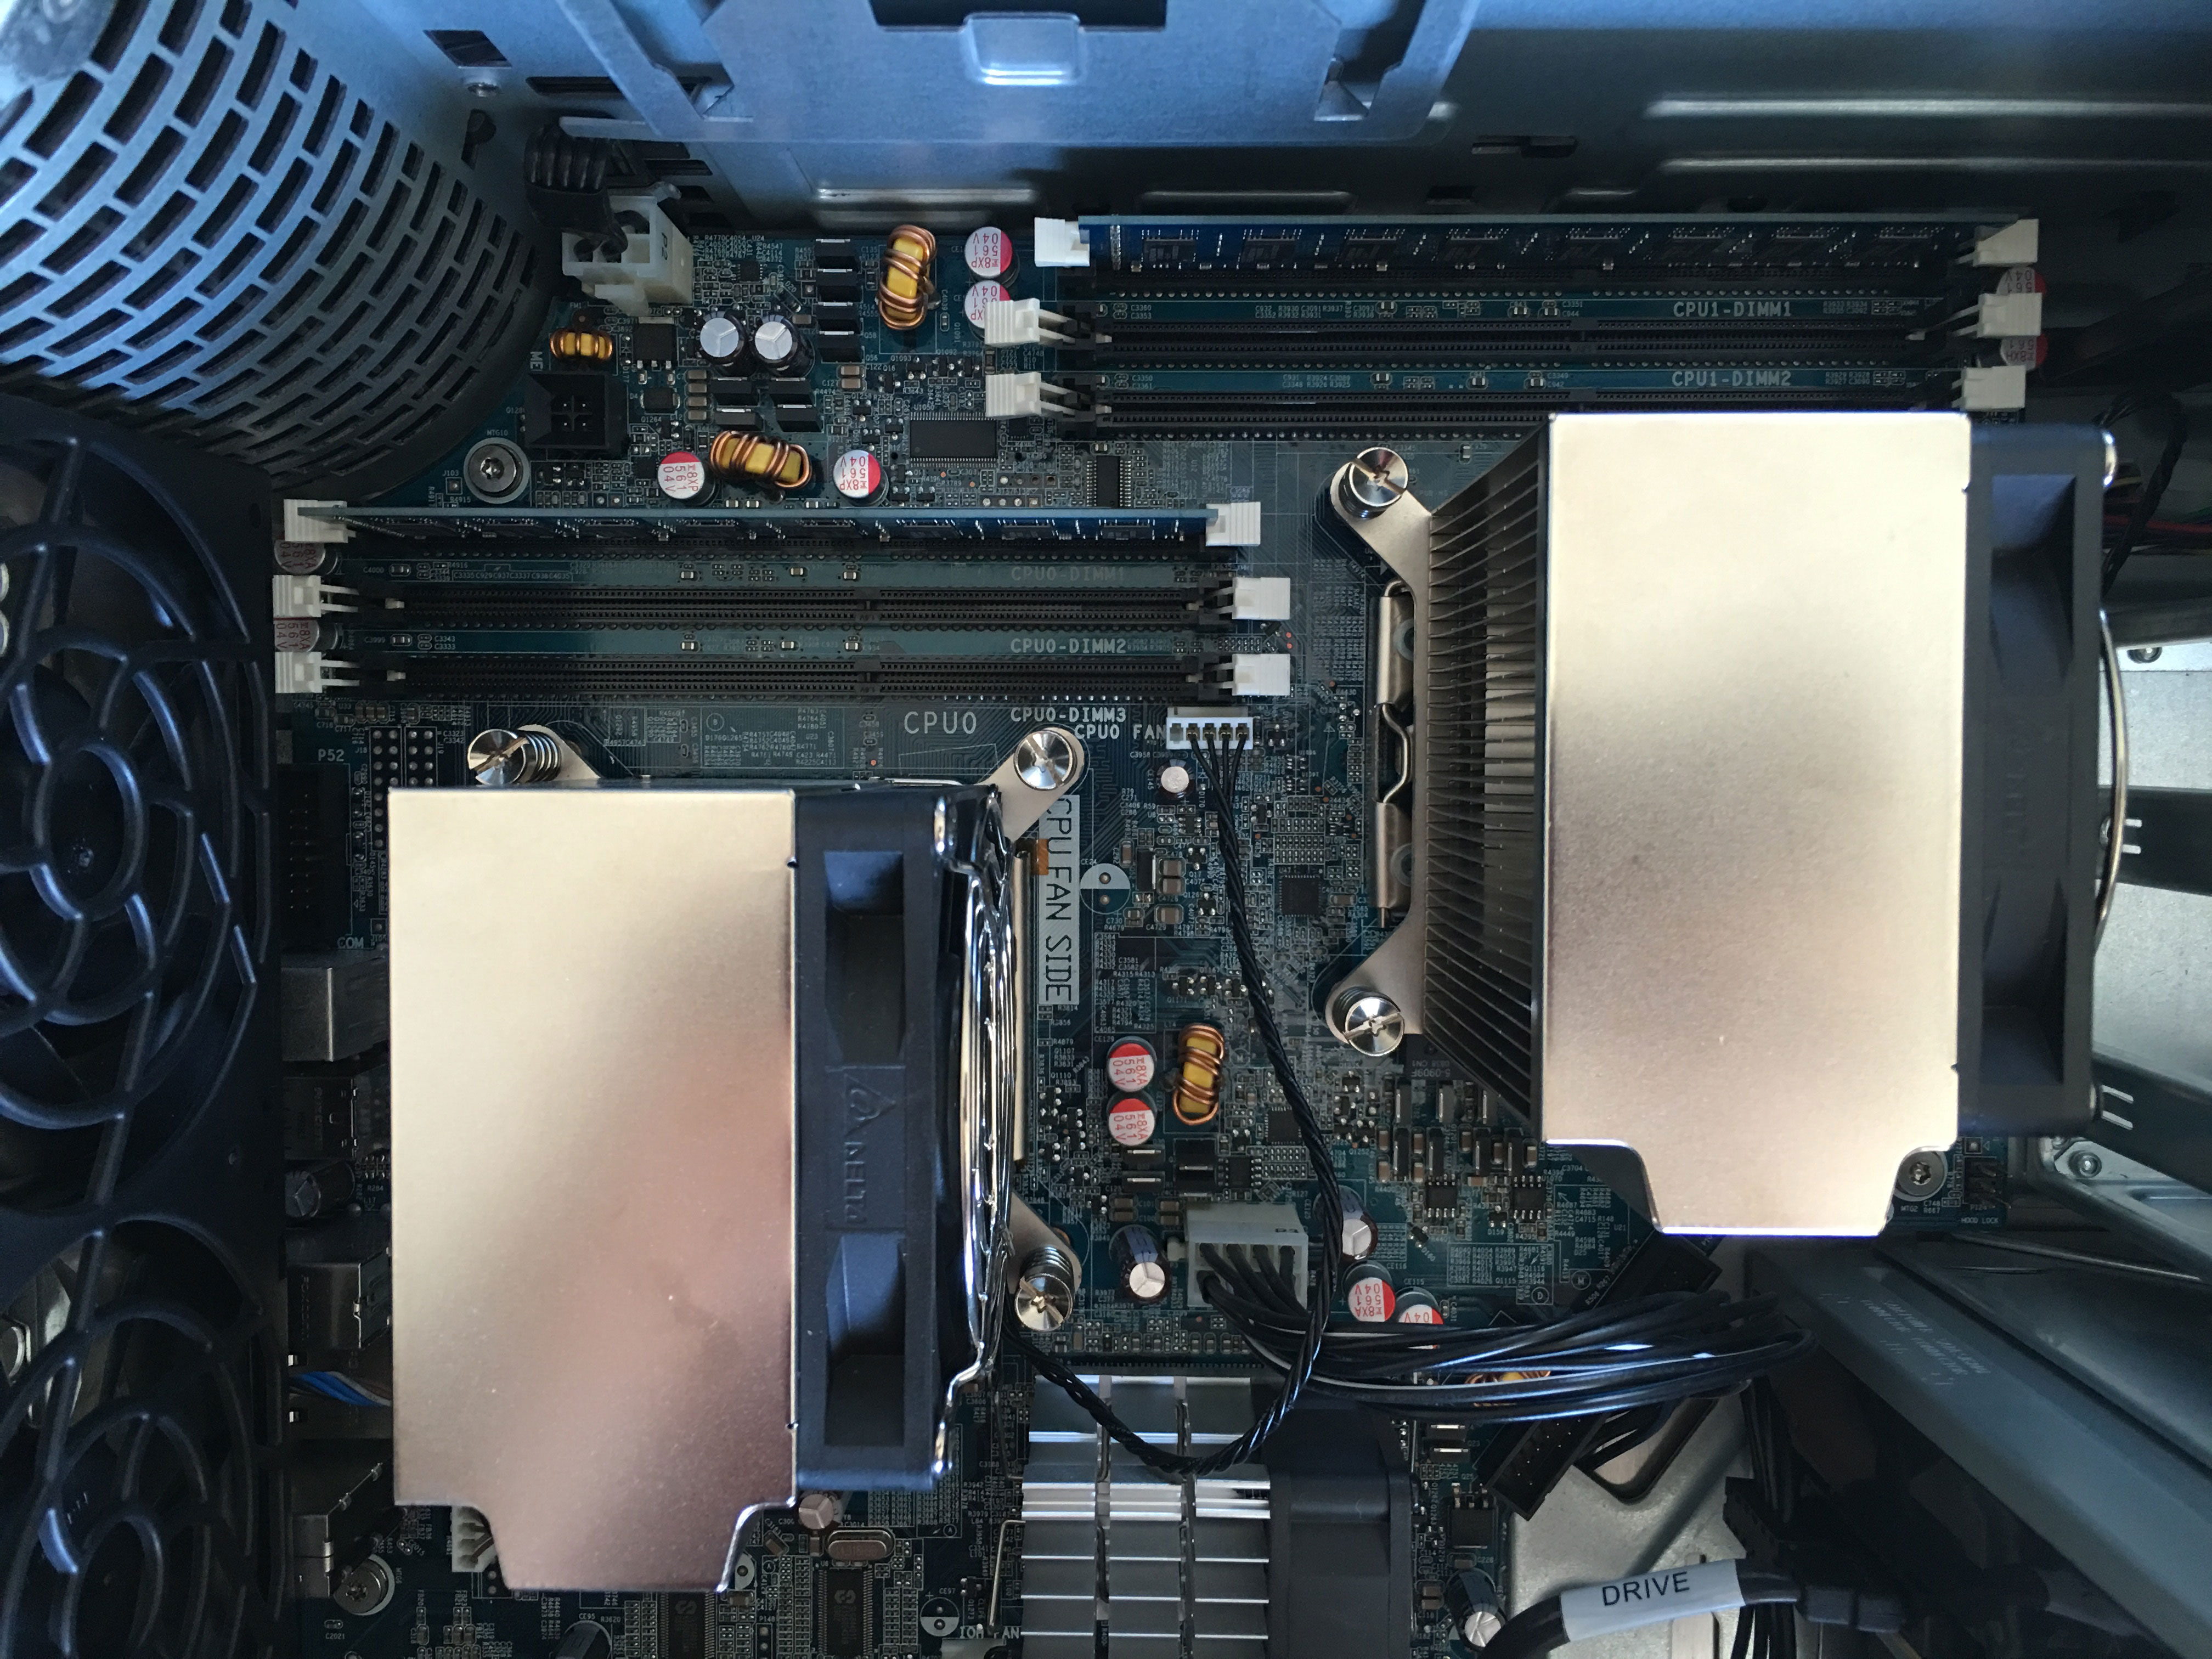
My Z600 came with 4GB of RAM, split into two 2GB sticks – one per CPU. The RAM is hidden under a cooling hood that’s easily removed. I bought 16GB of very swanky looking Corsair Vengeance RAM in red. Although it fits the board, and will probably work just fine, it has these funky red pieces of nice looking cooling rods on top and is therefore a little higher than “plain boring” RAM (52mm to be exact, or roughly 2 inches).
Hence, the Z600’s cooling hood doesn’t fit on anymore with such RAM installed.
I returned the Vengeance for now and will buy some cheaper “plain old boring” DDR3 RAM instead sometime later. I’ll see how my little buddy performs with only 4GB of RAM in the meantime. I did instead buy a Samsung EVO SSD in the meantime, so perhaps swapping out memory isn’t going to be that big a deal anymore.
First Boot (Take 1)
Excitedly I plugged an HDMI cable from the GTX 970 into my 52″ monitor (the only one I have that accepts HDMI input), just so that I can set the machine up. I only have Mac Thunderbolt displays otherwise, and neither of them accept anything other than Thunderbolt as an input (not even Mini Display works). But that’s OK, all I wanted to do was setup the machine and then VNC into it. A render node doesn’t really need permanent peripherals attached to it.
I had already sourced a USB keyboard, and I already had a USB mouse, and with the graphics card in place, what else was missing?
A frigging power cord of course.
I used to have countless amounts of those back in the UK – but since we’re here in Florida, I didn’t take any of them with me. And as of 2016, it appears these “kettle cords” have become rather scarce. I only seem to have three in my apartment: two powering my Mac Thunderbolt displays, and one powering that 52″ flat screen TV. Can’t really use that one – so why not use one of the white Mac cables?
Turns out that Apple made sure they fit nothing other that a Mac display: a flashy white plastic ring makes sure it doesn’t slot into a HP Z600 case. Sigh!
It was late, and the Powercord Warehouse was too far away (and neither my local CVS nor Walgreen’s had any) – so I had to go to bed without even pressing the power button.
Dang! So close!
Day 2 (Tuesday)
First Boot (Take 2)
After a late start into the day, I finally got my power cord from the local BestBuy. It was 3pm in the afternoon, and as soon as I got home I plugged in the Z600. I pressed the power button on the front and… hey presto, all fans sprang into overdrive, creating the noise you’d get from one of those Xlerator hand driers at Starbucks! Slightly shocking at first – it reminded me of those permanent server fans that you don’t want to have anywhere near your desk.
But after only a few seconds, all fans had calmed down to complete silence (even though they were still running). And of course, the lovely HP logo showed itself on the screen. Phew! My new Z600 was working – so was the GTX 970 graphics card with that home made adaptor. My dodgy soldering skills didn’t blow anything up just yet.
Both of my old hard drives were recognised properly, but an old Windows 7 installation on one of them didn’t want to boot. And understandably so. Let’s shift our attention to the operating system next.
Windows. Always a pleasure.
I had two choices of Windows: either use the Windows Vista Business Edition, for which I have a copy and a COA key underneath the Z600 workstation. It’s the license that came with the machine back in 2009. All drivers would be available, albeit perhaps outdated at this point, all CPUs would be supported with this edition of Windows, but support for Vista stops in 2017 – less than a year from today. Not such a future-proof choice.
Or, use my copy of Windows 7 Home Premium, then quickly use the “assistive technologies” loophole and upgrade it to Windows 10 for free. Granted, it would still be Windows 10 Home, but that’s upgradeable to Pro should I need to do that – probably when I find out for certain that multiple CPUs are not supported in the Home edition. And since my Z600 is a dual CPU affair, it stands to reason that I can only get access to all available hyper threaded Xeon cores with a higher edition.
I chose the Windows 7 route, just to see what would happen. And fair enough, the installation took less than an hour and the whole machine was working with the minimum of drivers. Turns out my 500GB SATA drive made some terrible noises, so I was using that old 160GB SATA drive that originally came with my NC10 instead (which is still going strong as a CentOS server by the way).
Drivers. Never a pleasure.
The first thing I wanted to do was to install the graphics card driver. It’s the single most important thing in any Windows setup, as otherwise the whole system doesn’t run smoothly. My GTX 970 was working with the standard VGA driver, but things like hardware acceleration weren’t supported yet.
So I slipped that DVD into the drive and installed the included driver. All well until it told me that for the driver to work, we’d need to install some flavour of the.NET framework. Downloading it came to a halt in the same place about three times in a row – so this driver was a no-go. I took it as a sign that perhaps we should skip this whole “Windows 7 Upgrade farce” and move straight on to Windows 10 before wasting any more time.
But before moving on, I had a question I wanted to have answered for certain:
How many cores can we see with Windows 7 Home Premium?
According to the control panel, even Windows 7 Home Premium can see all 16 CPUs. That was a pleasant and unexpected surprise. Perhaps I didn’t need to shill out on a Pro edition after all?
However, a quick test with Carrara showed that only 8 cores were being used for rendering, not all 16 as were available. I had already checked that hyper threading was switched on in the BIOS, so that wasn’t the problem. It looked like Windows 7 Home Premium was only using a single CPU, even though it had access to all RAM and showed 16 available cores.
This fact was also reflected in the CPU temperature gauge (in the BIOS), which showed that CPU 0 was about 10 degrees warmer than CPU 1. So it looked like only half my workstation’s rendering power was being used.
Naturally I couldn’t live with this, so I decided that before doing anything else, we’d have to move to Windows 10 and see how that worked out.
Upgrading to Windows 10
The friendly Upgrade Assistant sprang into action right away and started downloading the whole 3GB relatively quickly – and that was before Windows 7 even got a chance to check for several years worth of updates. A nice touch… or so I thought.
When Windows 10 began to install in the background, it took about two hours before it got to about 69%. It was late, so we had a walk to the beach followed by dinner, and by the time I was getting ready for bed, it had reached 99%. Although the hard disk was being accessed regularly, Windows 10 never seemed to move beyond 99%.
The next morning it still said 99%, at which point I understood that Windows was playing a little computer joke with me. I laughed and restarted the machine, which of course failed. Repairing Windows worked, although it took half an hour to boot the Z600 into a working version of Windows 7 as if nothing had happened.
The Windows 10 Upgrade Assistant told me that he would have to start AFRESH with the whole affair, at which point (19 hours after beginning the upgrade) I decided that perhaps this wasn’t working. Windows 7 had been trying to check for updates for several hours and hadn’t come up with any either.
Taking this as a sign of a HUGE waste of time, I decided to try out Windows Vista Business instead.
Day 3 (Wednesday)
Windows Vista in 2016. Do we really have to do this?
Vista Business does support multiple CPUs, and since my Z600 came with a Vista Business COA sticker, I might as well see if there’s more pleasure to be had with this version of Windows – no matter how old it is. Support for it as well as updates will stop within the next 12 months from the time of my little experiment, but who cares. If it works for my rendering needs, let’s give it a go.
I started installing Vista on a new Samsung EVO 500GB SSD I purchased on sale at my local Best Buy, and the whole installation took less than half an hour. BY then I had a working version of Windows running on my machine again, dual CPU support and all. Much quicker than I had expected!
The trouble was Vista itself: it’s one of those Windows versions that doesn’t know any piece of hardware by itself, besides maybe a generic graphics card driver. For example, the built-in ethernet service wasn’t even discovered, and Vista thought there’s no network card installed. Shame on you, Vista!
So I had to download a couple of drivers manually on another system, bring the USB drive over (for which Vista also wanted a driver, although it didn’t really need one), and tell Vista that there’s wired internet in town. Slightly cumbersome, but it made it work in no time.
And don’t get me started on the (unupdateable) Internet Explorer 7 Browser I had to endure until I had at least Firefox working. Let’s just not go there…
I tried to install the GTX 970 driver from the CD again, and this time it worked fine – including the .NET framework download and installation. After a reboot I had the gorgeous NVIDIA control panel to play with, and all the power of my new graphics card.
Nice! Let’s see what my 3D applications have to say about that.
Carrara 8.5 on Windows Vista
Just as I had expected, with the right edition of Windows, Carrara uses both CPUs – all 16 cores on my system. It’s quite a sight, I don’t mind telling you!
Since Carrara doesn’t do native GPU rendering, the new graphics card had little improvement to add here. That’s more relevant to…
DAZ Studio 4.9 on Windows Vista
With the correct driver in place, the GTX 970 – with the help of the two Xeon CPUs – can render a moderate 1920×1080 scene with three primitives in about 6 minutes. My Mac Mini takes just over TWO HOURS for the same scene… a frightening thought!
Up until now I just queued any Iray renders in a batch and let one of my off-site Macs render them overnight – guess that’s not necessary anymore!
Vista Issues
I went to bed knowing that this machine was going to be a lot of fun, and very helpful in creating those otherwise long running renders. And I was super happy to see that neither of the apps I intended to use had a problem with Vista. But there were other issues.
See, I don’t intent to run the Z600 on a second monitor – at least not for now. Perhaps in the future. Right now I’d like to access it remotely, and under Vista, the only way to do this is via VNC. While that works OK, the refresh rate even on a very fast network isn’t great. RDS works much sleeker and better, but that’s only supported since Windows 8 (I think). Nevertheless, I did setup TightVNC under Vista and it worked OK.
What was bugging me was the same issue I had with my Windows 7 installation: Windows Update was seemingly not working. I had left the previous installation running overnight to find several years worth of updates, and 12 hours later it was still looking. The same happened with Vista. Not only would I have to run an outdated version of Windows, I would also lose out on any updates that had been released since then. Not a stable nor future proof solution.
Besides this, there were some screen issues I didn’t appreciate – so I made up my mind and decided to clone that Vista installation to a safe hard disk and start again the next morning. This time with Windows 10.
Day 4 (Thursday)
Bring on Windows 10
As I didn’t have any luck upgrading my previous Windows 7 installation to Windows 10, I thought perhaps a fresh installation directly from a Windows 10 DVD would work.
And it did!
Again I started with the Home edition, thinking that there’s at least a slim chance that my Windows 7 Home product key would work – which of course it did not. But the installation itself went swimmingly in just under an hour, and hey presto – Windows 10 Home was now gracing my new Z600. No need to download ANY driver, everything just worked out of the box, including Windows Updates. You got to love that! Windows has indeed improved over the years.
I tried Carrara again to see how many cores were used for rendering, and just like under Windows 7 Home, only 8 cores were used. Looked like I had to “go pro”. But with an unactivated version of Windows 10, how would I do that? Fresh installation? Nah, there had to be a better way – especially because Microsoft does allow upgrading to Pro with an activated copy for an additional $99.
Turns out that there’s not really a need to activate Windows 10 in the first place: you can install whatever edition you wish and run it without a product key – at the time of writing at least, for as long as you want! There’s a mildly annoying nag watermark on the bottom right corner, prompting one to “activate Windows”, but all functionality is there. That’s superb for testing and evaluating – which is technically what I was doing here. After all, I had no idea if perhaps my Z600 was too old to support Windows 10.
Upgrading Windows 10 Home to Pro
Another nice thing I found out was that there is indeed a super fast way to turn Windows 10 Home into the Pro edition, with features such as dual CPU support and RDS among several other things. All we have to do is enter a new product key, namely this one:
- VK7JG-NPHTM-C97JM-9MPGT-3V66T
Windows will go to work and install “additional features”, restart, and within 20 minutes or so my Z600 was running Windows 10 Pro. Huzzah!
As with Vista Business, Carrara could render beautifully with 16 magnificent cores, and DAZ Studio worked blazingly fast just as it did under Vista.
Looks like Windows 10 is my Z600’s newest companion.
RDS: Remotely connecting to Windows 10
The next thing I did was to setup an RDS connection instead of the previous VNC connection. Both are ways to login to another computer remotely and operate it. The big difference between VNC and RDS is that VNC transmits a picture via the network, a mirror of the remote computer’s desktop and screen resolution. And since that’s a video stream, the refresh rate isn’t great.
RDS on the other hand transmits the items that appear on the desktop “in principle” by using Microsoft’s Remote Desktop Protocol (RDP), and re-assembles them on the receiving client. Therefore, the screen resolution can be set to anything you want it to be, even if it doesn’t match an attached monitor. You’ll always see a crystal clear picture with minimal lag, with the resolution you desire. Very clever!
In my case, I can run Windows at 2560×1440, just like I run my Mac. Moreover, I can utilise my 27″ Thunderbolt Display without actually plugging it into my graphics card. It’s no good for doing any camera manipulations in a 3D viewport (because somehow the mouse/trackpad translations are way too sensitive – don’t ask me why), but it works a treat for anything else – including loading a scene to be rendered or any other administrative task.
The only limitation of RDS is the way it handles OpenGL on startup. For example, opening DAZ Studio results in an error message (something like “you need at least OpenGL 1.3, and your system only has 1.1”). However, the problem can be circumvented by starting DAZ Studio via VNC (or locally), then switching to an RDS connection with the app already running. Out of a sudden, that OpenGL thing is no longer a problem. Whatever, dude…

Day 5 (Friday)
Rendering Workflow
With all the technical setup out of the way, I was finally ready to test my vision for a speedier rendering workflow, for both DAZ Studio and Carrara. My plan was as follows:
- setup scenes on my Mac desktop
- save scene files to Dropbox
- switch to my Z600 via RDS (I use Remotix by Nulana for this – works a treat)
- load the scene and render
- save the render back to Dropbox
- do postwork on my Mac
While this looks cumbersome and convoluted, it’s extremely fast and easy, thanks to Mac Spaces. So my Z600 appears like just another desktop app alongside all my other open apps. If you don’t know Spaces, it’s akin to having several desktops lined up next to each other, and with a three-finger swipe on the trackpad you can switch between them. You’ll never run out of screen real estate that way.
Since then I’ve been thoroughly enjoying the new setup. Both Poser and Carrara have had a helpful feature for many years, in that you can send a scene to render either in the background, or to a bunch of render nodes. One drawback was that your main computer was still doing a lot of work and therefore loses the ability to perform at its peak. After all, we’re asking him to render heavy stuff, and remain responsive at the same time.
But DAZ Studio has never had something like that out of the box. Now I simply setup a scene on my main Mac, perhaps do a quick preview, and let my new rig render it in its own time. Meanwhile, I’ve got all my Mac’s resources back at my disposal – be that for setting up the next scene, fiddling with Photoshop, surfing the web or doing a few emails.
In addition to that I have my various laptops that can support a render node setup, and if that wasn’t enough, I also have two Macs in a data centre that I can send jobs to.
Rendering has never been this much fun!
This is something I’ve considered doing for a while now. That you’re getting decent HD renders in a quarter of an hour is extremely compelling information…
I highly recommend it over a brand new system. The amount of power you get for your buck is phenomenal.
For DAZ Studio, the GTX 970 does most of the work in Iray renders. I’ll have to run some speed tests to see if adding the CPUs does increase render times and if so by how much. I’ve heard that adding a single CPU to a GPU for an Iray render can compromise render times. Then there’s the OptiX Prime Acceleration too… I’ll run some tests, watch this space!
In regards to CPU only rendering, for Carrara and 3Delight, I’d say this Z600 is about twice as fast as my 2.3 GHz quad-core i7 Mac Mini (2012 model).
Are you aware of this tool? :
http://www8.hp.com/us/en/workstations/remote-graphics-software-mac.html
Might be useful.
Best regards.
WHOA, no, I’ve not seen that before – looks amazing! I’ll check it out, maybe come in handy indeed. Thank you so much for sharing 🙂
Any luck with the tool?
It’s probably officially supported on Z..20 and Z..40 (Z420, Z620, etc.), but may work on your Z600 as well.
I found some posts on the HP forum that confirm RGS does work on Z600’s (for free). The software likely includes bios and/or system board identification, iow: it recognizes your system and auto approves the license.
I am not sure if non Quadro cards are supported, but that’s a matter of trial and – hopefully no – error.
You know, when I first read that there was a license fee involved I never dig any further due to wallet broke-ness issues… but if that license is in fact free, I’m very happy to have another crack at it! Think I have some time this week, I’ll take a look!
Jay, is your Z600 still configured as described in your post above?
A memory upgrade would make a big difference in performance. RAM modules are available at low prices from ebay.
The bios boot block date of our Z600 reads 01/30/09, which means there is a Revision B3 System Board aka a MK1 under the hood.
The memory that works in your system:
PC3-10600 DDR3 1333 ECC 240-pin ECC DIMM
This should be NON REGISTERED ECC!
Here’s some extra info:
http://h20331.www2.hp.com/Hpsub/downloads/HP-Z600-Workstation-memory-configuration-and-optimization.pdf
Another major performance boost could be obtained by upgrading your boot drive to SSD.
It is recommended to use (second hand) HP approved Intel X-25M or Intel 320 series 160GB or 300GB drives. This will work best with your bios (which is non UEFI).
If you have some money to spend you could transform your Z600 into a rocket by installing a Kingston M2 Predator SSD. There are some guidelines to get the latter to work, but you won’t believe the gain in performance.
I did make a few upgrades shortly after putting the unit through its paces, so now it has 20GB of RAM (24 is the max with my revision of the board I believe), and I’ve added a 500GB Samsung EVO SDD. To get fast access to external drives I’ve also added a USB 3 controller, and now I’m happy to say this is my got-to system for any 3D rendering and editing work. Like you said, it feels like a rocket and is probably by far the fastest, yet cheapest hardware I’ve ever had.
Someone over on the DAZ forums even bought himself a pair of matching hexacore Xeons as a replacement for the quad-cores on his board for about $120, so he runs his system even faster. That’s another idea, especially when you get a single-core unit from eBay, or one with a bust CPU.
Still didn’t get a chance to test out that tool yet, but it is definitely on my long to-do list!
Hello. Thanks for your extensive input. I wonder, if you had any issues with PSU. My is so loud, beeping and squeeking. Not the fans, but the transformer itself is noisy. It makes my head hurt. Is yours quiet?
Keep on the good work and happy new year.
Hi Srečko, no my power supply is extremely quiet, one of the quietest I’ve ever had in a midi tower this size. If it’s not the fans making the noise, and instead it is an actual beeping sound, then it indicates something isn’t quite right under the hood. Perhaps one of your cards is draining too much power, or an on-board configuration isn’t right. I remember experiencing loud beeping when I added a RAM module that the board didn’t like – but that coincided with an error message presented as part of the BIOS, so the machine didn’t even boot. I’d probably check the BIOS for any messages, and pull some of the heavy-load cards to see if this queens your PSU down. That’ll give you a clue as to where the problem lies.
Good luck!
Hi there,
I know it is an old topic, but maybe you could help me still with a piece of advice.
I just bought one z600 myself- it has 2×6 cores 5650, 32 GB Ram and I want to fit an Asus Turbo White 970 Gtx in it. I chose that graphic card because it blows the heat out through the back and directly out of the case. Now, the problem is obviously the power, the card specs state a hefty 225W power drain ( it also needs a 8 pin PCI-e). I am a bit afraid to adapt that molex to 6 pin thing like you did and to use a converter 2×6 to 8 pin, as I read Molex don’t provide enough power (way under the 75W needed) and that it could melt and fry. The second idea would be to use a single 6pin to 8 pin adapter, as I also read that the 6 pin can provide much more then the 75W specified. But twice as much? There is a video on Youtube with a guy mounting a Gtx 960 using a 6 pin to 2x6pin adapter, but that card consumes way less than the mentioned Asus 970 Gtx…
I would be very thankful for your thoughts on this.
P.s. I am not even sure the PSU can deliver the load, in which case the plan B would be to use a second PSU just to power up the graphic card with.
Hi xor,
congratulations on your purchase! Amazing specs indeed. The Z600 is a fascinating machine, I’m sure you’re going to love it.
I can certainly understand your dilemma – here’s what I’m thinking. I’d probably try the GPU with the internal power supply first. It should be capable of delivering 650W, which should be able to deliver the 225W for your GPU and leave enough oompf for a couple of hard disks and a USB gadget or two. Don’t worry about the molex connection, it’s wired directly into the PSU and has no knowledge of much or how little power it’s supposed to draw. Even if you put a 650W drain directly on it, it will deliver (hopefully you’ll never have to do that).
Which leaves the adaptor. If you can get a 6pin to 8pin, go for it. That’s the easiest solution. Soldering things is always an adventure, I was surprised that it worked out in my case (I don’t do this very often). As far as I know, it doesn’t matter if you draw all the power from a single 6 or 8 pin, or if you use a splitter for that, at least not in regards to the power draw. Some GPUs expect power on both connectors, even if only a single source is used (which is a ridiculous design – but I guess it leaves options in case the user would need to split the power draw across two PSUs).
On the off-chance that your PSU should blow, you can get a new one for $80. I guess an external PSU would be a last-restort option, but it’ll be an ugly hack, and it might be noisy, so I’d go for the elegant internal option first.
Good luck, and let me know how you get on!
Hey Jay,
thank you for the quick reply. I forgot to mention that this particular graphic card needs only one 8 pin PCI-e, instead of 2×6 the original NVidia 970 has. I already have an adapter 6 pin to 2x 6+2 pin ( of course I will use only one of the two), precisely this one:
https://www.ebay.de/itm/PCI-E-6-pin-to-2x-6-2Pin-6-Pin-8-Pin-Power-Splitter-Kabel-PCIe-PCI-18AWG-Draht/401517323955?hash=item5d7c4c26b3:g:4MMAAOSwH1VaxDsO
For the external PSU, I plan to use the one I have in my other computer, which is a Corsair HX 850W. I’m not very concerned about how is going to look like, actually I bought the system for rendering (Softimage,Maya) and Zbrush sculpting.
I’m just waiting for the card, hopefully Monday I’ll have a working system one way or another :).
Hi again,
Ok, my z600 is up and running- like a charm. I didn’t use the adapter though, as the gauge on the one I’ve got looked suspectedly thin. But I found this blog: http://nerdralph.blogspot.com/2016/03/hacking-gpu-pcie-power-connections.html
So I just bridged the last 2 pins of the graphic card so it thinks it has a 8 pin in it, and it works like a charm directly with the 6 pin output of the PSU.
The performance of the system is pretty amazing!
Hi xor, I’m still kind of confused as to what you did to bridge the 8 pin and 6 pin on your gpu. I’m planning on getting a EVGA GTX 970 SCC which has a 8 pin and a 6 pin connector so how could I make them work so I don’t have to replace the stock PSU which only has one 6 pin. Any help would be appreciated.
I know that this is old but thought I’d chime in as I am having fun messing around with my budget build.
I have the HP Z600 and can confirm the MSI GTX 970 Gaming 4gb works perfectly in this machine. What I did was take the 6 pin from the power supply and hooked it directly into the card. Then I got a dual sata adapter to 8 pin cable and plugged it into the 8 pin on the top of the GPU. I used the 2 sata power cables that extend from the base of the MB. This machine has 2 sata power cables, a Molex, and a mini 4 pin (not sure what it is called). I then converted the Molex with a Molex to 4 Sata cable adapter, for a USB 3 PCIe adapter, an SSD, and the DVD reader. I put the GPU in the first X16 slot which outputs 75 Watts of power and the supplemental power from the configuration mentioned. I have had no issues at all. I have 2 X5675 with only 24gb of RAM (Upgrading soon! to 48gb).
With this configuration running smoothly, I recently found an Asus Strix 1080 8GB graphics card for $300 dollars with 2 years left on the warranty. Do you my current configuration could handle the small increase in overall power? I am up in the air but this is a subject that is foreign to most people I know. Love the article and have stumbled on it probably 20-30 times since messing with my machine.
Thanks!
Hi Timothy, glad the article helped – I totally agree, this is a “jumping into the deep end” type hobby, certainly not mainstream 😉 My Z600 is still running in this exact configuration, and it’s so smooth that it has become my main workstation – replacing my Mac Mini, which is sitting on the same desk. The heavy lifting is done by the Z600 (rendering, 3D intense games, transcoding), while I use the Mac for Photoshop, writing, coding and web administration. They compliment each other well, and if I were looking for another Windows machine, I’d do exactly the same thing again: source a Z600/Z620/Z800 from eBay on the cheap, get good GPU, max out the RAM and give him an SSD. I’ll take that over a $4k new build any day.
In answer to your question, as in “can the stock Z600 power supply cope with a GTX 1080”, I’d say: probably. NVIDIA are a little sketchy with their exact power requirements, but if I go by these two spec sheets for the GTX 970 and the GTX 1080, it appears that both are equally happy with a 500W power supply. Since the 970 works OK, and the 1080 doesn’t need too much more extra wattage, I guess the chances are good.
It all depends on the amount of attached USB devices and internal drives and cards of course, and there’s the thing about the 8-pin adaptor you need to build somehow, but as you said, there are ways around it. Let me know how it’s going in your adventures, I’d be interested in adding a 1080ti to my next Zxx system.
Hi Jay,
I have just installed a new graphics card and now can’t fit the left panel back. Do you remember what size the Torx scews are? I will have to order a screwdriver. Thanks!
? That is funny! These things happen I guess. If I remember correctly, the Z600 can be opened without the need for a screwdriver, same goes for installing cards. I’ve just installed an Elgato HD60 Pro in mine and haven’t needed a single tool. Which Torx are you referring to?
Nice I should show you guys my specs
https://www.3dmark.com/spy/5756842
Oh nice, thanks for sharing! How did you do that? Do you have to register for those results to be memorised? I’d love to post mine, so we have a bit of a comparison going.