I’ve just learnt how to update a counter variable in Unreal Engine. There are several steps to it and some prerequisites, namely:
- we need to have a variable to read out
- we need a text field to be updated
- we need to bind the text field to the variable
- we need a widget and add it to our viewport
I won’t go into the details of the ever so cumbersome text editor here, just the principle on how to bring all these components together.
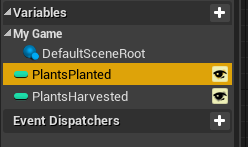
The Variable
For the counter to be accessible from both the widget blueprint as well as the object that’s updating it, let’s implement the variable in our Game Mode. I’ll call mine PlantsPlanted and make it a public integer so that other classes can set this value later (perhaps when we plant a plant).
While we’re here, I’ll add a custom event that will update my variable when anyone in the game needs to do so. I’ll call it AddPlanted, and here’s what it looks like:
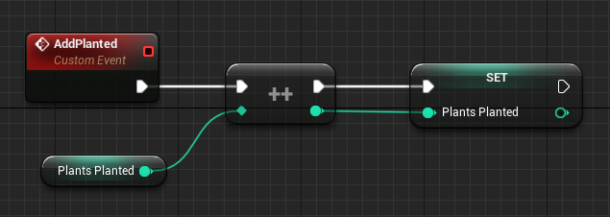
There’s not much to it: I get the current value of my variable, then use a ++ method to “add 1” to the current value. It’s a C thing (although other programming languages also use this notation). When the value has been increased, we’ll store the new value in the same variable.
Note that we don’t need to call anything else here, like update the text field. This seems to happen automagically, thanks to the binding we’re about to create.
The Widget
I’ll create myself a new Blueprint Widget that will hold our value and display it in the top corner of our screen. Right-click in the Content Browser to do that, then open it. I’ll call mine HUD for now.
Technically a text field by itself will suffice, but positioning it together with another text field can cause headaches. I’d like my field to read something like “Collected: 34”, so I might need two text fields that auto-align. I’ll use a horizontal box for that, to which I’ll parent the text field. All these items are accessible on the top left menu and can be dragged into the canvas.
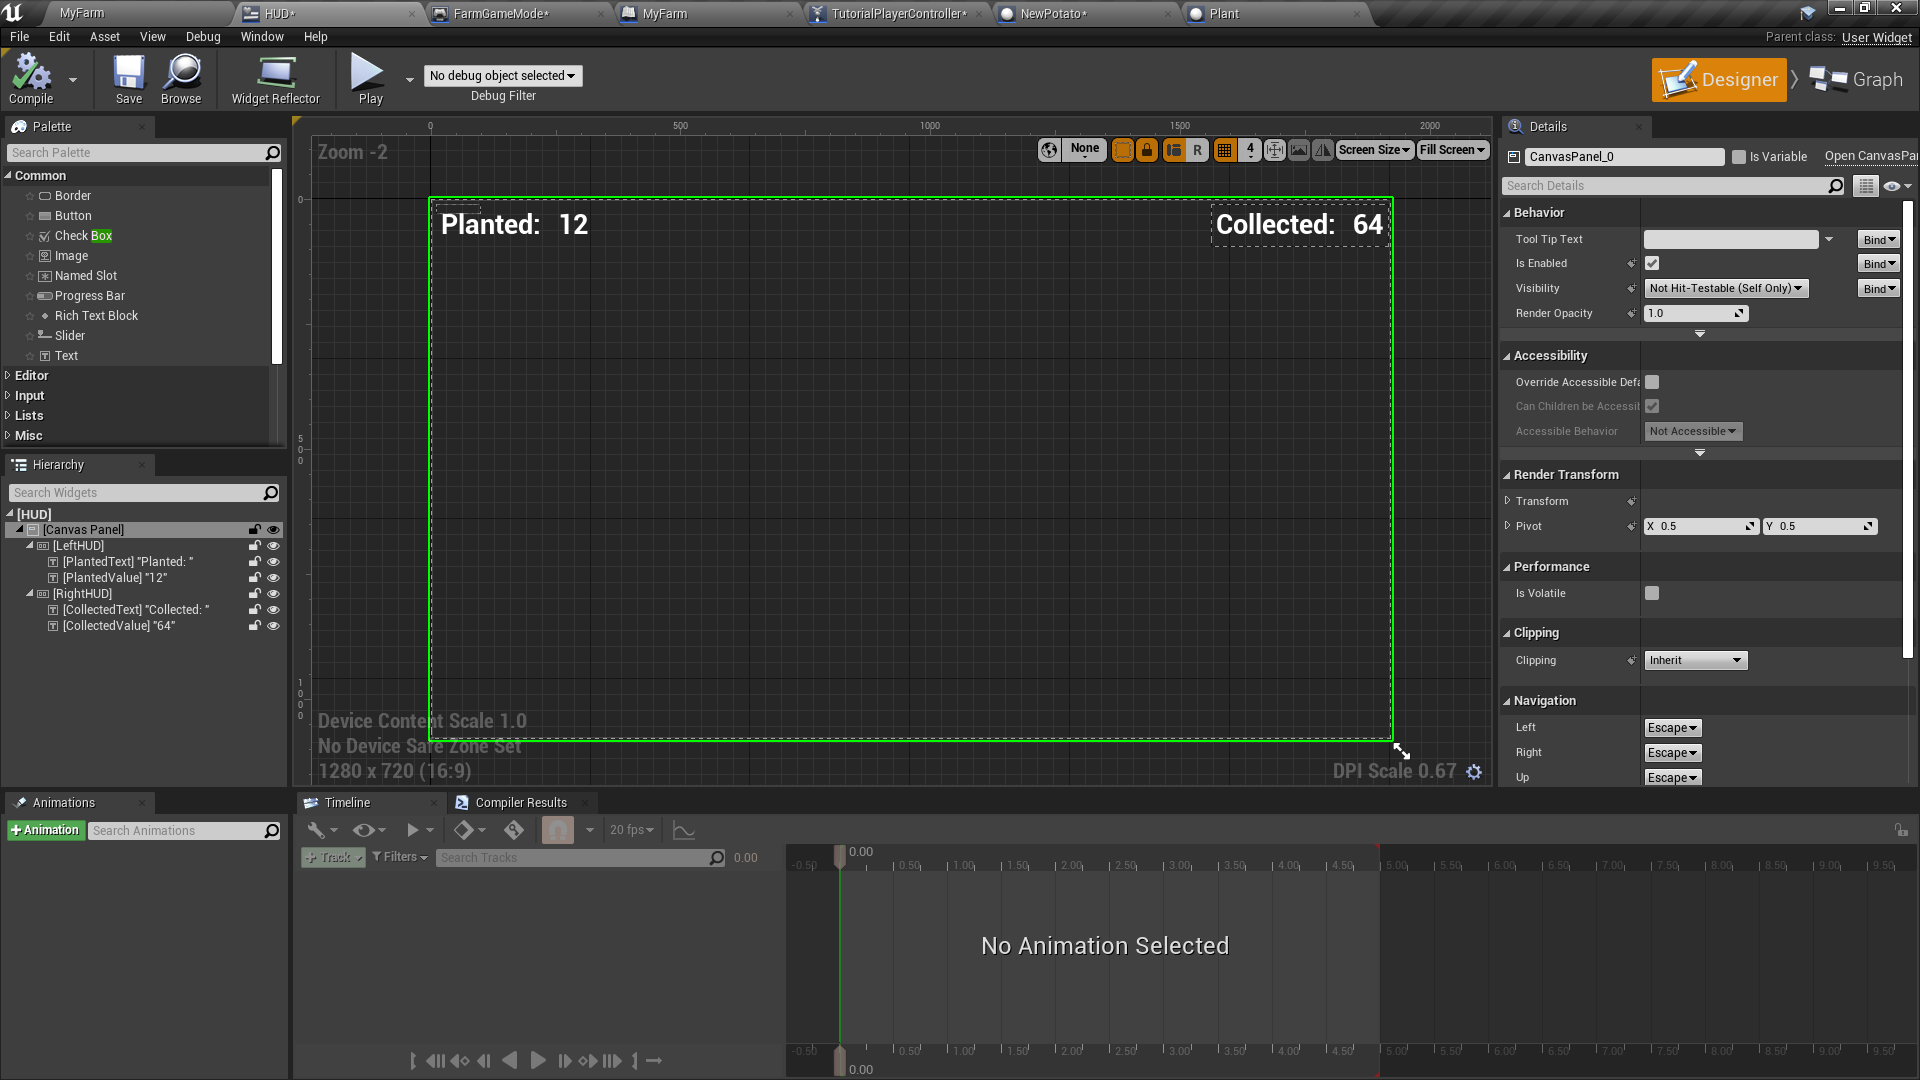
I’ve actually made two counters here, but the one we’re focussing on is on the right hand side. I’ve named each element something memorable too. For example, my text field is called CollectedValue. The prefix text is called CallectedText, in case I ever want to change it in code (for translation perhaps).
The Binding
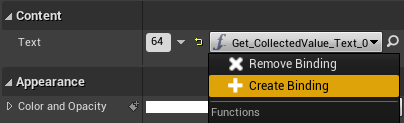
With your value text field selected, click the word Bind, then select Create Binding.
A scary new window with purple nodes opens up. That’s OK, we need to go there anyway. Unreal Engine has added two nodes for us, namely the output of the text field’s value, and plugged it straight back into the input of the same field. It’s like “get value” connected to “set value”. The idea is that we’ll put some logic into the middle here, thereby changing the value. It’s ingeniously simple!
We need to grab the value of our Plants variable from the Game Mode and add its value to the text field. Let’s do it!
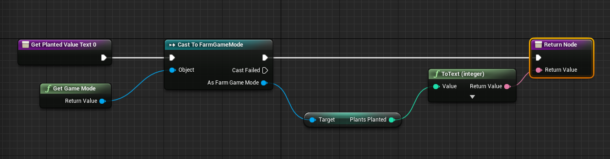
This looks more complicated than it is: After disconnecting the pre-wired pins, I’ve grabbed a reference to my own Game Mode (called FarmGameMode) first. This has to happen via a Cast To node, which requires the Get Game Mode as an input. Essentially we’re telling Unreal Engine that we’re sure my own game mode is used, rather than the generic Game Mode class.
As my own game mode, I have access to the Plants Planted variable and can connect it to the text field’s input. Unreal Engine will detect that the text field requires a string input and will add an Integer-to-String node automatically. Very convenient! Apple would never do that 😁
By the way, if you ever need to go back to the canvas view, the top right has a switch for that. Once again, nothing else is necessary here.
Adding the HUD to our Viewport
All that remains to be done is for our HUD Widget to be added to the viewport so that it becomes visible. There are various ways to do this, but I feel that the Level Blueprint is the ideal place to hold this code. It’s somewhat out of the way and can be left there until we no longer need it, but the Game Mode will suffice as well.
Whichever place you choose, I’ll add the widget to EventBeginsPlay.
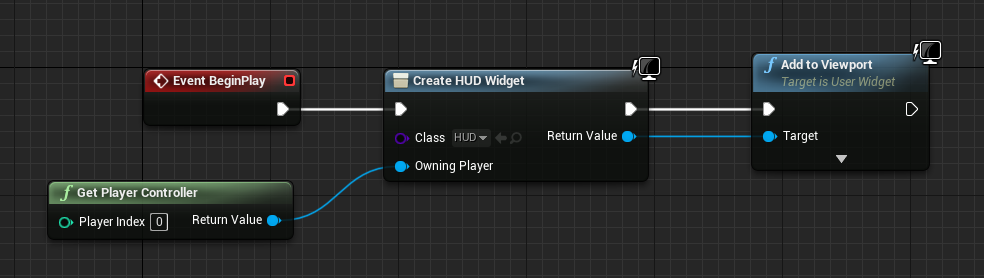
I’ll create a widget node and pick the Widget Blueprint I’ve made earlier (called HUD). I’ll have to grab a reference to our Player Controller, and then add the widget to the current viewport.
In my player controller I have an event that triggers the first custom event we’ve written here (AddPlanted), which increases the “planted plants” counter. As soon as this happens, the new variable value is read out and updated on the screen. While this may look complicated, a lot of the heavy lifting is already happening under the hood. I love bindings!