Transparency is handled differently across render engines and file formats. While a PNG, TIF or GIF file can contain transparency data, a JPG image cannot. DAZ Studio’s Iray render engine can’t handle transparency data embedded in such images and requires the use of a special Opacity or Transparency Map. This might sound a little confusing, because opacity is the opposite of transparency, and only one map is needed.
Let me show you how to apply one in this article.
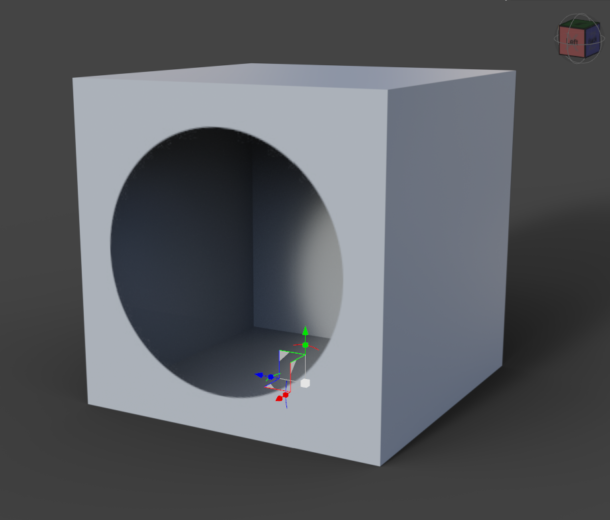
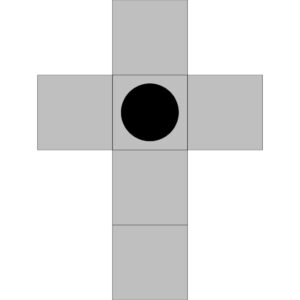
With your UV mapped object selected, head over to the Surfaces Tab and take a look at the Geometry Channel in your material. The first one in the list is labelled Cutout, and it lets you apply a Cutout Opacity map. Mine is white, with a black circle on one face.

Set the value to 0 and your whole object will be transparent; set it to 1 and it’ll use your map with 100% strength applied. There’s also a value that’s set to 1 by default, giving you the option to apply how “heavy” you’d like to apply your map. On my simple cube object, and when rendered with Iray, my black circle has the following effect:
The Opacity/Transparency Map
Anything that’s white on the map we’ve applied is rendered with full transparency, while anything black appears fully opaque in our render (hence it’s difficult to describe this map either as opacity or transparency map because technically it does both). For those of us who don’t remember things:
- white = opaque
- black = transparent
- grey = in-between values
If we were to apply this map to our cube, the hole would still appear in the same spot as above, but all walls would look “a bit transparent” because they’re not 100% white.
You can further tweak your transparency effect by adjusting the value of the Cutout Opacity. 0 means the map won’t applied at all, while the object will appear 100% transparent. 1 means the map is applied at maximum strength.
Hope this helps!
Hey Jay,
What is the cut out option is not there? How do you enabled it? I tried with the settins enable hidden, but no effect.
Thanks!
It’ll depend on the shader if this option shows up. The Iray Uber shader has it, which is kind of the default shader for most objects, but it could be that you have a different one applied on your surface. To convert it over to Iray Uber, head over to the Surfaces Tab, select the material zone in question, then switch to the Presets Tab, and under Shaders – Iray, apply the first one in the list (Iray Uber Base). Now go back to the Editor tab and the cutout opacity channel should be there (under Geometry).
Writing it down like this makes it sound seriously complicated LOL – hope it helps!
Thank you jay,
Your wonderful like always.
It was a 8.1 prop. So it was it a PBR shader then.
– How can you see that?
– PBR shaders can not do transparentcy then?
Thank you!