
Photoshop’s Blending Options are so powerful and useful, it’s easy to forget that there are other ways to accomplish the same thing. Case in point: the Stroke Effect, which lets us create an outline around an object. It’s essentially an outline we can apply, which can be used to separate a transparent object from the background.
Clip Studio Paint on the other hand doesn’t have the Blending Options, so how can we create this Photoshop Stroke Effect? With something called Outline Selection. Let me show you how it works.
- create a selection (from the object you’d like to create the stroke/outline from)
- create a new raster layer for your outline
- pick a colour for your outline
- head over to Edit – Outline Selection
This will bring up the following modal window:
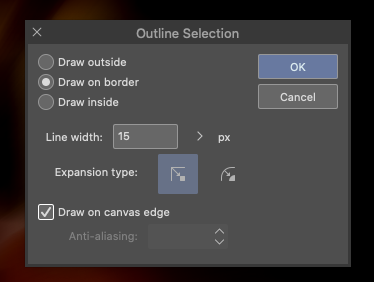
The options here are very similar to the Photoshop Stroke dialogue. Once you hit OK though, the settings are applied to the selected (hopefully new) layer for further adjustment if necessary, or to be re-done if the effect isn’t as you had imagined.
This is an important difference between CSP and Photoshop: we don’t have the convenience of Smart Objects or “trying it again” without having to re-do the whole procedure. For example, if the stroke colour or width isn’t as we had envisioned, or needs refinement later on. Still, it’s nice to be able to create outlines in CSP even if it takes a bit of getting used to the process.
Creating a Selection
CSP has great options to make selections, so if you haven’t isolated the object that needs an outline, try one of the following:
- right-click on a layer and choose Selection from Layer
- use the Selection Tool (M) and draw a rectangle, circle, polyline
- or use the Selection Pen to draw it out
On this note, selections are stored in special Selection Layers if you want to keep them around, much like Photoshop can use the Alpha Channel to load/save selections.