
I’ve been making some thumbnails for my Stardew Valley streams on YouTube, using low-res pixel artwork to reference the characters. My thumbnails are much larger than the original artwork, so I had to resize them in Photoshop. However, when I did this, I’ve noticed that Photoshop was trying to “smooth” the pixels as good as it could. This was not what I was looking for (left image). I wanted to make my images larger, but retain the crisp retro pixel look (right image).
How do we do that in Photoshop, and why might it happen?
Having solved the whole puzzle last year, I couldn’t for the life of me remember how to do it, so a little note is in order. Here’s how to make it work:
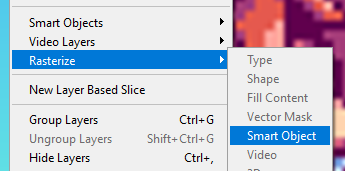
First we need to rasterize our layer. Retro resizing doesn’t work with Smart Objects.
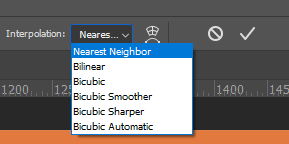
Next we need to resize our layer using the Transform Tool (V), using an algorithm called Nearest Neighbour. It’s an easily overlooked super tiny menu at the top.
And that’s all we need. This will resize the rasterized image and retain the pixelated retro look.