Control Rigs are Unreal Engine’s “easy” way of letting us animate objects and characters in Sequencer. They allow us to create new and override existing animations directly on the timeline. These things are ever so slightly intimidating to set up, but if you know how they work, you’ll be able to animate any rigged object in Sequencer.
Note that for biped characters, this process is getting somewhat simpler in Unreal Engine 5.4 for Modular Control Rigs, but for fault finding and non-biped characters, or where Modular Rigs simply don’t work, you need to set them up from scratch. Let’s see how to do this.
I’m using a Third Person template in Unreal Engine 5.4 and UE4 Manny in this example.
Creating the Control Rig file
Let’s find our character’s mesh in the Content Browser and right-click on it, then choose Create – Control Rig. For UE4 Manny this is in Characters – Mannequin_UE4 – Meshes.
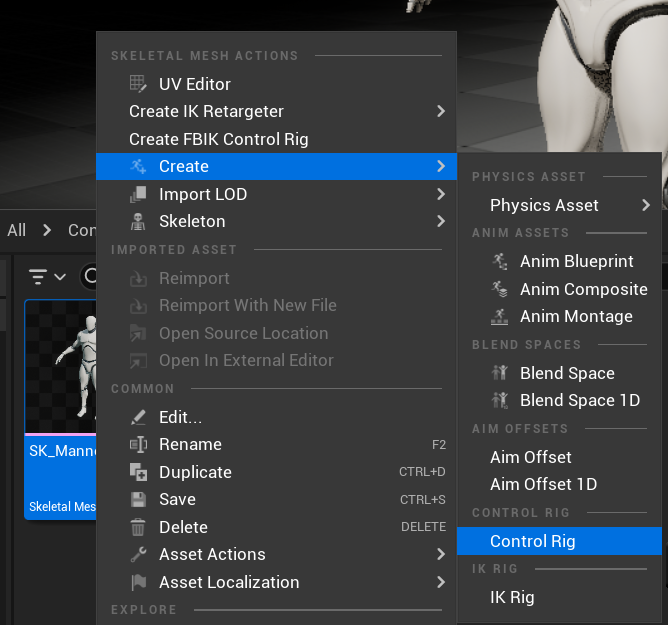
This will create a new file with a default name next to our mesh. Let’s open it with a double-click.
Note that come characters may already come with a control rig, like the UE5 mannequin. Other products may add a base configuration to this file (like the Daz to Unreal Bridge). Let’s assume our control rig is completely empty, as will be the case with most custom figures.
Setting up Bone and Control Arrays
With the Control Rig file open, we’ll see a big Blueprint like graph with only a single node called Forwards Solve. Our mission – should we choose to accept it – is to create controls for the bones we want to move and hook them up to the actual bone rotations via Blueprint code. The more controls we create, the better we can control any aspect of our character’s motion.

The good news is that we don’t have to go through the whole skeleton if we don’t need to animate every part of it. For example, if I want my character to move his head only, then I don’t need to worry about the toe bones. For this example I’ll rig the whole character without fingers or bones to keep it “simpler” (yeah right – “Unreal Engine” and “simple” in the same sentence – as if).
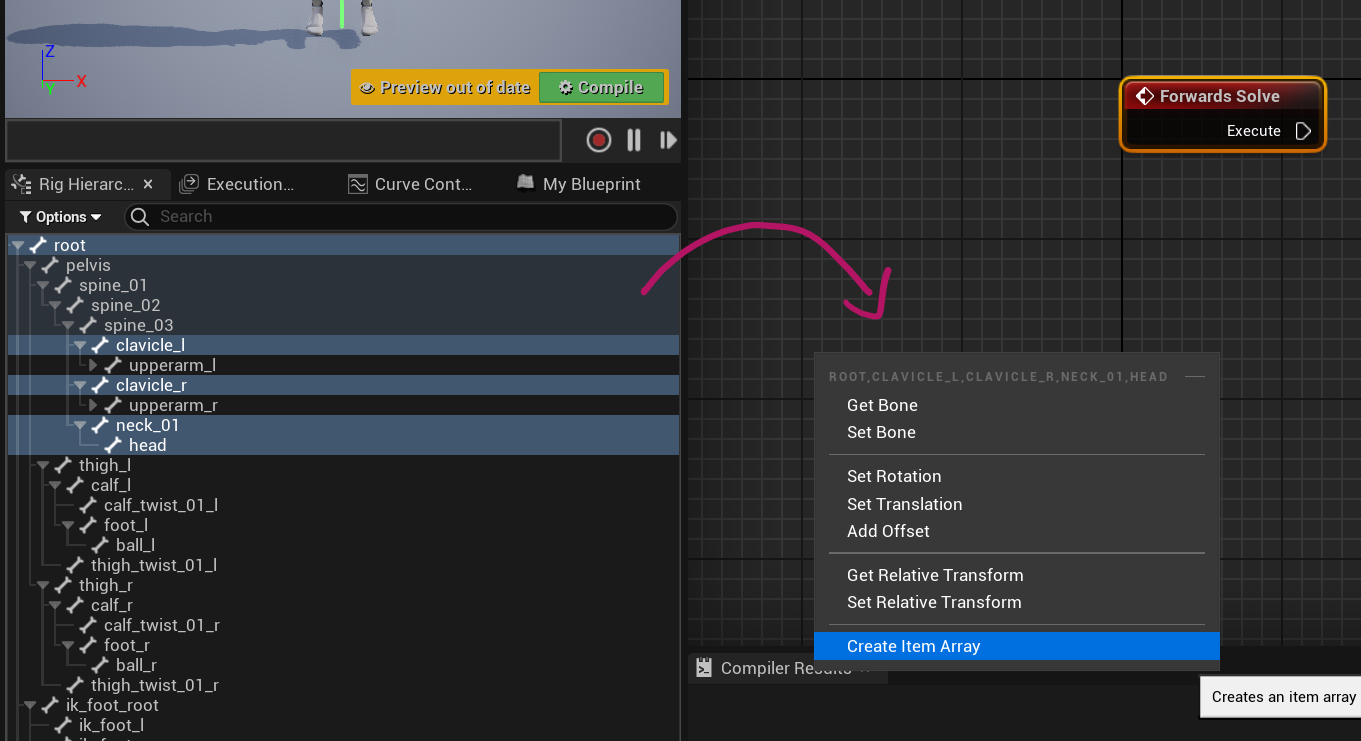
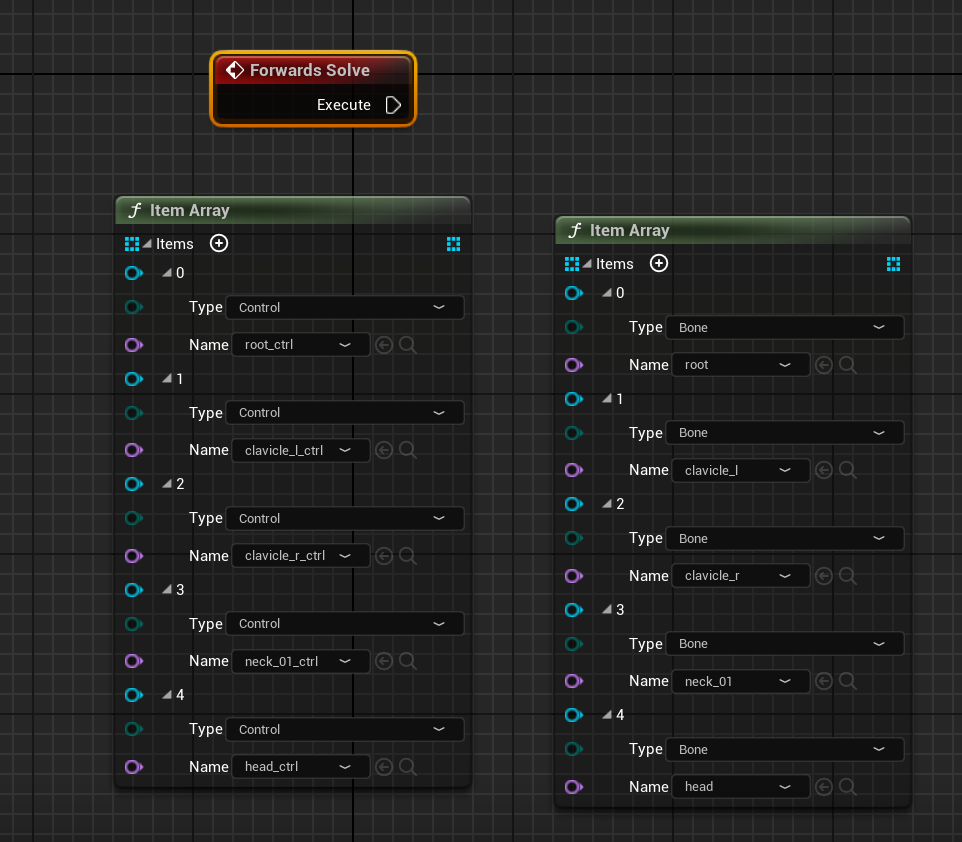
On the left hand side in the Rig Hierarchy, select the bones we want to control. In my example it’ll be everything except for twist bones, fingers and toes. You can also leave out the upper facial rig if you don’t need those (UE4 Manny doesn’t even have those, but Daz and RL characters do). With your selection, left-drag from the bones into the graph window and choose Create Item Array (not all bones shown in the screenshots).
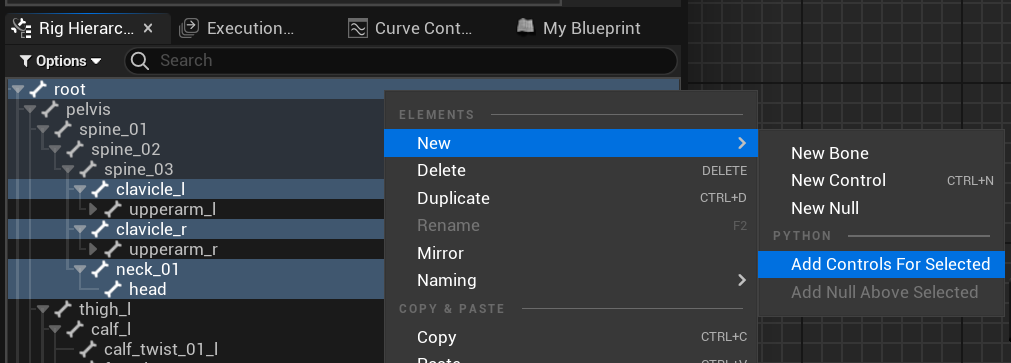
With the selection still in place, right-click on any selected bone and choose New – Add Controls for Selected. This will create our control nodes at the bottom of the Rig Hierarchy.
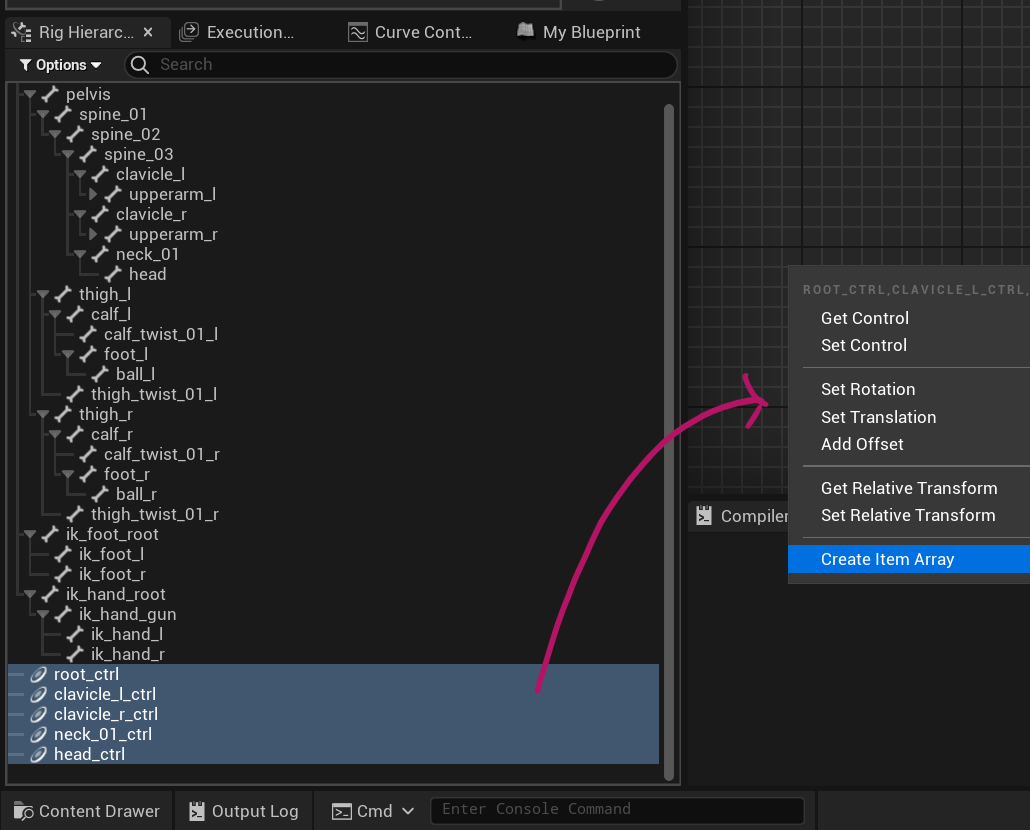
We need an array for those controls too, so select them and left-drag them into the node graph. Note that potentially collapsed controls need to be expanded to become part of the array. You’d imagine there’s a simple “expand all” option somewhere, but of course there isn’t, but we can use left arrow key to go through them slightly faster than doing it with the mouse.
This will leave us with two arrays and an execute node. Let’s hook them up.
Setting up Forwards Solve
Forwards Solve means that when we change a control node, its value needs to be set on the actual bone. It’s slightly weird to think about it, but technically we can never select the bones directly unless we’re in the Persona Animation mode, where the skeleton is exposed. When we deal with a character in the regular viewport, we can’t select bones. With the help of our control rig, we’ll be able to use selectable nodes that can drive the skeleton.
To do this, we need to loop through our controls array and our bones array, get the current control value and set it on the current bone. Here’s what this looks like (click to enlarge):

We use a For-Each loop from the controls array to iterate over every control element. We also use an At node from the bones array, using the index value from the loop to line up both values (hence it is important that the order of values in both arrays matches up, so that the control adjusts the correct bone – more on that later).
Next we use Get Transform from the control and use its value as input on the Set Transform on the bone. This means we look at what value is being set on the control (i.e. a user adjustment) and feed it into the corresponding bone (i.e. model adjustment).
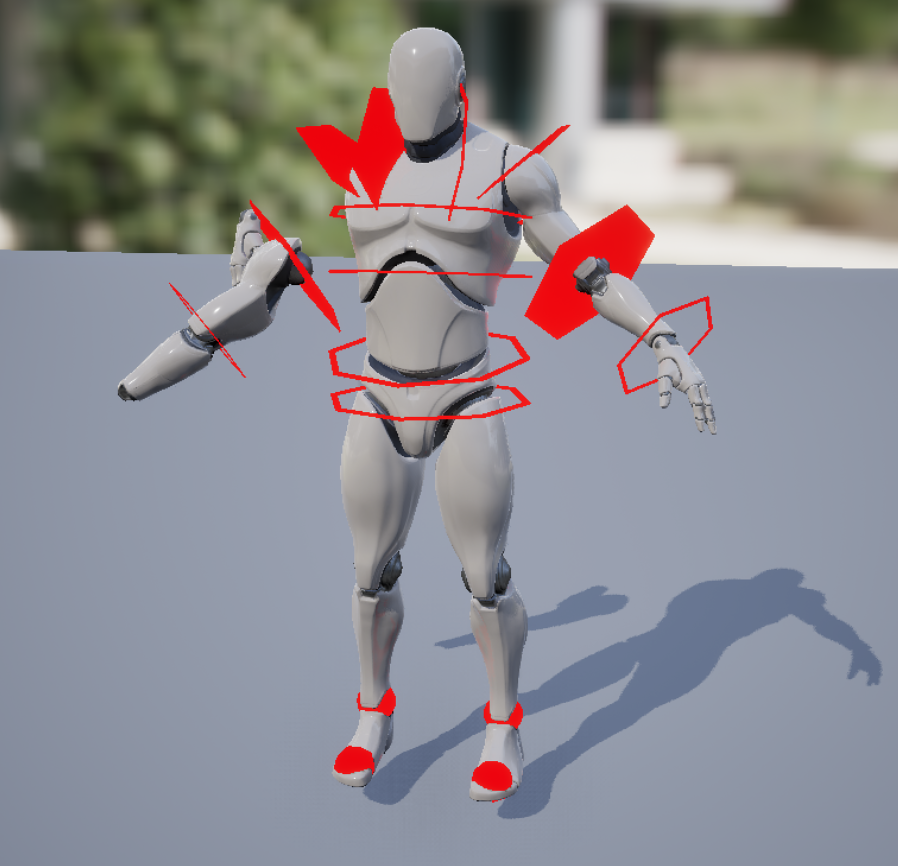
Note that if the items in both arrays do not match up, or the order is wrong, you’ll see odd issues with your characters and objects. Here’s an example of Manny’s arm being detached from the body, and his hand in the wrong place. If you encounter such trouble, take a look at both array elements side by side and see where the mismatch happens. It’s easily corrected, just takes a little patience.
Setting up Backwards Solve
While the above will let us make bone adjustments, it will not let us reverse-engineer existing animations. UE needs a Backwards Solve to translate an animation into Control Rig information so we can adjust it. It’s basically a copy of the Forwards Solve, with the two arrays swapped around like this:
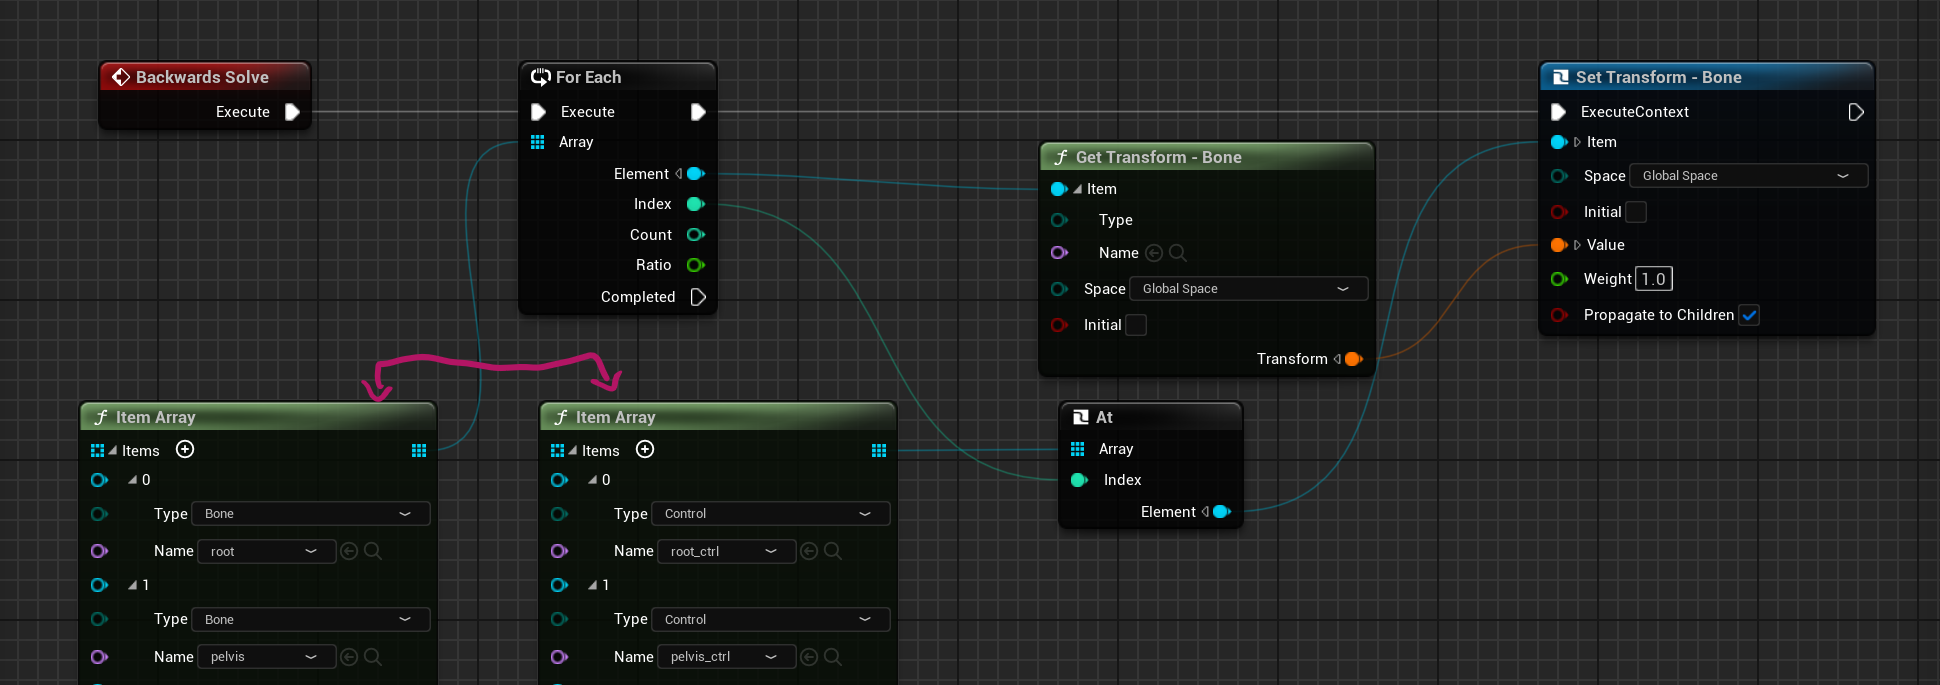
Here I’ve copied the Forwards Solve nodes and plugged them into a Backwards Solve node. The loops and get/set transform nodes are the same, but this time we look at the bone rotation and give that value over to the Control Rig.
Adjusting Control Shapes (optional)
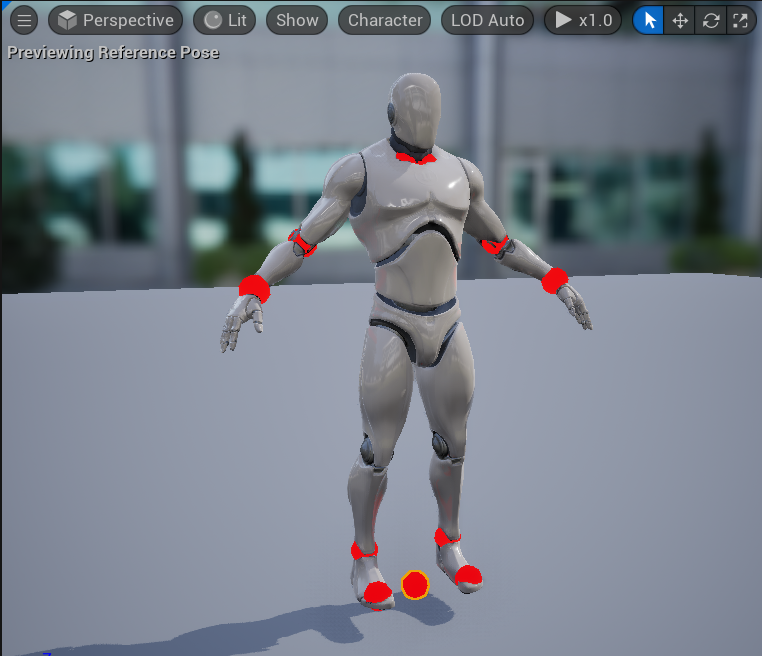
If we look at our completed Control Rig now, we’ll see something like this. Manny shows some red spheres in some joints but not in others. That’s because the red sphere is the default shape for our visible controls, and several of which are buried inside his body so we can’t see them. To be able to select them easily in the viewport later, we can change the unreachable nodes manually, like for the spine and clavicle nodes. We can even change the colour to make it look super pretty or more intuitive.
To do that, select a control point in the Rig Hierarchy, then expand the Details panel and take a look at the Shape section. Change the shape from the default value to something like a thick hexagon or circle. To make it bigger, scale it up to 4 or 5 uniformly. You may also need to adjust the rotation of the shape to better represent what this control does.
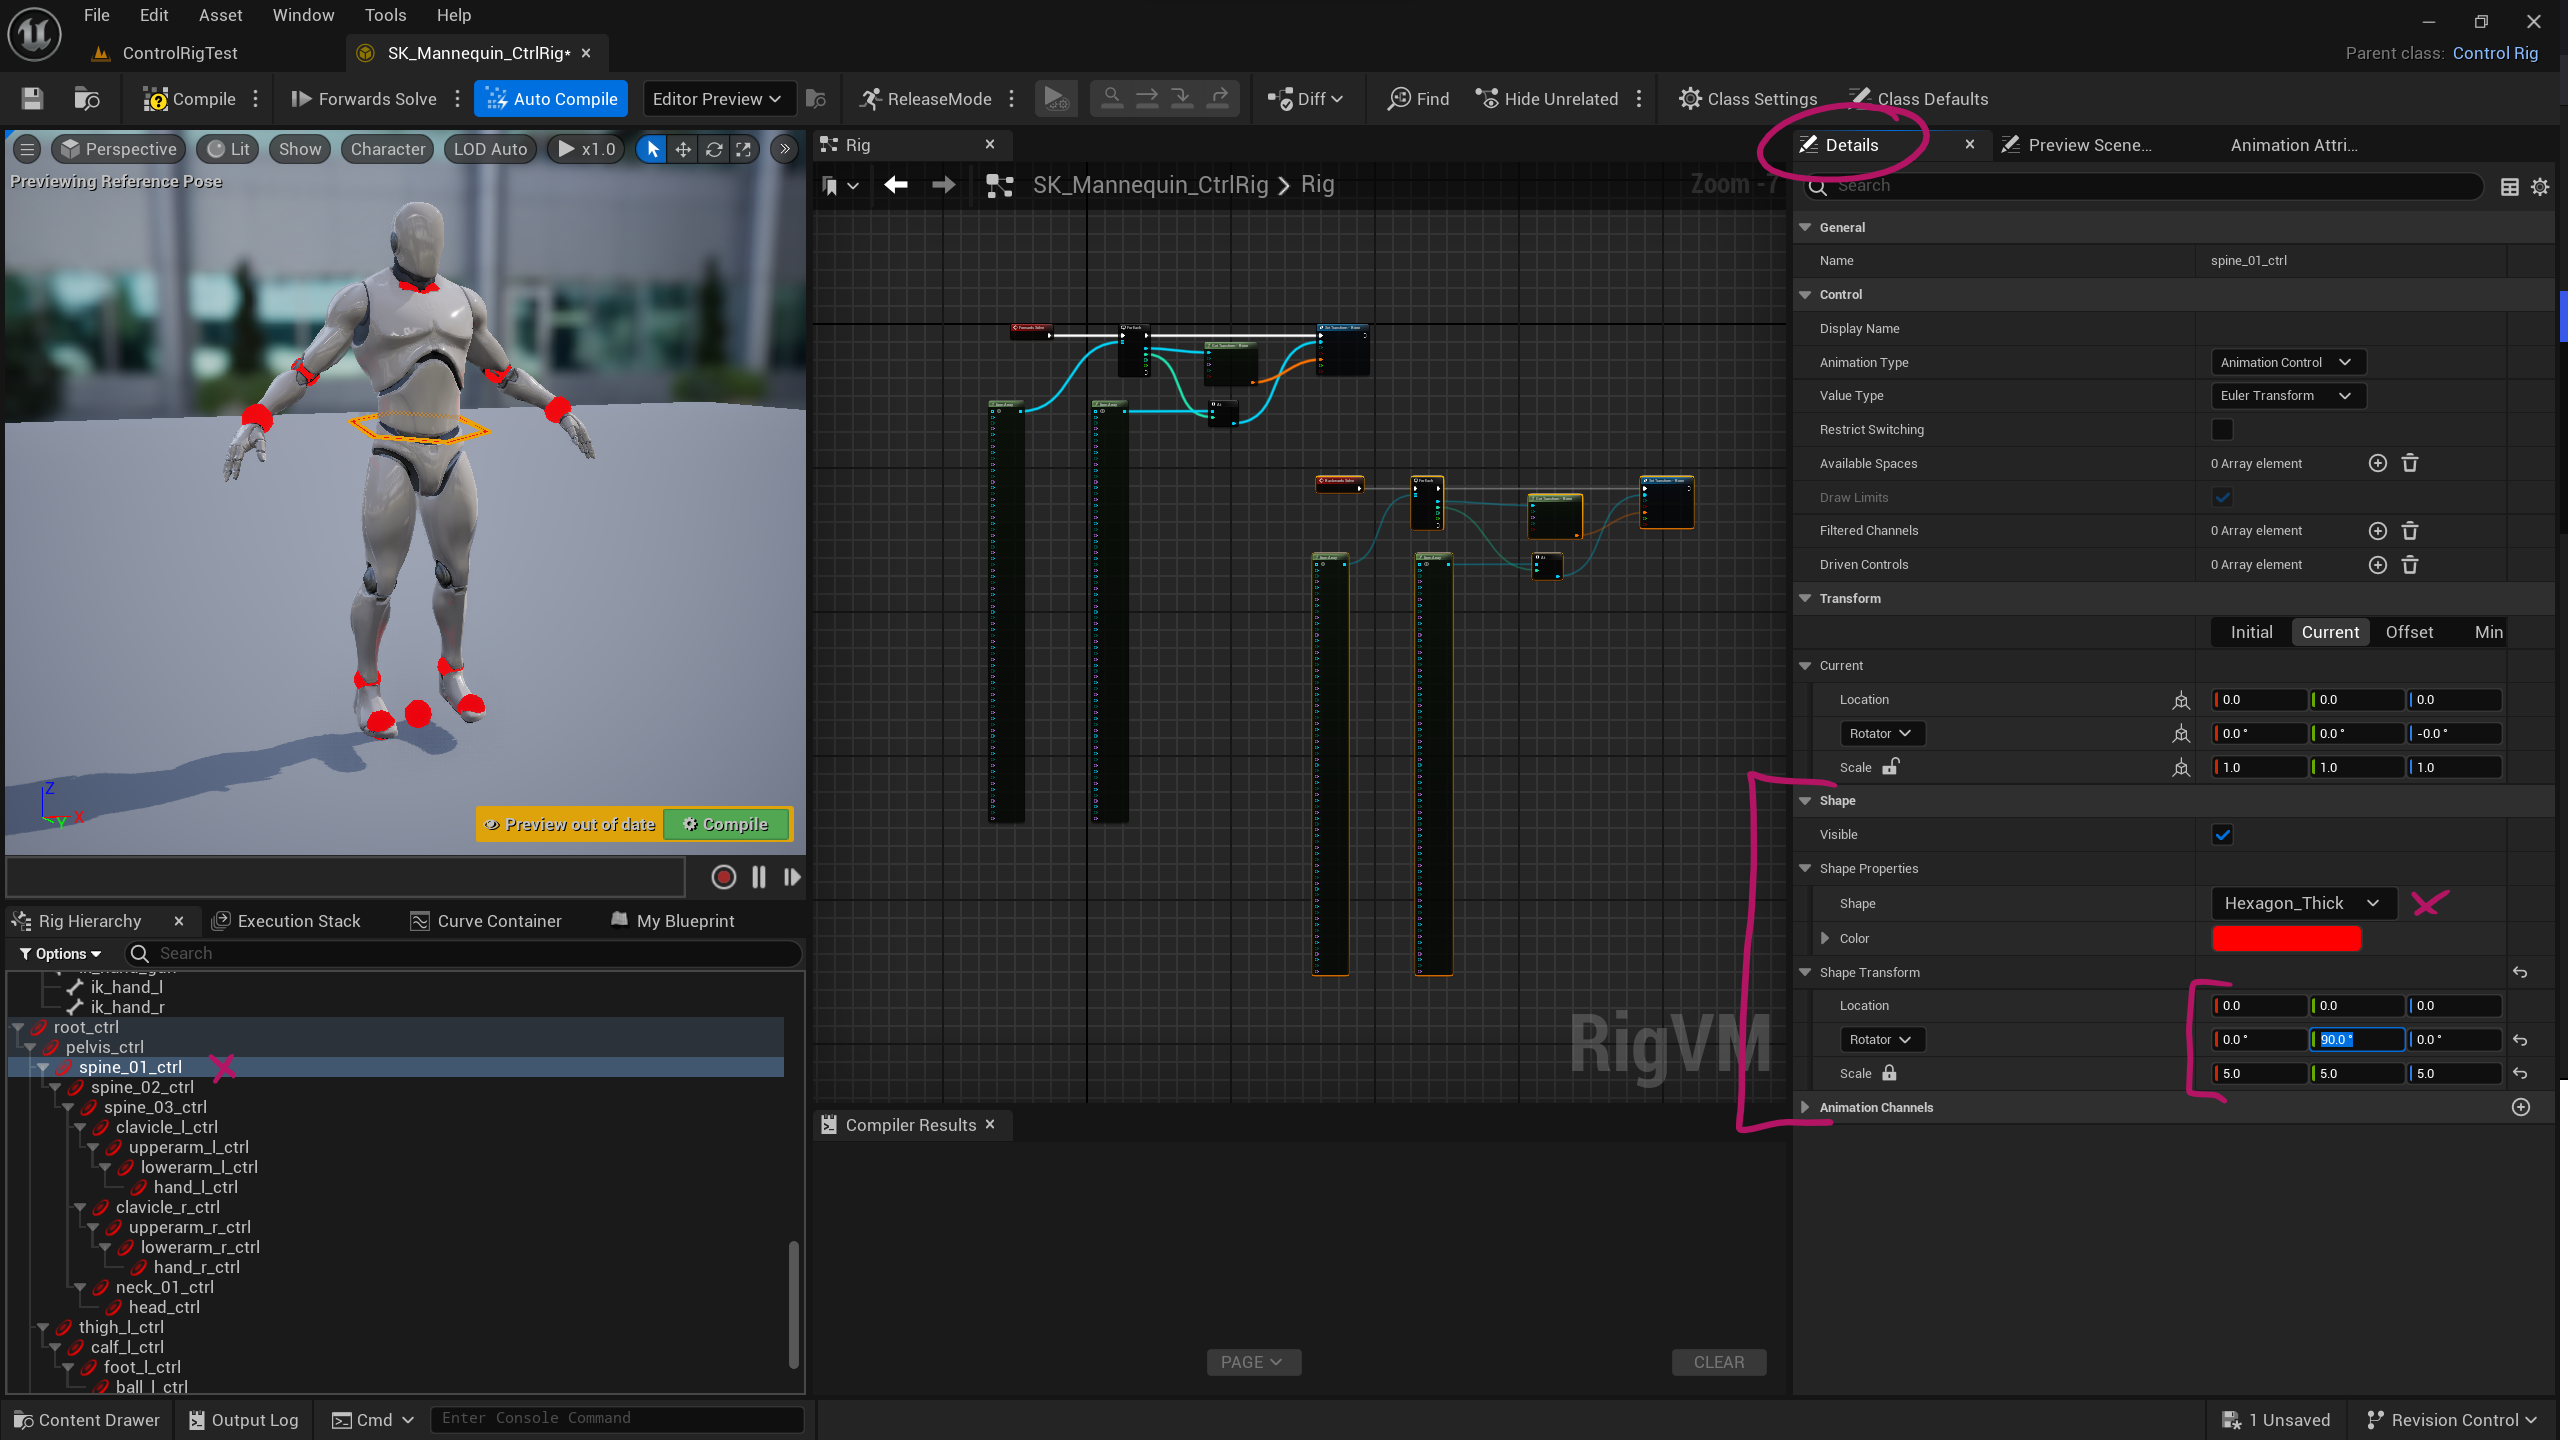
Note that this is an optional step. You can still select any control you want to override on the sequencer manually, you just won’t be able to do it as elegantly as you can with the posh UE5 Mannequin control rig. I highly recommend checking out how they’ve set it up and get some inspiration for your own rigs.
Conclusion
That’s it for the setup, now it’s time to use our new Control Rig on the sequencer – but we’ll leave that for my next article. This setup can be expanded with finger controllers, Inverse Kinematic controllers and all kinds of other jazz.
I wish this was a little easier to setup, or perhaps made fully automatic. Expecting artistic users or animators to go through this and more isn’t fair, and I think EPIC realised this. One step into am easier UE future is EPIC’s new Modular Control Rig feature in UE 5.4. This will let us drag say a whole arm onto the figure and create the rig in place from modular pieces. Having said that, I’ve tried it out and crashed the preview release on both occasions, so it’s not fit for prime just time. It also doesn’t explain how these rigs actually work do under the hood, which I hope I could shed some light on in this article.
Happy rigging!
Thank you for this tutorial, it was just what I needed. I do have one question though, Do I use the Control rig instead of my skeletal mesh.
If i drop my skeletal mesh into the sequencer I don’t see my newly created control rig, I have to drop in the Control rig itself, is there a way to associate the control rig with a skeletal mesh?
You use the Control Rig in addition to your mesh: add the skeletal mesh to sequencer, then add a control rig track on the mesh and pick your custom control rig (or an FK Control Rig) from the list. Now you can animate the controls and your skeletal mesh will follow. On some figures, like the EPIC UE5 skeleton, the control rig automatically loads when you drag the mesh into your sequencer (I don’t really know how to set that up, but I’m sure it’s just a default association somewhere). Hope this helps!