If you want to properly convert Genesis 8 and some Genesis 3 clothing over to Genesis 9 without using auto-fit, there’s a handy Developer Tools menu we can use. To convert into a native G9 item, the clothing needs to be stripped of its existing rigging, then re-rigged with Transfer Utility. Here’s how the Developer Tools can help us do this.
First, load the Genesis 9 Dev Load into your scene, as well as the clothing item you’d like to convert. Make sure to un-parent and un-fit the item, and make sure to cancel the auto-fit dialogue should it come up. I’m using some tights here, and this is what my scene looks like. Not a great fit, so let’s change this.

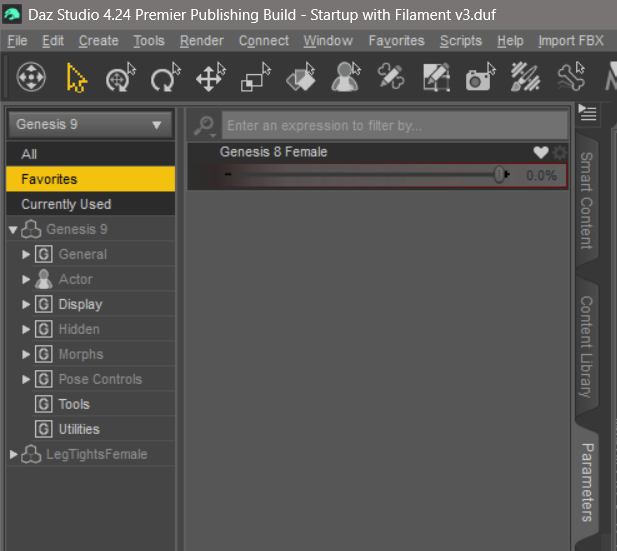
Open the Parameters Tab, select the Genesis 9 figure and find the Developer Tools in the Utilities section. We’ll use the marked entries to make the conversion.

Set G9 to Shape
Select this option to turn the base shape of G9 into something else. Our choices are
- G8 Male
- G8 Female
- G9 Male
- G9 Female
- G9 Anime Male
- G9 Anime Female
My tights are made for Genesis 8 Female, so I’ll use that option. This will dial up the G8F Clone Shape so that my clothing appears to fit, so all we need to do now is to rig it. Thankfully there’s a tool for that called…
Create Follower
Before we can use it though, select your clothing item and strip it of any existing rigging. This is important because it currently contains the G8 rigging, which is not compatible with Genesis 9. Head over to Edit – Rigging – Convert Figure to Prop and see your clothing converted into a prop. Notice the icon change in the Scene Tab.

Now our clothing is ready to be rigged. We can do this with Transfer Utility, but our developer tools make this literally a single-click option that will do the same thing. Select Create Follower now and your item should be rigged for Genesis 9 and parented to the figure.
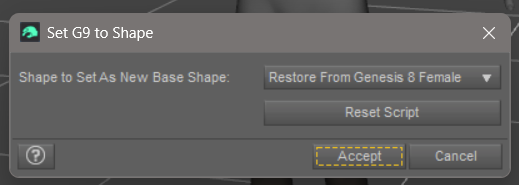
It’s still in its Genesis 8 Female shape though, so we need to reverse this to see if our item works on the G9 base shape. To do this, select the G9 figure and head over to the Parameters Tab. Enable “show hidden files” in the context menu, then navigate to the Favorites section, where we have a temporarily favorited item in the form of a dial that is responsible for the G8 clone shape.
Dial it out to -100% to reveal the Genesis 9 shape, still with your clothing item fitting. It may not fit perfectly, so at this point you can add a smoothing modifier, increase the iterations and bake all these changes in to make it fit better. Mine looks OK so I’ll move on to updating its base shape for this G9 shape now.

Update Follower Base Shape
Technically our clothing item now auto-follows the G9 shape, but it still thinks that the G8F shape is it’s base. We need to changes this by selecting our clothing item, then on the developer tools, click the Update Follower Base Shape button.
Your item will look terrible for a moment, but don’t worry about that. Select the Genesis figure and reverse its base shape back to G9. This can be done with the Set G9 to Shape button again, which now brings up a slightly different option. Hit accept to reverse the script and you’re golden.
Saving your converted clothing
Congratulations, you’ve just made yourself a native G9 version of your clothing item! You can fit it to any G9 figure without auto-fit ruining your day, and all the old material presets will still work (except for hierarchical presets, which expect the G8 rigging we’ve removed, so you’ll have to convert those if necessary).
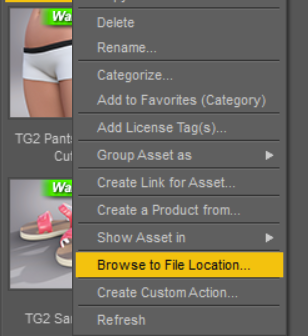
There’s only one step left, and that is to save our clothing to the library. Makes sense to do this next to the original item perhaps (a right-click on your original item will give you the option to “browse to file location”, which will open an Explorer window from where you can copy the path.
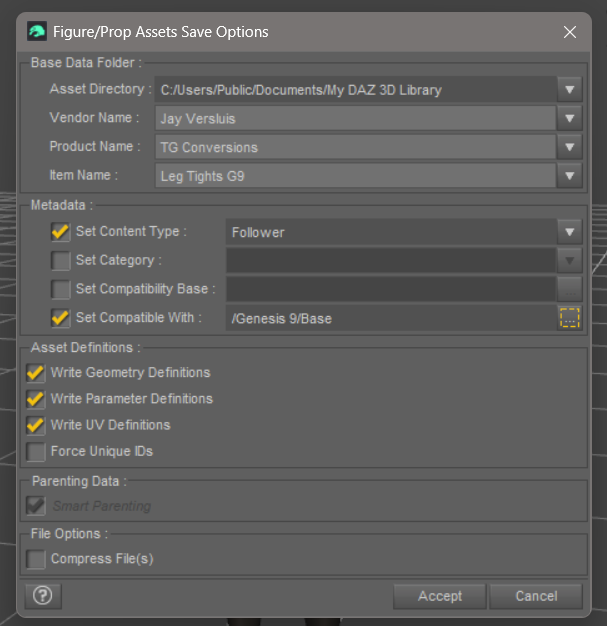
With your clothing selected, head over to File – Save As – Support Asset – Figure/Prop Asset. Paste in the path from the original item or pick a location of your choice, give it a name and hit save. A somewhat scary window pops up that lets us help Daz Studio understand what figure or existing item this will be compatible with. These are the defaults, with updates to the product name. Amend as you see fit. Hit accept and your item will be stored.
Now you can apply it to any new Genesis 9 figure.
Hope this helps, and have fun with Daz Studio!
Is the result any better than AutoFit followed by updating the Scene ID and saving. (I am also realling updating base geometry manually in my deliberate process and that could be answering my own question.)
Yes, this will generally yield better results, plus you have an option to override what the item looks before it gets re-rigged for G9. A quick example is making smoothing modifier with increased settings. You could also use Mesh Grabber even take the object out into a 3D modeller, and so forth. It’s also a great starting point for clothing creators who don’t want to make the same item twice but sell for both figures.