 I’ve bought another classic retro title from GOG.com the other day: Indiana Jones and the Emperor’s Tomb (from 2003 I believe). I greatly enjoyed this game on the original Xbox and I had no idea that it had even been released for other platforms.
Turns out the game does support a (more or less) mappable Gamepad profile, but it was written many years before the Xbox 360 Controller for Windows was even invented, and as such not all buttons can be mapped.
Which means the gaming experience sucks – especially for a game with so many commands.
Luckily I found a very helpful forum post discussing these very issues, and of course someone cleverer than you and me has figured our how to get the Xbox controller to (mostly) work in this game. I did have some success following that post, but to make this thing work 100%, there are a couple of things we need to do.
I thought I’d share them in this article, in case you too would like to help Indy fight against the evil Nazis.
Mapping the Controller
With both the Xbox 360 (wireless) controller and the game from GOG.com installed on your system, head over to the main game’s folder and navigate to C:/GOG Games/Indiana Jones and the Emperor’s Tomb/GameData/indy/. Here we’ll find a file called binds.cfg which is responsible for binding keyboard and gamepad commands just the way we like them.
The file has several lines of what looks like code, the top portion (lines beginning with setbind 0) are for the keyboard, whereas the bottom portion (lines beginning with setbind 1) are for the gamepad.
Delete the whole bottom portion, i.e. all lines beginning with setbind 1, and replace them with this:
setbind 1 COMMAND_FORWARD CONTROLLER 0 AXIS_Y 0.0 1.0 1.0
setbind 1 COMMAND_BACKWARD CONTROLLER 0 AXIS_Y -1.0 0.0 1.0
setbind 1 COMMAND_LEFT CONTROLLER 0 AXIS_X -1.0 0.0 1.0
setbind 1 COMMAND_RIGHT CONTROLLER 0 AXIS_X 0.0 1.0 1.0
setbind 1 COMMAND_PUNCH CONTROLLER 0 BUTTON_0 -1.0 1.0 1.0
setbind 1 COMMAND_KICK CONTROLLER 0 BUTTON_2 -1.0 1.0 1.0
setbind 1 COMMAND_JUMP CONTROLLER 0 BUTTON_1 -1.0 1.0 1.0
setbind 1 COMMAND_BLOCK KEYBOARD 0 KEY_M 0.0 1.0 1.0
setbind 1 COMMAND_USE CONTROLLER 0 BUTTON_3 -1.0 1.0 1.0
setbind 1 COMMAND_RELOAD CONTROLLER 0 BUTTON_5 -1.0 1.0 1.0
setbind 1 COMMAND_INVENTORY KEYBOARD 0 KEY_UP 0.0 1.0 1.0
setbind 1 COMMAND_INVENTORY_PREV KEYBOARD 0 KEY_LEFT -1.0 1.0 1.0
setbind 1 COMMAND_INVENTORY_NEXT KEYBOARD 0 KEY_RIGHT -1.0 1.0 1.0
setbind 1 COMMAND_INVENTORY_EXIT KEYBOARD 0 KEY_DOWN -1.0 1.0 1.0
setbind 1 COMMAND_CAMERA CONTROLLER 0 BUTTON_4 -1.0 1.0 1.0
setbind 1 COMMAND_CAMERA_X CONTROLLER 0 AXIS_RX -1.0 1.0 10.0
setbind 1 COMMAND_CAMERA_Y CONTROLLER 0 AXIS_RY -1.0 1.0 10.0
setbind 1 COMMAND_GAME_START CONTROLLER 0 BUTTON_7 -1.0 1.0 1.0
addbind 1 COMMAND_GAME_START KEYBOARD 0 KEY_ESCAPE -1.0 1.0 1.0
setbind 1 COMMAND_EXT_1 KEYBOARD 0 KEY_LBRACKET -1.0 1.0 1.0
setbind 1 COMMAND_EXT_2 KEYBOARD 0 KEY_RBRACKET -1.0 1.0 1.0
setbind 1 COMMAND_PEEK_LEFT CONTROLLER 0 BUTTON_4 -1.0 1.0 1.0
setbind 1 COMMAND_PEEK_RIGHT CONTROLLER 0 BUTTON_5 -1.0 1.0 1.0
setbind 1 COMMAND_ROLL KEYBOARD 0 KEY_Q 0.0 1.0 1.0
setbind 1 COMMAND_UI_LEFT CONTROLLER 0 AXIS_X -1.0 -0.9 1.0
addbind 1 COMMAND_UI_LEFT KEYBOARD 0 KEY_LEFT -1.0 1.0 1.0
setbind 1 COMMAND_UI_RIGHT CONTROLLER 0 AXIS_X 0.9 1.0 1.0
addbind 1 COMMAND_UI_RIGHT KEYBOARD 0 KEY_RIGHT -1.0 1.0 1.0
setbind 1 COMMAND_UI_UP CONTROLLER 0 AXIS_Y 0.9 1.0 1.0
addbind 1 COMMAND_UI_UP KEYBOARD 0 KEY_UP -1.0 1.0 1.0
setbind 1 COMMAND_UI_DOWN CONTROLLER 0 AXIS_Y -1.0 -0.9 1.0
addbind 1 COMMAND_UI_DOWN KEYBOARD 0 KEY_DOWN -1.0 1.0 1.0
setbind 1 COMMAND_UI_SELECT CONTROLLER 0 BUTTON_0 -1.0 1.0 1.0
addbind 1 COMMAND_UI_SELECT KEYBOARD 0 KEY_RETURN -1.0 1.0 1.0
addbind 1 COMMAND_UI_SELECT KEYBOARD 0 KEY_NUMPADENTER -1.0 1.0 1.0
setbind 1 COMMAND_UI_DELETE KEYBOARD 0 KEY_DELETE -1.0 1.0 1.0
setbind 1 COMMAND_UI_START CONTROLLER 0 BUTTON_7 -1.0 1.0 1.0
addbind 1 COMMAND_UI_START KEYBOARD 0 KEY_RETURN -1.0 1.0 1.0
addbind 1 COMMAND_UI_START KEYBOARD 0 KEY_NUMPADENTER -1.0 1.0 1.0
setbind 1 COMMAND_UI_BACK CONTROLLER 0 BUTTON_1 -1.0 1.0 1.0
addbind 1 COMMAND_UI_BACK KEYBOARD 0 KEY_ESCAPE -1.0 1.0 1.0
setbind 1 COMMAND_TURNLEFT CONTROLLER 0 AXIS_RX -1.0 0.0 1.0
addbind 1 COMMAND_TURNLEFT KEYBOARD 0 KEY_LEFT -1.0 1.0 1.0
setbind 1 COMMAND_TURNRIGHT CONTROLLER 0 AXIS_RX 0.0 1.0 1.0
addbind 1 COMMAND_TURNRIGHT KEYBOARD 0 KEY_RIGHT -1.0 1.0 1.0
setbind 1 COMMAND_CLIMB_DOWN CONTROLLER 0 AXIS_RY -1.0 0.0 1.0
addbind 1 COMMAND_CLIMB_DOWN KEYBOARD 0 KEY_DOWN -1.0 1.0 1.0
setbind 1 COMMAND_CLIMB_UP KEYBOARD 0 KEY_UP -1.0 1.0 1.0
setbind 1 COMMAND_TOGGLEHELD CONTROLLER 0 BUTTON_9 -1.0 1.0 1.0
setbind 1 COMMAND_TOGGLEHELD CONTROLLER 0 BUTTON_6 -1.0 1.0 1.0
setbind 1 COMMAND_SKIP_CUTSCENE CONTROLLER 0 BUTTON_8 -1.0 1.0 1.0
addbind 1 COMMAND_SKIP_CUTSCENE CONTROLLER 0 BUTTON_0 -1.0 1.0 1.0
addbind 1 COMMAND_SKIP_CUTSCENE KEYBOARD 0 KEY_ESCAPE -1.0 1.0 1.0
setbind 1 COMMAND_TOGGLERUN KEYBOARD 0 KEY_LMENU 0.0 1.0 1.0
It looks scary, and I didn’t come up with this – it was someone by the name of SumoX who has kindly shared this on the GOG forums. Save the file and we’re done hacking the game for now.
Mapping Triggers and D-Pad
Sadly the above technique won’t let us map the trigger buttons or the D-Pad on our Xbox controller. This means that while we can play the game already, we won’t be able to make Indy do a roll or select items from his inventory yet. As hard as I tried, there is just no way to map those buttons from within the game.
So we need an additional tool that has helped me on many occasions. It’s something that lets us map any gamepad button to any keyboard or mouse input, regardless if a game supports it or not. Several such tools exist, but I’m using the excellent Xpadder from Xpadder.com (costs $9.99 – well worth the expense).
Don’t get discouraged by the website, which seemingly does not seem to feature much content. You have to provide your email address there, then you’re sent an automated email immediately with full access details. Trust me, it’s not a scam…
Once Xpadder is installed in your system, we need to create a profile for our controller. All we need to map here are the two trigger buttons and the D-Pad. Once those are enabled, map the following keyboard commands to them:
- Q to the left trigger (for roll jumps)
- M to the right trigger (for blocking punches… I think)
- cursor keys to the D-Pad (up, down, left, right)
Here’s what it looks like when you’re finished (very simple):
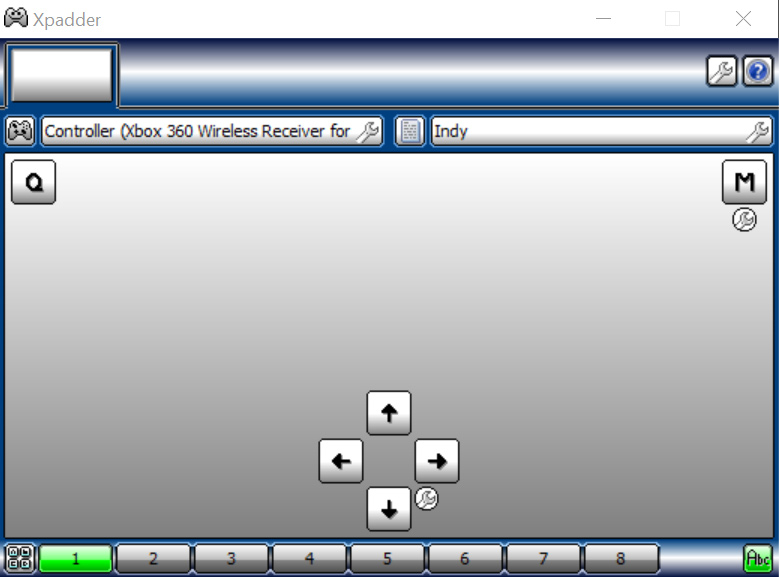
If you press any of the mapped buttons, they’ll turn green in the above display. Looks like it’s all working… or is it?
Running the game
When we run the game, with Xpadder running the background, it appears that our carefully mapped trigger and D-Pad buttons are ignored. Which sucks.
The reason for that is that Xpadder needs to be run as Administrator to work with this game. To do that, close Xpadder, then find the file (depends on where you’ve copied it during the installation), right-click it and choose Properties.
In here you’ll find a section called Compatibility, at the very bottom of which is an option to Run as Administrator. Tick the box, and now Xpadder will always be run as Admin when you start it.
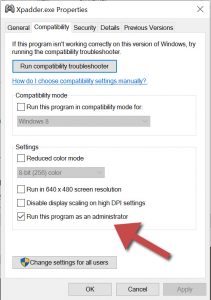
Restart Xpadder, restart the Game, and hey presto – now we can control Indy just like we could on the original Xbox!
Xbox Mapped Controls
Here’s a list of controls for the Xbox 360 controller and what each button does in the game when mapped as shown above. Commands will behave differently depending on Indy’s situation:
- Left Stick: move Indy
- Right Stick: move the camera
- A: punch left / fire weapon
- B: jump / swing
- X: punch right / break something
- Y: action (i.e. pick something up, move a lever, etc)
- Top Left Trigger: center camera behind Indy
- Bottom Left Trigger: roll (push forward plus trigger)
- Top Right Trigger: reload weapon
- Bottom Right Trigger: block punches / enable Pacheng shield (when equipped)
- D-Pad Up: open inventory / climb up ropes and chains
- D-Pad Left/Right: cycle through inventory items (D-Pad Up selects)
- D-Pad Down: close inventory / climb down ropes and chains
- Start Button: show menu
- Back Button: quick select previously equipped item
Quick Selecting necessary items
From time to time you’ll see an icon at the top right, for example when Indy can use his whip to swing. You can either pick the item from the inventory using the D-Pad, or when such an icon is showing, press Y and Indy will equip the necessary item automatically.
How to whip across obstacles
When you see something that can be used with the whip, face Indy the correct way and with the whip equipped, hold down A. Tapping A will simply lash the whip, but it won’t let Indy use the whip to jump across an obstacle.
Sometimes the “hook” used to whip across something may be too far away to latch onto. In such a case, run towards the hook, jump, then hold A to latch on and whip crack away.
How to wall-hug
Wall-hugging lets Indy stay flat against a wall and walk sideways down small ledges. TO enter wall-hugging mode, walk towards a wall and press Y. Press Y again to exit wall hugging mode.
How to have a proper brawl
Ammo is scarce in this game, and many a time Indy will have to beat up his enemies to stay alive. Use A and X alternately to do this. It’s like punching them with Indy’s left and right hands.
Use A and X together and Indy will grab an enemy by their collar and throw them against a (hopefully nearby) wall. This will make them go down a lot faster.
Indy also has some surprise moved up his sleeve, but I’m not sure if the are triggered randomly or not. I sometimes hold either bottom trigger down while using the above combinations, resulting in such moves as holding an enemy with one arm around his neck while punching him with the other.
How to swim underwater
Indy can swim, and at times he finds large oxygen tanks that help him stay underwater for longer. But swimming itself can be tricky if you don’t know how.
It’s simple really: hold down B to move into the camera’s direction. No need to tap the button repeatedly, just keep holding it. Then move the camera using the right stick to where you’d like Indy to go.