When I delivered my previous audio book to ACX, I remember that one of their requirements was that the audio peak levels should come in at -3dB. I also remember that threw was a super easy way for me to do this in Premiere Pro, the software I use for editing my files. I wanted to do the same thing this week, but I couldn’t for the life of me remember how to dot it!
Consulting this website – as I do from time to time – I couldn’t find a note. Perhaps I didn’t write this vital part down the last time. Let me do it right away, now that I’ve found out how to do it (again).
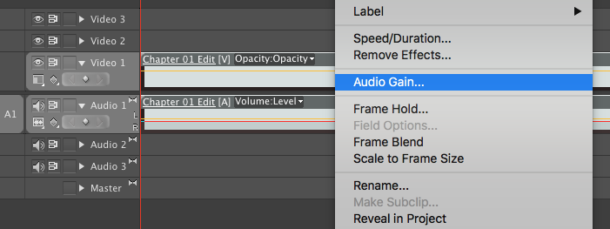
My first though was that it must be an audio effect we drag onto the timeline in question. But that’s not what I wanted to do. I was happy with the dynamics, I didn’t need to do any compressing or filtering. Instead, it’s as easy as right-clicking on a clip in the timeline and selecting Audio Gain. We can also press the G shortcut to bring up this menu.
This will open a modal dialogue with several options.
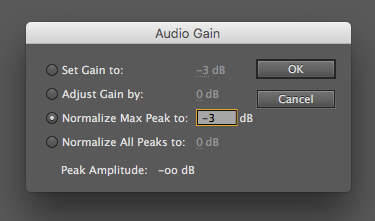
The one I needed was Normalize Max Peak to -3dB. This will look through the selected clip(s), find the highest peak, and adjust it to the value of your choice. The All Peaks option below of it would do the same for every single clip on the timeline. While powerful during video editing, it may not be what we want in this case of editing an audio book. It would likely make quieter passages louder at edit points, leading to an uneven listening experience.
To use this technique with various clips, either select all clips before running this command, or create a new sequence from your sequence and run the command on that.
Larry Jordan has written an article that explains more in-depth what this dialogue does. Thank for sharing, Larry!