When you’ve been working with Premiere Pro for a while, importing large amounts of data and creating countless projects, there comes the time when you might want to clean up your Media Cache Database. It’s an exotic combination of various files that Premiere creates to make playback and scrolling during editing as fast as possible.
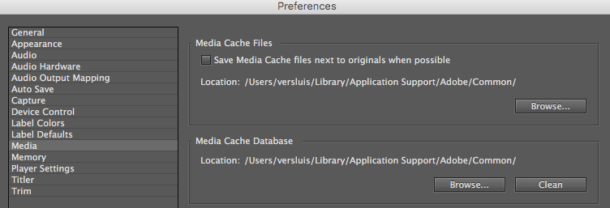
To access this option, head over to Preferences – Media and hit the big Clean button.
While this will clear out the number of entires in Premiere’s database, it may leave some generated files on the hard drive, or worse, it may lead to some of the temp files no longer accessible. As a result, your project appears to play back without audio or video in the timeline.
I had this recently on a larger (and important) project of mine, and I was wondering how to make Premiere rebuild those files from scratch, if they can’t be found anymore. Turns out the solution is relatively simple: with Premiere closed down, we delete ALL files in two (or three) folders, and when Premiere re-launches it will rebuild everything that’s needed for your current project.
Here’s how to do it:
- close Premiere
- head over to the Media Cache Folder (path seen in the screenshot above)
- delete the Media Cache folder
- delete the Media Cache Files folder
- delete the Peak Files folder (if you have one)
- relaunch Premiere and load your project
At this point you may have to wait a moment or two depending on the size of your project. Watch the progress bar at the bottom right as it goes through every file that needs to be regenerated (or conformed).
Thanks to Screenlight TV for explaining this in more detail.