I’ve been playing with a new title sequence for shiny new gaming channel, and I thought it would be fun to have a movie file playing on a plane object that’s seen as a screen in a cinema. I knew this was possible in Blender, but I didn’t quite know how to achieve it. After some tinkering I found out. Let me share my findings with you.
It’s very simple actually: setup a material, including a Texture Node, but instead of an image file, we pick a movie file (or image sequence). That’s really all there’s to it. The difficult part is understanding the settings in the Texture File though.
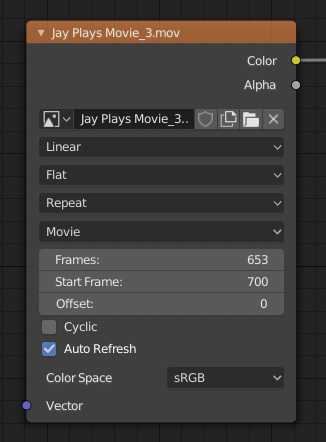
In the fourth drop-down, Movie was selected automatically when I added my movie file. This can be changed to Image or Image Sequence though, just in case yours is not set correctly. For the record, I’m using an MP4 file with H264 encoding, at 60 frames per second. The three following options are interesting (and important).
Frames Option
Frames needs to be set to the duration of our movie file. Blender does not figure this out automatically, and the default is just 1, which means your animation won’t be running. As I understand this value does not need to be exact, but it is an option for us to stop movie files earlier than their entire duration.
Say your movie has 1000 frames, and you want it to start at the beginning of your 1000 frame animation. However, you’d like the animation to stop and freeze the last frame after 500 frames. You can achieve this by giving Blender 500 as the Frames value.
Likewise, if your animation is 1000 frames, but your movie files is much longer than this, just give it 1000 frames and the movie will play until your animation is over. The value does not need to be exact, and you can add a larger value that necessary here. This comes in handy when you know the rough duration of your movie file, but not the exact frame count. Guesstimate and you’ll be fine.
Start Frame
Denotes on which frame of your animation Blender shall start running your movie. 0 is the default, which means Blender starts playing as soon as the animation begins. In my case, I didn’t need that, because my movie screen object doesn’t kick in until frame 700. Entering that value means my movie starts playing as soon as the animation reaches frame 700.
Offset
Offsets the above by however many frames into either direction. I’m not sure what this is for. I tend to cut the clip I want to use in a video editor, so I guess I’m content with the other two options.
Auto Refresh
Ticking this box will update the image in your 3D view depending on where your play head is. Unticking it will mean images on your objects won’t update. It’s easier on the viewport performance to disable it. I leave it on to see what my animation looks like in context.
I have found that I can’t bake the texture. I only get a freeze frame (the first frame of the movie). Have you had any experience with this?
I’ve had this before when I don’t specify values for the duration of the movie. Blender is very pernickety about this and needs to know the number of frames you want to show and when to start showing them. Something as simple as reloading can upset it. Check if it has forgotten the values on the node. Hope this helps.