When I import regular OBJ files into Blender, they come in with a basic diffuse shader applied, with the texture file in the right place. Sadly, that texture is often scaled incorrectly. While it is possible to edit the UVs to make it all look handsome, there is an easier way for us to scale textures, namely by adding a Mapping Node into the shader. Here’s how it worked for me.
In the Node Editor, add a Mapping Node (SHIFT+A, then find it under Vector). Leave it on the Point Tab and connect its output to the Vector Input of the Image Texture (the purple one).
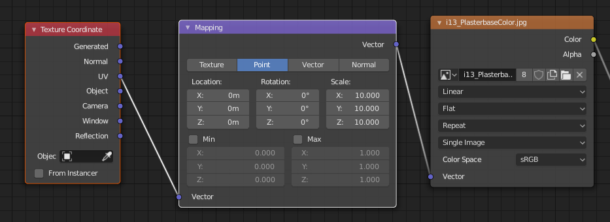
Notice that the effect is probably not what you’re looking for. You’ll also need to add a Texture Coordinate Node in front of that, connecting the UV output to the Vector Input of the Mapping Node. I guess otherwise, the Mapping Node doesn’t know what to scale – which makes sense. Once connected, you should see no difference – but no texture weirdness either (other than the wrong scale).
To make a texture smaller, increase all the Scale Values in the Mapping Node. To decrease the texture size, increase the Scale Values on the Mapping Node.
If this inverse law of doing things is freaking you out, switch the Mapping Node over from Point to Texture. Doing so will allow you to decrease the scale values and see a decrease in texture size (and vice versa), but you’ll be dealing with decimal point values. Whatever works for you.
That’s how to do it! Works great in Blender 2.8 and above. Happy fiddling!
Hello! I am a novice and I’ve got a problem with scaling. May be I just don’t understand the process. I have 2 surfaces – a square part of wall and a rectangular part of wall which is in fact a column – i.e. short width with long height. They belong to separate cubes. When I apply texture to square it looks just fine. All the same operations with the column result in compression of the texture in the horizontal direction. That is the quest for me. Why? Yes, I corrected that manually by modifying the X-scale in mapping, but could it be some way to set it automatically? Changing the width of the column leads to stretching of the texture and that’s not what I need when copying or modifying that element. Could you help please?
Hi Tony, it’s probably the UVs on the column that leads to the issue. UV unwrapping is a deep topic, are you familiar with it? Blender has all the tools you need, but they’re a little tricky to comprehend as a newcomer. Let me know if you know what UV unwrapping is and how it works, I’m happy to explain more about it and show you how to un-stretch your column.
This seems perfect for what I need to do! For some reason the texture coordinate box isn’t showing up as an option for me. I’m using 4.2.3. Any idea what I can do to get this feature?
It’s hiding in the Input category, or you can search for it (SHIFT+A, then click search, then type “texture coordinate” and it’ll pop up). Let me know if you can find it.