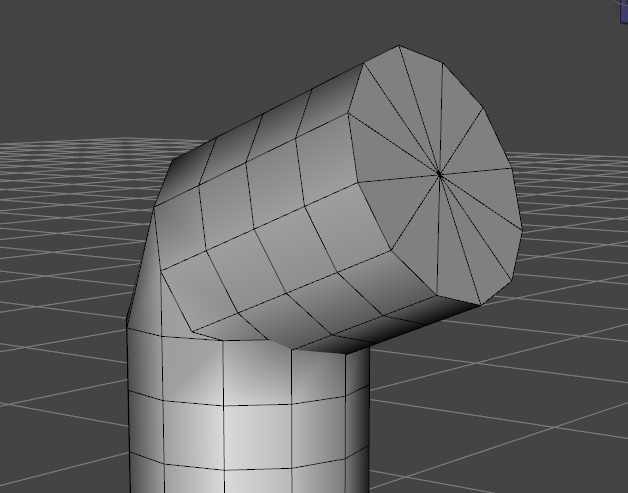
In my previous article I’ve explained how to rig a simple cylinder in DAZ Studio using the Figure Setup Tab. While my little cylinder bends, it does so with rather sharp deformations at the intersections to its other parts. The geometry seems to collapse, and in a real life scenario we may find that some bones may adjust parts of the figure we might not want. In this article we’ll take a look at how we can adjust the maps to make the bending a bit more handsome.
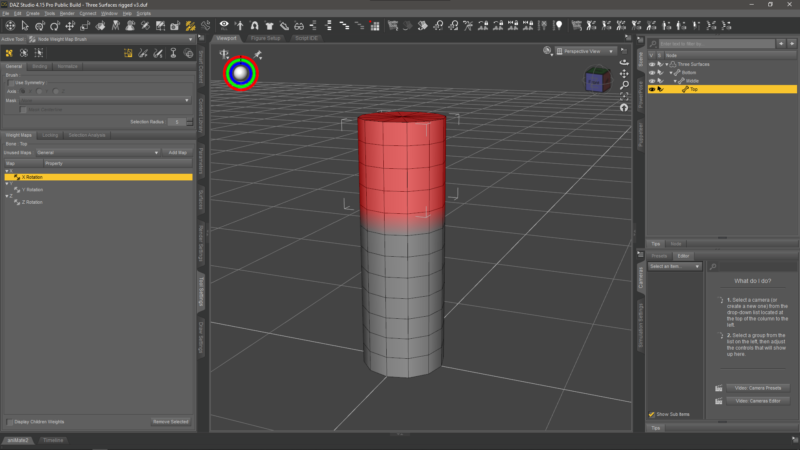
Let’s select our Node Weight Map Tool and take a look at the tools tab. I’ll pick the top part of my cylinder as an example, then choose the X rotation to see the map. Notice how the colour changes to red. This means my X rotation map has an influence of 100% over the vertex group it controls, meaning everything that’s red will move as much as possible.
The kink we saw in the above screenshot is caused by the map digging into the lower part of the polygon group as the top part is digging in to the bottom part. We can paint the map by hand, or even better in our case, smooth the zone of influence to become less towards the lower part. Think of it as a gradient that goes around the bottom zone.
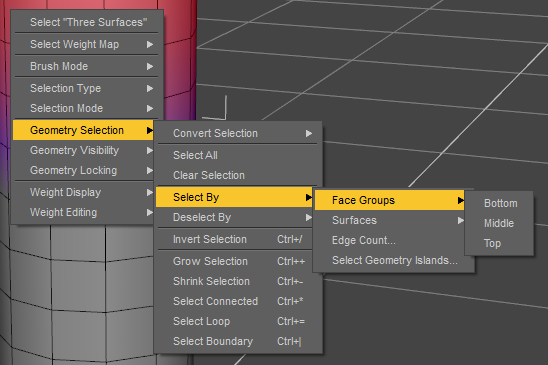
To do that, we need to make a selection first. Since we want to affect the whole face group, let’s right-click and try Geometry Selection – Select By – Face Groups and pick the top.
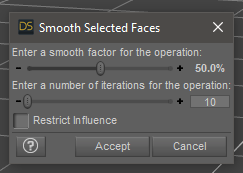
Now we’ll perform an action on the selection, namely smoothing out the map. Pick Weight Editing – Smooth Selected. You may need to increase these values, or run the operation multiple times to get the desired effect.
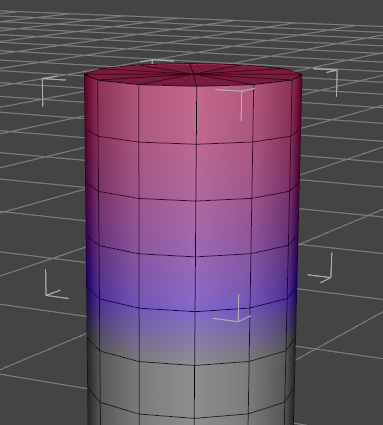
When I’m done, my cylinder looks like this. Blue indicates less of an influence, so the bottom (or rather, the end of my selection) is bent less strong than the top.
I’ll repeat the smoothing operation on the middle part, which has the same 100% fill on its X-rotation map. Select it, and it’s corresponding map, then apply the same we did with the top part. After smoothing out its X-rotation map, I can bend my cylinder much nicer than before.

If this didn’t work for you, make sure you’re rotating the correct axis: if I bend my guy around the Z-axis, I’ll still get the abrupt bending motion – that’s because I haven’t fixed the Z-rotation map, only the X-rotation map. For a real-life object I’ll have to fix both, or set rotational limits so that users can’t bend it in ways it wasn’t designed for. The bending (Y-rotation map) also has to be fixed if my object is to behave less strong and more natural if desired.
That’s it! Explore all the selection and editing tools, there are so many of them to make your content creation life easier. The hardest part for me was understanding what step to take and in which order, as well as the concept that each rotational axis has its own map, and that all these maps need to be fixed to get the desired results. If your head is smoking, and you can’t make head or tail of this whole rigging thing, trust me I hear you. Eventually it’ll fall into place, and I hope this guide comes in handy.