One of my supporters had a great tip on how to convert Genesis 3 clothing to Genesis 8. He’s made a German video about the process and asked if I could make an English version. It’s coming soon, in the meantime here are the written instructions. This works for converting both genders in both ways (G3 to G8, and G8 to G3). Here’s what we need to do:
- load your figure and clothing into the scene (do not fit your clothing)
- adjust the pose (A to T or vice versa)
- bake the joint rotations
- change the scene identification of the clothing
- transfer the rigging
Let’s see how to do this step by step.
Bring in your target figure, then load your clothing. Make sure that the figure is not selected when you do, otherwise the auto-fit dialogue will pop up. We want to avoid that. For my example I’ll use a Genesis 8 figure with a shirt that was made for Genesis 3. You’ll see that the pose is different.
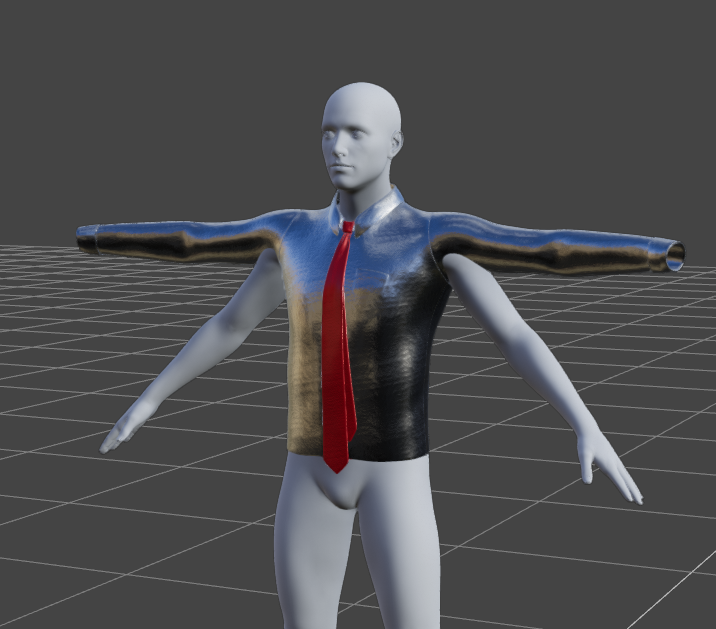
Adjust the left/right shoulder bends by 45 degrees, as well as the left/right thigh bends by 6 degrees. I’ve described the exact details in this article. If the clothing item doesn’t have one of them, don’t worry about it. My shirt for example doesn’t have bones for the legs, so there’s nothing to adjust.
You can use the Power Pose tool to select the bones, or switch over to the Joint Editor to make those adjustments. I recommend the latter as we’ll need to work with it a little more. When my shirt is in place it’ll look like this:
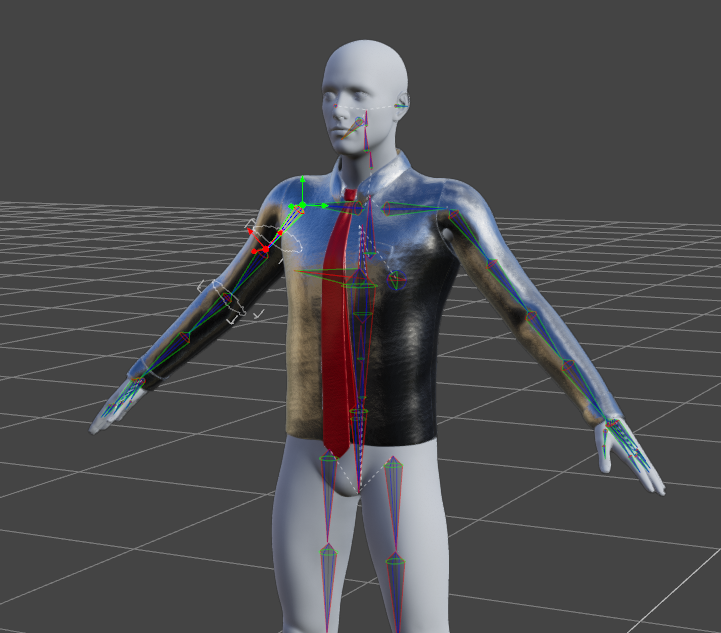
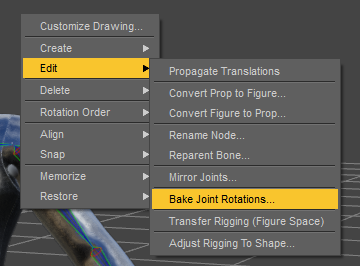
With the Joint Editor still selected, right-click anywhere in the viewport and choose Edit – Bake Joint Rotations. This will apply the values we’ve adjusted so that the joint sliders are now showing zero instead of a number.
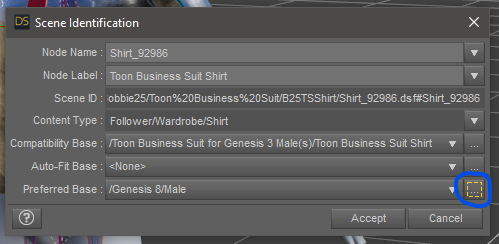
Next we’ll need to tell DAZ Studio that this is now a proper Genesis 8 item so that subsequent fittings won’t trigger the auto-fit process. DAZ Studio keeps track of what item belongs to what figure with something called the Scene Identification. We can change this value manually in the context menu (hamburger icon) on the Scene Tab.

Under Preferred Base, click the three little dots icon and change it to match your figure. You’ll have to select the generation and gender.
We’re nearly done, there’s only one step left. If we try to fit our clothing right now, you’ll notice that it changes position. That’s because the rigging of our clothing isn’t exactly aligned to the figure yet, so let’s do that next.
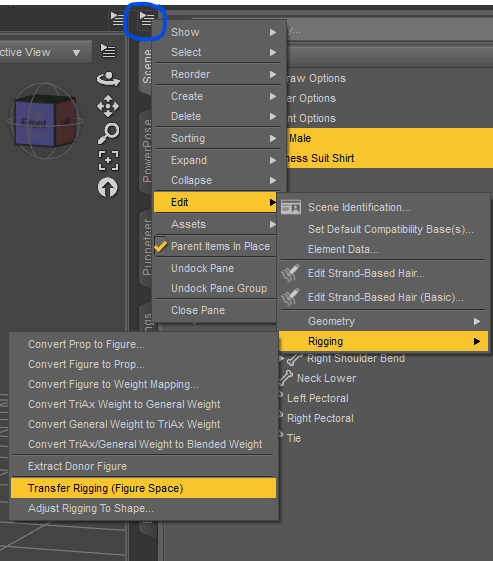
In the Scene Tab, first select your figure, then hold CTRL and also select your clothing item. The selection order is important here. On the Scene Tab context menu (hamburger icon), choose Edit – Rigging – Transfer Rigging (Figure Space).
And that’s it! When you try to fit your clothing to the figure now, the clothing will stay exactly in place, does not trigger auto-fit and behave as if it was a native clothing item.
Thanks to Hektixx for this tip! Watch his original German video here, and if you feel like it, drop him a buck or two on Patreon.