Importing Mixamo animations into Daz Studio has always been a passion of mine, but the process has never been simple. I’ve previously described how to use the Genesis 1 figure as a workaround, but the hand and finger movements were off and needed some further attention.
When Travis from Daz forwarded me a post by the 3Dstorbist, suggesting to use the Genesis 2 figure and a magic correction script, I tried my hand at it and thought the results looked great, so much so that I wanted to share the process with you in my own words. I found the original article a little confusing, but here are the steps in a nutshell:
- load Genesis 8 or 8.1
- load Genesis 2 (same gender)
- adjust Genesis 2 so that it matches the A-Pose
- bake joint rotations
- export as FBX, upload to Mixamo
- apply pose, download new FBX from Mixamo
- import into Daz Studio, save as Pose Preset with animation
- apply Pose Preset on Genesis 8 figure
- run 3Dstrobist’s magic script
Let’s go through this step by step. I also have a video coming soon that I’ll add to this article when it’s released. We need the Genesis 2 and 8 Starter Essentials installed, and a compatible version of Daz Studio. I’m using 4.20 for this, but previous versions should work as well.
Creating the Genesis 2 A-Pose
Before we upload Genesis 2 to Mixamo, we need to turn it into an A-Pose that matches the Genesis 8 figure as closely as possible. Load both figures into the scene, then for convenience make the G8 figure un-selectable (CTRL-click the little arrow icon in the Scene Tab, the one next to the eyeball icon). This will ensure only the G2 figure can be adjusted as you click a limb.
The figures have a slightly different shape, which makes 100% exact pose matching impossible. Here are the values that seem to be working well enough, but feel free to make your own adjustments at this step. For the Genesis 2 Male figure:
- Left Shoulder Bend: -45
- Right Shoulder Bend: 45
- Left ForeArm Twist: 10, Bend: 15
- Right ForeArm Twist: 10, Bend: -15
- Left Pinky 1 Side-Side: -7
- Left Ring 1 Side-Side: -5
- Right Pinky 1 Side-Side: 7
- Right Ring 1 Side-Side: 5
- Left Thigh Bend: 1, Side-Side: 6
- Right Thigh Bend: 1, Side-Side -6
For the Genesis 2 Female figure, all values are identical except for these:
- Left ForeArm Twist: 10, Bend: 17
- Right ForeArm Twist: 10, Bend: -17
For your convenience, here are the two pose files for Genesis 2.
Baking Joint Rotations
Once the pose is applied to Genesis 2, switch to the Joint Editor tool and right-click onto your figure. A context menu opens up. Choose Edit – Bake Joint Rotations. This will make all our adjusted values the new defaults, so whatever may have been -20 will now read zero. If you’re familiar with Blender, it’s the same concept as “applying the rotations”.
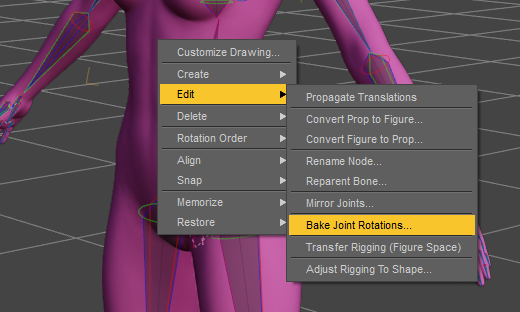
Switch back to the Universal Manipulator, we’re done playing with bones.
Exporting Genesis 2 for Mixamo
If you haven’t already, make your Genesis 8 figure invisible so that only our Genesis 2 geometry will be exported. CTRL click the eyeball icon on the scene tab on Genesis 8 to assure any attached items will be indivisibilsed, like eye lashes and tear ducts. Now click on the Genesis 2 figure and head over to File – Export and choose Autodesk FBX as the file type. A context menu for export options will appear, here are the settings that seem to work well for me:
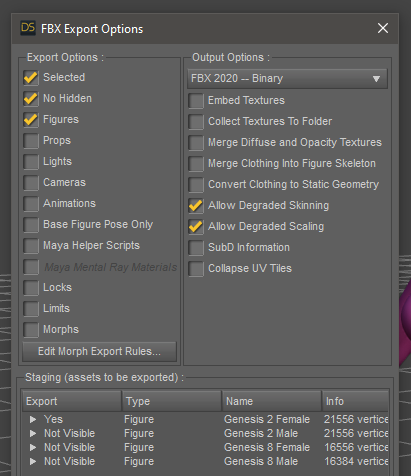
Make sure only one figure is visible, and that any other objects in your scene show as “not visible” at the very bottom. When you’re done, hit Accept. Delete the G2 figure from your scene, we won’t need it anymore. Leave the G8 figure intact though, we’ll need it later.
Import into Mixamo
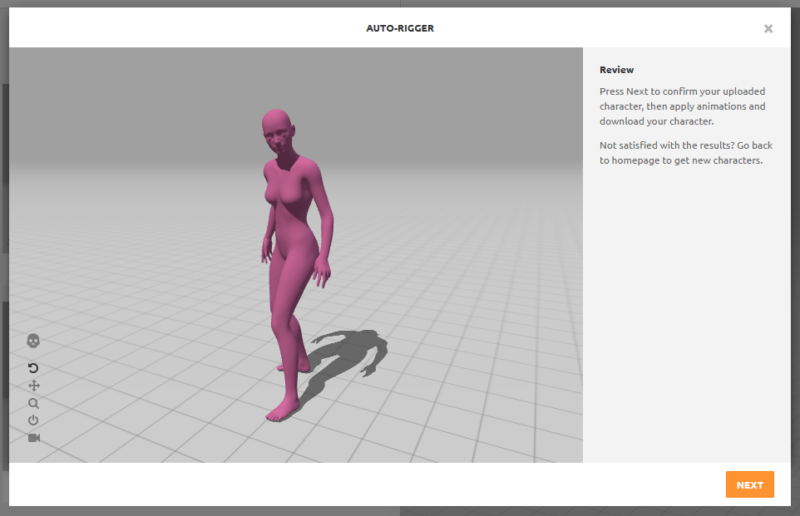
Log yourself into Mixamo and upload your new character. There should be no error messages, but be aware that it’s SaaS (Software as a Service), and as such, changes in Mixamo can happen at any time. Let’s hope it’ll work as well in the future as it does when I’m writing this article (in April 2022).
Pick an animation you’d like to use and make the appropriate changes to arm width and in-place movement. Hit the big orange Download button and choose the following settings:
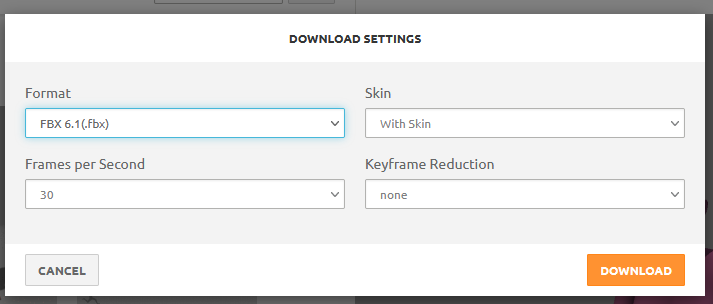
- Format: FBX 6.1
- Skin: with skin
- Frames per Second: personal preference (30 will work fine)
- Keyframe Reduction: none
Creating the Pose Preset
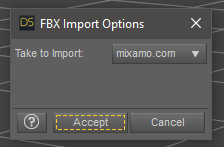
With your Genesis 8 figure still in the scene, head over to File – Import and load the file you’ve just exported from Mixamo. An options dialogue will pop up, select mixamo.com from the drop-down menu.
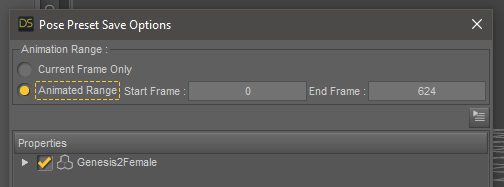
We’ll need to save this data as a Pose Preset so that we can apply the motion to the Genesis 8 figure in the next step. Select the Genesis 2 figure, then head over to File – Save As – Pose Preset. A dialogue will first ask for the file name, followed by a choice of Current Frame or Animated Range. We need the latter option.
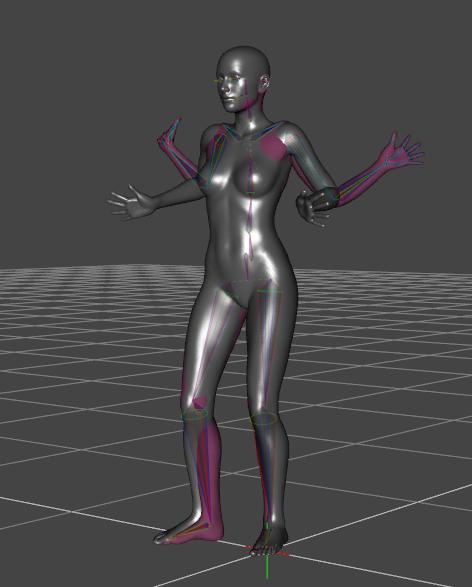
Now select the Genesis 8 figure in your scene, make it visible and apply this pose preset, either by double-clicking from the Content Library, or by choosing File – Merge. Play the animation and notice that it works for some of the motion, but not for the arms or legs. We’ll fix this in the next step.
Fixing Joint Rotations
The 3Dstorbist has a magical script on his DA page. It’ll fix the rotational differences we get between our figures. For it to work, both the imported Mixamo FBX and the G8 figures need to be in your scene at the same time. Open the Script IDE pane (under Window – Panes), dock it at the top, then paste his script into the box.
Now hit the big blue Execute button and and after a few seconds, the Genesis 8 figure should be fixed and run almost parallel with the imported G2 figure when you play the animation.

Although the figures are not 100% in sync, the G8 figure by itself is usable for most cases. Feel free to delete you G2 figure from the scene, we won’t need it anymore. You can now save a new Pose Preset from the G8 figure and apply it directly to G8 and 8.1 figures in the future.
For completion, here’s the script:
function transferY(a,b){
	var t8,t2;
	t8=Scene.findNodeByLabel(a);
	t2=Scene.findNodeByLabel(b);
	var valr=t2.getYRotControl().getValue ();
	t8.getYRotControl ().setValue (valr);
}

function transferX(a,b){
	var t8,t2;
	t8=Scene.findNodeByLabel(a);
	t2=Scene.findNodeByLabel(b);
	var valr=t2.getXRotControl().getValue ();
	print (valr);
	t8.getXRotControl ().setValue (valr);
}

var nframes=Scene.getAnimRange().getDuration ().valueOf()/Scene.getTimeStep().valueOf();

for( var fr = 0; fr <= nframes; fr+=1 ){
	Scene.setFrame( fr );
	transferY("Left Thigh Twist","lThigh");
	transferY("Right Thigh Twist","rThigh");
	transferX("Right Shoulder Twist","rShldr");
	transferX("Left Shoulder Twist","lShldr");
	transferX("Left Forearm Twist","lForeArm");
	transferX("Right Forearm Twist","rForeArm");
}
I strongly suggest to head to the original source for the code, but just in case it ever goes down, I’ve pasted the script here to keep it in another safe place.
Further Reading/Viewing
- 3Dstorbist’s DA article and original script
- a video I’ve made about this process (coming soon)
- a Daz stream I did using this principle for creating an animation
I tried following this method, but noticed that there is no FBX 2020 option when I attempt to export the Genesis 2 figure. As a result, the figure does not upload into Mixamo. I have Daz 4.20. Do you suppose it could be that I am using a Mac and the Mac version of Daz just doesn’t have this option? Is there another FBX option, such as FBX 2014 (that is the highest it goes), that could work with this?
Thanks!
That’s possible, I haven’t checked the FBX export option on macOS for a while. Lower versions should work too, I have a feeling something at Mixamo’s end may have changed. It wouldn’t be the first time.
Hello Jay,
I really appreciate your work in documenting and sharing DAZ Studio experience.
I make to you the same question I just made to 3dstrobist, the author of the DAZ Script script source code. I would like to ask you if you know if there exist downloadable official source code stubs or type definitions or source code to use for code completion, code analysis, etc, in external IDEs.
Thanks
You’re welcome Marco! You mean source code for writing scripts and plugins for Daz Studio? It’s not particularly well documented I’m afraid. There’s a C++ SDK you can download from here: https://www.daz3d.com/daz-studio-4-5-sdk
Sample projects are included, and there are more links in the Daz Forums (top of the website, under Community – Forums, then under Daz Studio there are two sections for SDK Developers and Script Developers). Hope this helps to get you started!
Another way to do this is to save the pose as above and use the Bon Minion for the proper G8 or G9. I have done this and it seems to work.
…Oops…Bone Minion
I am getting error while executing the script
Executing Script…
Script Error: Line 5
TypeError: Result of expression ‘t2’ [null] is not an object.
Stack Trace: ()@:5
Error executing script on line: 5
Script executed in 0 secs 5 msecs.
That happens when you don’t have both the G2 and G8 figures loaded when running the script.
Woohoo! Another mystery solved, really appreciate it 🙂
Jay,
Just a heads-up that with 4.22.0.16, the FBX v6.1 export from Mixamo triggers an error:
Rigging: Bone chain type incorrect – Limb Node: Genesis2Female
For me, the workaround is to export from Mixamo using the FBX Binary, which is equivalent to FBX 2019.
Oh sweet, thanks for letting me know! It’s been a while since I’ve tried it.