Blender has this habit of being a little different then perhaps any other 3D app. While it can deal with morph targets, they’re called something different and it’s entirely un-obvious how to bring them in (hint: it’s NOT the import option, nor in Edit Mode). I’ve just figured out how to do it and thought I’d share this with you and my future self – I’ll undoubtedly forget again soon.
Morph Targets are called Shape Keys in Blender. They’re designed to be used in editing and are disabled by default. In a nuthsell, you create a base shape key that tells Blender that you’d like to store “deviations” from this base shape. Each additional shape can then be stored as a shape key. Dial one up, and the shape of the base object changes – just like a morph target.
Let’s see how we can create them from external objects now. For my example I’ll use two OBJ files with the same geometry: a grid plane(my base object), and a sculpted dent (my morph target). The principle is relatively simple:
- import both objects
- SHIFT-select both (main object last)
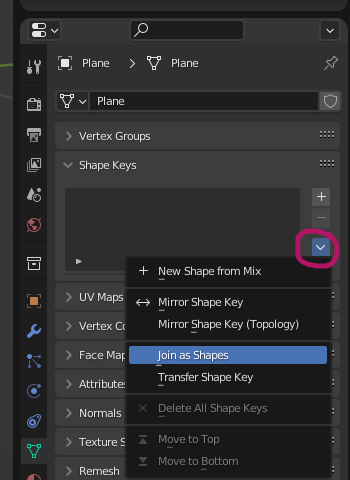
- under Shape Keys, choose Join as Shapes
Step by step
We start by importing both objects. They’ll likely look weird in the viewport as they’re probably in the same position and intersecting with one another. That’s… er… “totally fine” because that’s how Blender rolls. Let’s not worry about it.
Let’s select both objects by first selecting the Morph object (the dented plane in my case), then CTRL-select the base object. It’s important that the object you’d like to create the morph target on is selected last. If this is difficult to do in the viewport, use the Scene Outliner.
Now head over to the Shape Keys menu (under the Object Properties, the little flux capacitor icon). Select the little arrow icon in that menu and choose Join as Shapes.
This will import the shape of our second object as a new Shape Key into the first object. Feel free to delete the second object from the scene, select your first object and take a look at the two entries that have been generated in this menu.
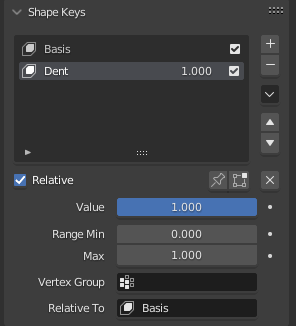
Basis is Blender’s way of storing the base shape, relative to which we’d like to use the morph. Dent was the name of my second object and can now be dialled in with the numeric value (incidentally on the Value field underneath). If you don’t like the name, feel free to double-click the entry to rename it.
That’s it! I’ve explained more about Shape Keys and how to use them with Daz figure poses here.