I’ve been using Faceform Wrap for a couple of years (formerly R3DS Wrap), and it handles texture conversions beautifully. While it can handle UDIMs natively, it’s a little cumbersome having to change the texture for each tile before export manually. Thankfully there’s a better way, and my man Brian found out how to do it (and thank you for sharing)!
Brian uses Reallusion’s Character Creator and the UDIM principle is the same as it is with Daz characters, but the tile names don’t match the Genesis figures. Here are my amendments for Genesis 8, 8.1 and 9 respectively.
Genesis 9
Genesis 9 has 5 UDIM tiles, and the following script will work for the texture export:
map = "Diffuse"
projectName = "Your G9 Project Name"
if frame() == 0:
    texture = "Head"
if frame() == 1:
    texture = "Body"
if frame() == 2:
    texture = "Legs"
if frame() == 3:
    texture = "Arms"
if frame() == 4:
    texture = "Nails"
return projectDir() + "/Translated Textures/" + projectName + "/" + texture + "_" + map + ".png"
You’ll have to convert the eyes and mouth separately or leave the stock textures in place, they’re good enough for most cases.
Genesis 8.1
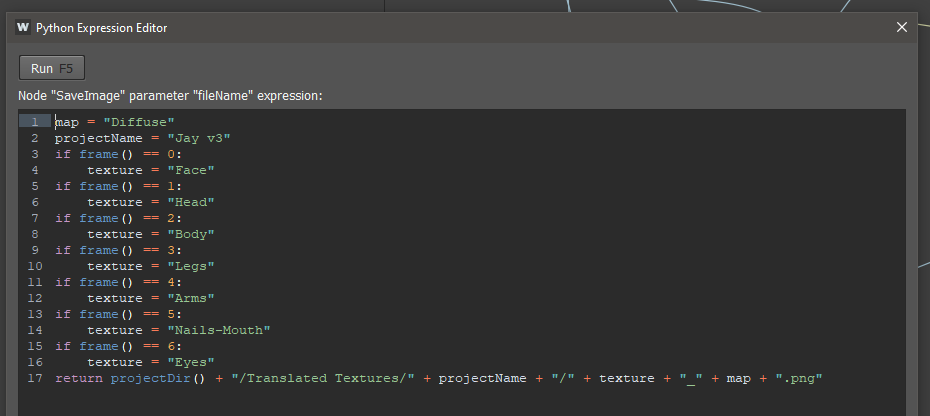
Genesis 8.1 has 7 UDIM tiles, including one for the eyes and one for the teeth. Here’s the script that will work to export all those tiles:
map = "Diffuse"
projectName = "Your G8.1 Project Name"
if frame() == 0:
    texture = "Face"
if frame() == 1:
    texture = "Head"
if frame() == 2:
    texture = "Body"
if frame() == 3:
    texture = "Legs"
if frame() == 4:
    texture = "Arms"
if frame() == 5:
    texture = "Mouth"
if frame() == 6:
    texture = "Eyes"
return projectDir() + "/Translated Textures/" + projectName + "/" + texture + "_" + map + ".png"
Genesis 8
Genesis 8 has only 6 UDIM tiles. Compared to 8.1, the body and back of head textures are on the same tile. This makes the G8 texel density a little lower. The following script will work for Genesis 8:
map = "Diffuse"
projectName = "Your G8 Project Name"
if frame() == 0:
    texture = "Face"
if frame() == 1:
    texture = "Torso"
if frame() == 2:
    texture = "Legs"
if frame() == 3:
    texture = "Arms"
if frame() == 4:
    texture = "Mouth-Teeth"
if frame() == 5:
    texture = "Eyes"
return projectDir() + "/Translated Textures/" + projectName + "/" + texture + "_" + map + ".png"
How to use the scripts
Brian has a video on his Patreon page that explains the process for Character Creator. It requires some knowledge of Wrap. You’ll use these scripts inside the Save Texture node and choose “Compute Frame Range” to export all tiles sequentially. Here’s how to do it:
1.) Set the timeline play range to the amount of destination UDIM tiles. So for Genesis 9 and its 5 tiles, the play range should be 0-4.
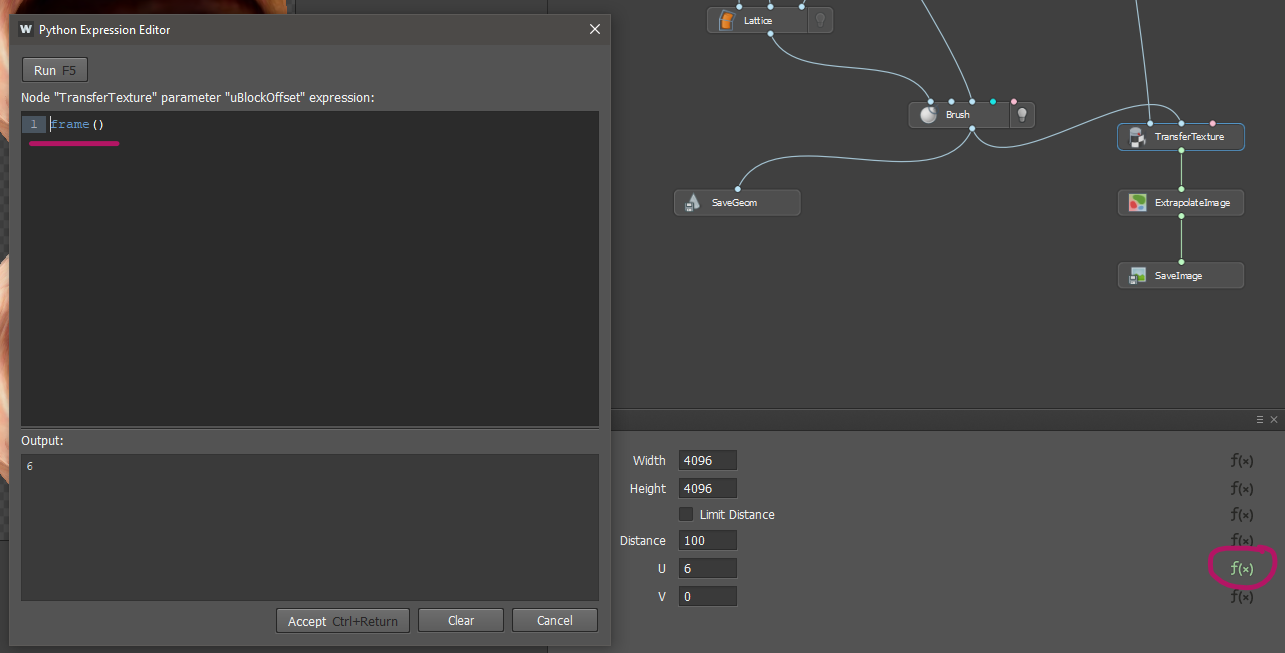
2.) Click on the f(x) field on the texture conversion node, next to U, and write frame(). This means that the U parameter will change every time you move to a different frame on the timeline.
3.) On your Save Image node, navigate to your output directory under File Name, then click on the f(x) field and paste in the script for your Genesis figure. Replace “Your Project Name” with the name of your own project, and the script will create a sub-folder inside a Translated Textures folder.
4.) Also on the Save Image, select Compute Frame Range and a modal dialogue will ask you how many frames you want to calculate. Even if you didn’t change the timeline, you can still override the tiles you want to export here. As the timeline advances, the frame() function will change both the UDIM value on the Transfer Texture node and the exported file name. Give it a few minutes and enjoy your new textures.
This workflow assumes you’re coming from a single texture source tile. Note that the indentations after an if statement are important for Python, they may not paste across properly. Here’s what the script should look like:
Have fun!
So question, how do you convert this UDIMS for metahuman ? I mean mostly the body textures since they are multiple textures ?
Metahumans only have two tiles, one for the head and one for the body. If your source character has UDIMs, I would first bake them onto a single tile and let Wrap convert from there. Blender can bake from UDIMs to a single tile though. If you’re using a Daz character as a source, you can let the Daz to Blender bridge handle this automatically on export.
Is there any workflow video that you could suggest or already have in ur channel ?? Would love to see the proccess !!