Depth of Field is a photographic term that describes how much of a scene is in focus. In the 3D world this has to be calculated and switched on – because otherwise everything in a rendered scene is in focus.
A real world photographic lens doesn’t work that way: take a portrait with a long lens, and a smaller aperture will give you less depth of field than a wider lens, and vice versa.
Thankfully it’s very easy to enable this feature in DAZ Studio and set the focus of your virtual lens to the object of your desire. Here’s how to do it.
You’ll need a camera to proceed. Depth of Field doesn’t work with the Perspective View. It’s always a good idea to frame up the scene using Perspective View, and when you’ve found an angle you like, head over to Create – New Camera. The following dialogue box opens:
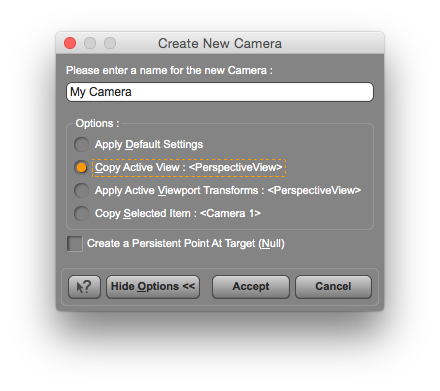 If you apply the default settings (top option) your camera will be created facing down at the centre of the scene. Not what we want, especially given that the Perspective View already has the framing we want to use – so choose Copy Active View instead. This will create a camera with a framing identical to what you’re currently seeing.
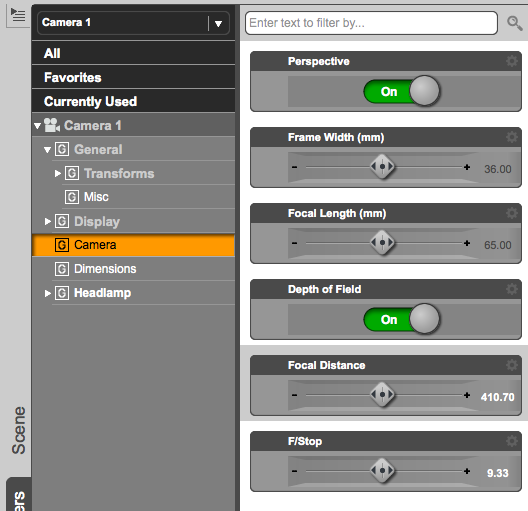
At the top right corner of the viewport you can select which camera you’re looking through. Stay on Perspective View for now.
Select your camera in the Scene Tab and have a look at the Parameters Tab. Under Camera there’s an option called Depth of Field. Switch it on.
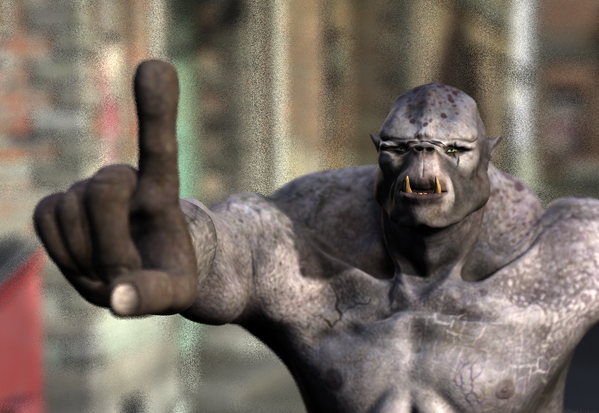
Now move the perspective view so that you can see both the object you’d like to frame, as well as the camera. A side view works best. Here’s my scene: I’ve got the Troll framed up nicely on the right, and I can see the camera on the left.
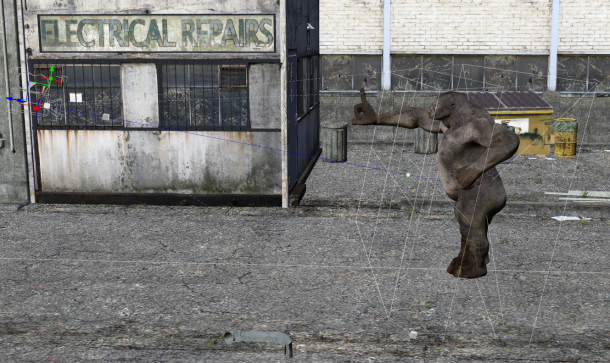
See all those faint white lines around the Troll? Those show up when Depth of Field is enabled. It’s a box that shows the part of your scene that will be in focus. Anything in front of the left square, and everything behind the right square will be out of focus.
To adjust those values, tweak the parameters of your camera:
- Focal Distance will move the entire box towards or further away from the camera.
- F/Stop will increase or decrease the width of the box. Just like in real life, a higher f-stop will give you a wider depth of field, while a lower f-stop will give you less depth of field. Real life values don’t necessarily yield the same results as in the 3D world.
- Focal Length scales the box proportionately and will affect both how effective the F/Stop and Focal Distance values are.
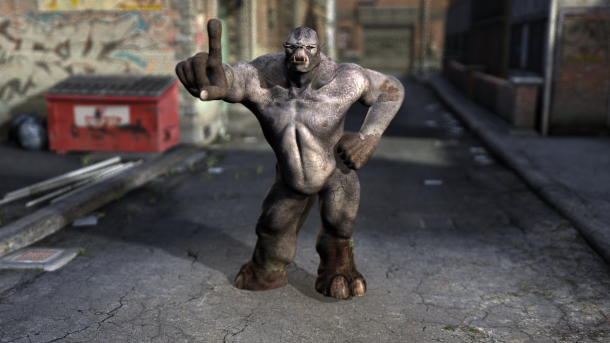
Fiddle with those sliders until your scene shows what you’d like to see “in focus”, then do a test render and see your handy work. Make sure you select your actual camera under Render Settings, otherwise you may render the Perspective View instead (or simply switch the current view over to your camera, then press CMD/CTRL-R).
Reducing the Frost Effect
Unlike other 3D applications, DAZ Studio (or rather, the 3Delight engine) does not apply the depth of field blur via postwork. Carrara and Blender do this, but 3Delight creates this effect at render time.
The problem is that it doesn’t do a very good job at it: if you look at a 100% zoom of the above scene, you’ll see that the blurred parts of the background look like frosted glass – not exactly realistic:
I have not found a magic setting that will just eliminate this – if there is one, please let me know. Perhaps “rubbish mode” is turned on by default, and I just don’t know how to switch it off. Actually I have found the solution to this puzzle a few months after I wrote this: increase the Pixel Samples under Render Settings for the frost effect to go away. I’ve explained how to do it in this article.
Alternatively, there are two other ways to reduce this effect: via downsampling, or by using a layer mask and applying a blur effect to the background in Photoshop.
Downsampling
The frost grain will remain the same size, even if we render at a higher resolution. That’s a good thing: by simply increasing your images dimensions by a factor of two, we will end up with a larger image at the expense of higher render time.
If we then reduce the rendered image size again to the original dimensions, the grain size will be reduced.
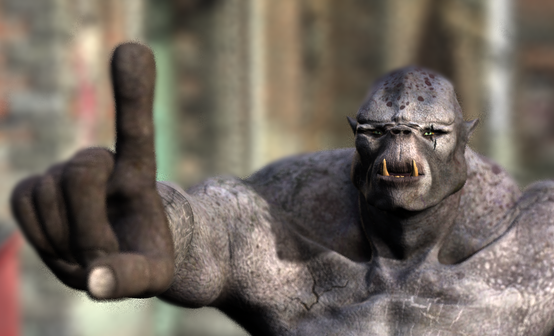
Here’s an example: The above image was rendered at 1920×1080, then cropped to 100% so that you can see the frosty grain a bit better. I’ve rendered the same scene at 4000×2250 pixels, then reduced the image size in Photoshop back to 1920×1080, then cropped the image again:
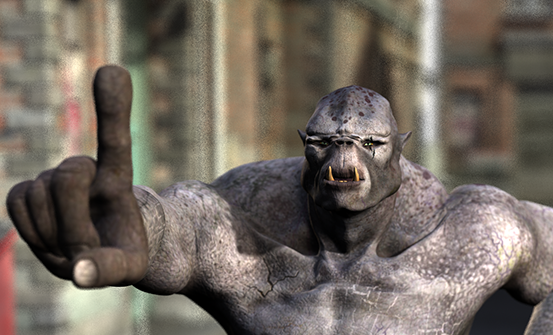
Image quality hasn’t degraded, but the size of the grain has reduced. You could go even further and increase your image dimensions to 3 or 4 times the size of the original – if you have the patience to wait for the render to finish.
Applying a Blur Mask
A quicker yet slightly more fiddly way to get rid of the grain is to duplicate your image to a new layer in Photoshop, then apply a Gaussian Blur to the bottom layer. Now add a mask to the top layer and remove all unwanted grainy background detail from it so that the blurred background from the bottom layer is visible instead.
How exactly you create the outline is up to you: you could render the image twice, once without the background, and once without the figure, then combine the two; or draw a mask by hand; or use a quick selection technique of your choice.
Here’s my approach, in which I quickly drew a mask by hand:
1 thought on “How to render with Depth of Field in DAZ Studio”