The other day I wanted to convert a logo into a path, so that I could use it as a shape in Blender. It was in fact the WordPress logo that was provided as a PNG or PDF from the WordPress Branding section.
The trouble was, both the PNG and the PDF are rasterised, and as such cannot easily be used for an extrusion in 3D as an SVG file would. The question then was, how do I convert an image into an SVG in Photoshop, so that I could import it into Blender?
It took a bit of fiddling, but here’s how I did it.
Quick introduction to SVG Files
SVG files can actually contain three types of data:
- Vector Graphics, such as paths (which is what we want)
- Raster Graphics, such as bitmap images (which we have, but don’t want)
- and Fonts
What I needed in Blender was indeed a Vector Path. Although the other two data types can be contained in an SVG file, Blender can only read path information at the time of writing. It makes sense too, because really I’d like to the path information available as a curve in Blender, not the potential raster or font information.
I’m mentioning this here because
- a.) I didn’t know this, and
- b.) importing an SVG containing either fonts or raster graphics will import nothing into Blender – which had me stumped.
Thanks to cegaton on Blender Stackexchange for this explanation!
Hence, for Photoshop to export vector data instead of raster data in our SVG file, we need to jump through a few hoops – but it is possible. Let’s see how!
Open the rasterised image in Photoshop
The first step to turn a raster graphic into a vector shape is to open my image in Photoshop.
With a PNG you don’t really get a choice as to how big it’s going to be, as this is defined by the file itself. With a PDF, you can define how big the file should be scaled as. I choose 4000 x 4000 pixels, thinking the larger the image, the better the results will be. And that’s true to: if you watch the above video, I’m doing it with a much smaller file, and the results are not as accurate for the path.
Creating a Selection
I’m assuming the image in question is a clear cut graphic rather than a photographic image, say a black and white logo, or something that can easily be selected using the Magic Wand tool. The WordPress logo is particularly easy to select.
Choosing the “addition” symbol lets you select multiple parts of the logo, should the need arise (it’s the “two squares bleeding into each other” symbol).
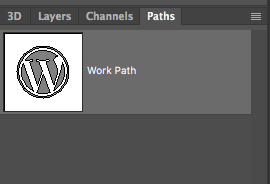
Create a Path from the Selection
Now head over to the Paths palette and select “Make work path from selection”. It’s the super tiny icon on the bottom, the fourth one from the left I believe. It resembles a circle with four little dots around it.
Create a Custom Shape from the Path
With the work path in place, and with the path selected, head over to Edit – Define Custom Shape. A dialogue box will appear, prompting you for a nifty title for your new shape.
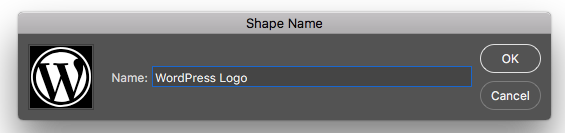
This will save our path as a vector curve to the Photoshop database. All we need to do now is to draw it out on an empty layer, which can then be saved as a vectorised SVG image.
Draw out our your new Custom Shape
Pick the Custom Shape tool, either from the menu or using the shortcut key U. The tool is hiding underneath the Rectangle/Ellipse/Line Tool (hold it for a few seconds for all tools to show up).
Create a new layer, select it, pick your custom shape and draw out out. Hold down the SHIFT key to make sure the shape is not distorted. Draw it out so that it fills the whole canvas. You can use SPACE while you’re drawing it out to re-position it on the canvas.
I’m sure there’s an easy way to centre such a shape on the canvas, but I haven’t discovered how to do that yet. If you know a better way, please let me know below.
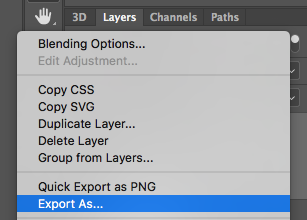
Save your shape layer as SVG file
Right-click your shape layer and select Export As…
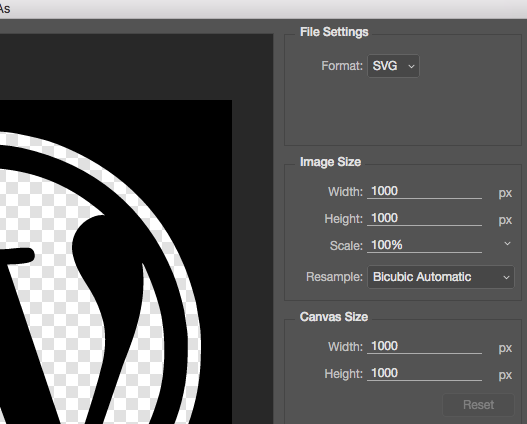
This will bring up the export dialogue. You can specify a size (which isn’t important since we’re exporting vector data) and a file format. Pick SVG, hit Export All and specify a location and file name.
And that’s it. The resulting SVG will import into Blender, where a Curve Object will now be in your scene.
Further Viewing
The above video is actually part 1 of a series on how to create a logo from a screen grab in Blender. You can watch the whole series on YouTube:
https://www.youtube.com/playlist?list=PLPcx_LSSGfZcC3_xaHyio5zs31Y5VyWpZ
Podcast: Download (Duration: 19:57 — 18.3MB)