There’s an article by Phil Miller that explains NVIDIA’s philosophy about the new interactive Iray Denoiser.
Thanks to deep learning, NVIDIA’s own DGX-1 AI Super Computer and a lot of trial and error, this machine developed an algorithm that can predict how accurate the final result will look like when only a limited amount of ray bounces are available.
In a nutshell, their Artificial Neural Network went ahead and compared a partially finished render with a finished one, and each time it made a prediction that was not looking handsome, it learnt from it. Eventually they came up with what’s currently integrated in the latest release of Iray, which has made it into DAZ Studio 4.11, and that in turn is available for us to beta test right now.
I’ve run some tests with this new toy, and I’m excited to share those with you today.
Test Renders
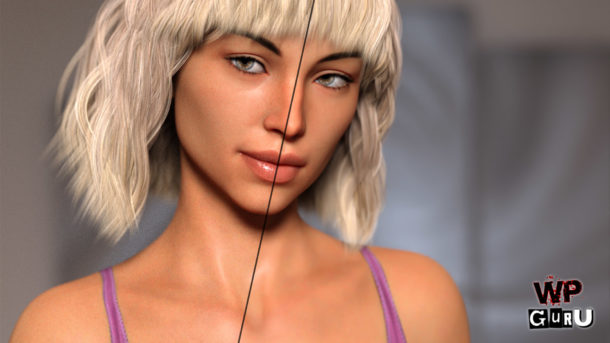
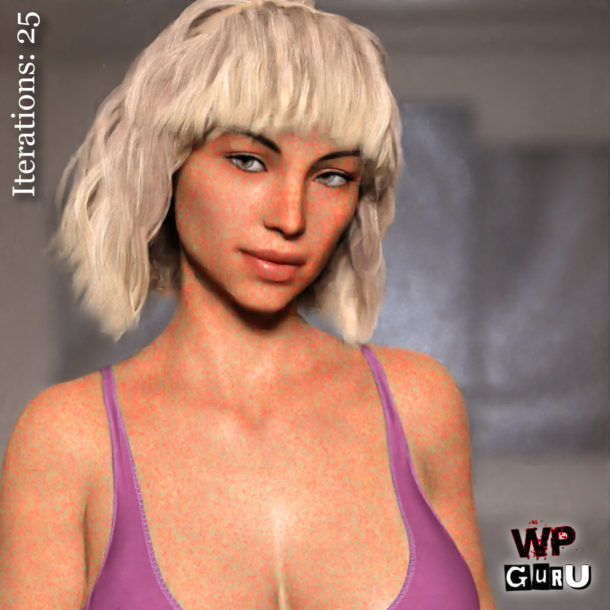
It’s a deceptively simple scene I’ve rendered here: a quick portrait with a background scene. What makes it a bit tougher on the engine is the depth of field, the translucent skin shader and the high geometry count in the hair. Bouncing rays around this scene takes my GeForce GTX 970 quite some time.
Let’s take a look at a few variations on this portrait. Click to enlarge (CTRL/CMD click to open the images in a new browser tab so you can switch between them for comparison).

After 2 hours and about 3600 Iray iterations, we still see a bit of noise.
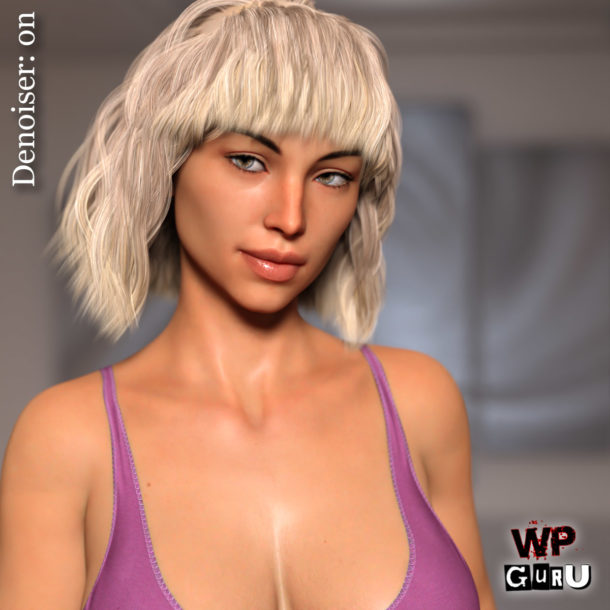
with the Denoiser enabled.
To eliminate the noise completely in this scene, I guess I would have had to let this render for about 6 hours. I haven’t tried it out, it’s just a rough guess. I might even let this render over night and see when the noise is gone without the Denoiser.
Although the Denoiser won’t replace a good clean regular render, the result is certainly “good enough” for what I’m doing – especially if there’s no comparison available. Cleaner images with less grain or noise compress (and re-compress) better, yielding smaller file sizes with less artefacts, and that’s always good for sharing on the web. There’s also huge animation potential here, where time is always of the essence.
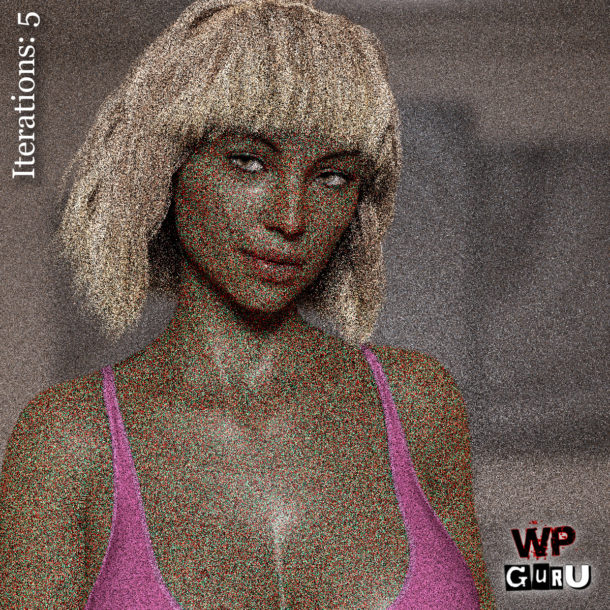
Denoiser artefacts over time
A regular render will just lose its noise over time. So the more Iray iterations (or rather, ray bounces) we let the engine do, the better and more accurate our image will look – and in an ideal world, it won’t have any noise at some point – usually in the distant future.
Let’s take a look at how the Denoiser behaves over time. It makes “educated guesses” at what it thinks the final render should look like, and the more real ray bounces it has, the better it gets.
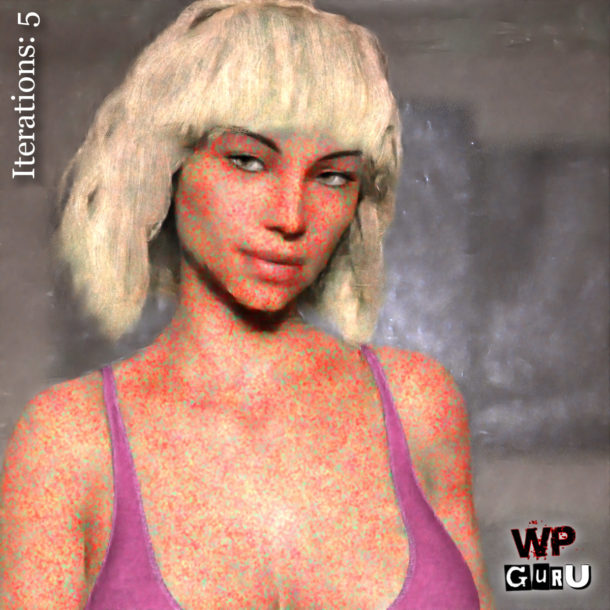

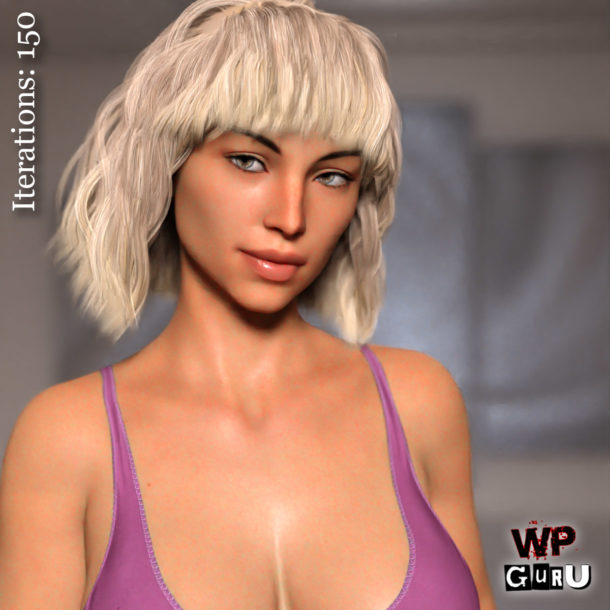
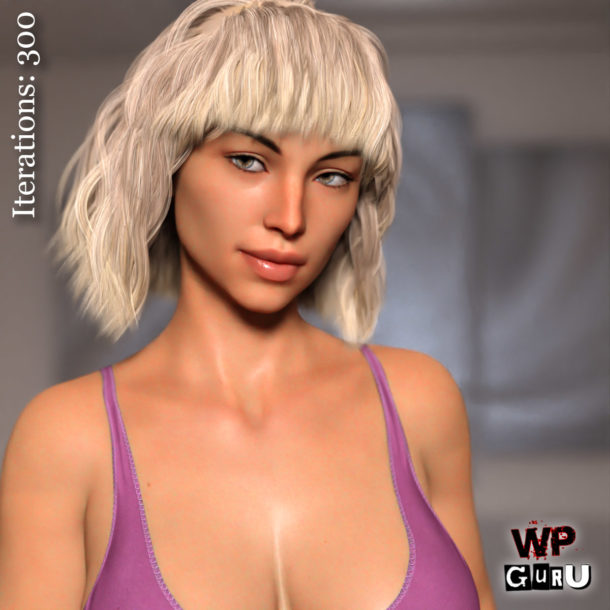
The longer we let the engine run, the better the Denoiser can guess what the final render is going to look like. Over time, the differences and resolution becomes less noticeable. We’ll see the detail increase, but without any noise (which – let’s face it – is often easy to spot, even on otherwise good looking renders).
One thing I don’t like about this “look” is the blurriness. Denoised renders, when not given enough time, look almost too Photoshopped. But again, give the engine more time, and this effect becomes less obvious.
How do we use it in DAZ Studio 4.11?
The Denoiser works for both the preview render in the viewport, as well as in the final render. All we have to do is head over to the Render Settings, under Filtering. Make sure to enable it (Post Denoiser Available), then switch it on (Post Denoiser Enabled). That’s all you need to do.
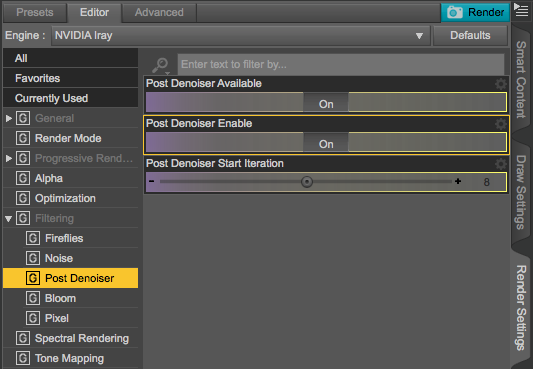
The only tweakable option right now is when the Denoiser shall kick in. The default is after 8 iterations, anything prior to that will be shown un-denoised. A lower value will yield super creepy (or shall I say artistic?) renderings of your scenes, while a higher value will let you keep an eye on the actual render output before any demonising takes place.
Setting the value to 0 will mean the Denoiser will work on the first iteration, so you’ll never see any noise. Thankfully the Denoiser is also active in the Viewport Preview, which means that we get a noise-free instant preview of our scene that’s getting better over time. It’s as close to “realtime Iray” as it gets.
So… how does this Denoising Magic work?
In a nutshell: Artificial Intelligence, Machine Learning, Super Computers and Artificial Neural Networks. Or something along those lines.
From what I understand, NVIDIA used their own Super Computer and fed it some data: they gave it many fully rendered images, and let the machine compare those to half-rendered versions of the same images.
Then they asked that Super Computer to take a guess at what it thought the grainy half-rendered version would look like, and let it compare its own predictions with the final image. When those predictions were wrong, they asked for another guess, until the computer got it right. During both failures and successes, the programme was “learning” what was working best in those trials.
The result is an algorithm that can predict with high accuracy what a half-rendered grainy image will look like, and this algorithm is shipped with each version of Iray and can be applied on the fly during GPU rendering. It stands to reason that over time, and as that Super Computer does more learning, it’ll gradually figure out an algorithm that gets better and better.
Let’s revisit this topic a year or two from now on and compare results, shall we?
If you know more about this mysterious topic, please leave a comment and post links to further reading 😉
Thankyou, this sounds very handy. Excuse my stupidity but how does one get 4.11. I can’t find the download link, despite googling.
Hi Debs,
that is an excellent question actually! DAZ don’t do much to promote this on their front page. The Beta is essentially a free product you have to “buy” (or rather add to your shopping cart and then check out without paying). Once it’s on your account, you’ll be able to search for “DAZ Studio” in Install Manager, and then you’ll be able to install it on your system side-by-side with the regular release version.
Here’s a direct link on the DAZ Store: https://www.daz3d.com/daz-studio-beta.
Hope this helps!
Great article on the new denoiser in Daz Studio and the comparison images were very helpful. Hopefully, DS 4.11 will come out of beta soon!