A while ago I wrote an article about how to grow grass on a place in Blender 2.79 using the Particle Emitter system. This process has changed since Blender 2.80, and since it was never intuitive to begin with, we’re all a little confused as to how it works in the new version. While I still remember, let me jot down a note for everyone’s benefit.
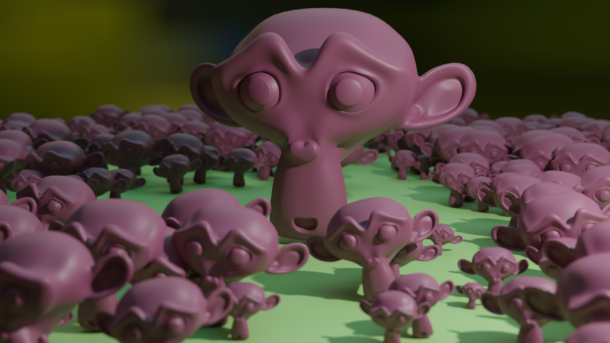
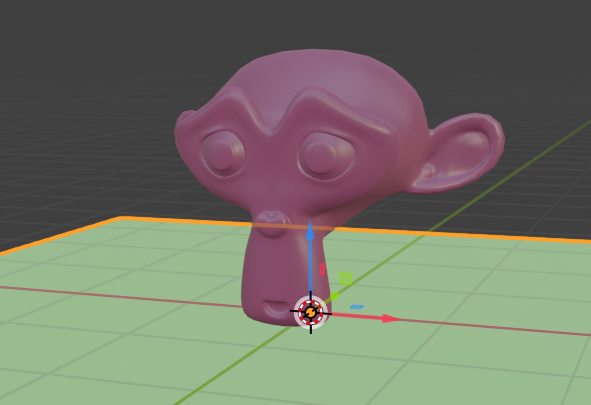
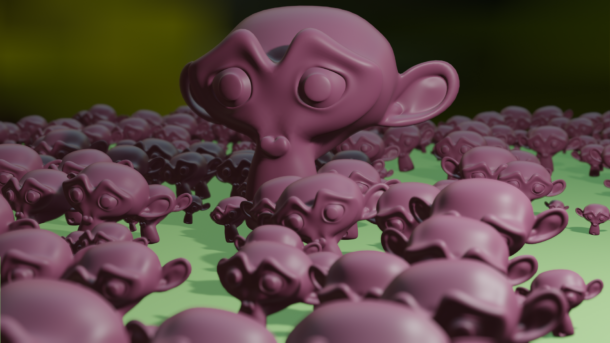
For this example I’ll replicate a few versions of Suzanne on a regular plane. The principles for growing grass or scattering rocks across a landscape are the same of course. We’ll start with a Monkey and a Plane.
Let’s select the plane and add a Particle Emitter Modifier to it.
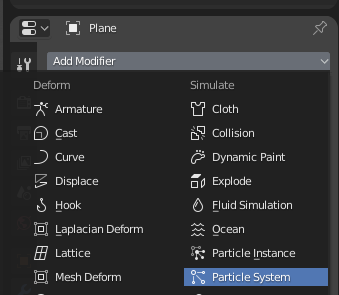
This will tell us that to modify any parameters, we need to be in the “particle context”. Clicking that message will take us straight there, or we can use the little “three lines” icon underneath the wrench.
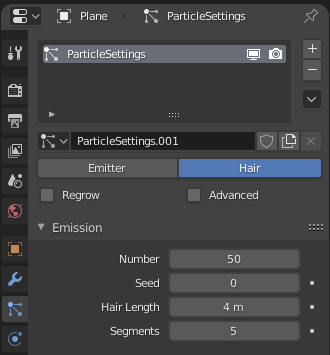
Emitter Settings
To replicate an object, we need to switch from Emitter to Hair – as bizarre as it sounds. I’m going to reduce the amount of emitted objects from the default 1000 to 50 for this monkey example.
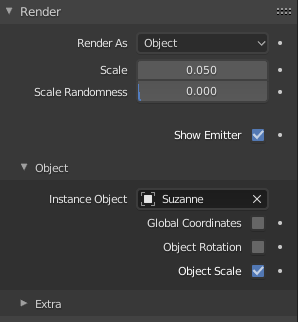
Next we’ll enable the option to replicate objects. We can do that in the Render Tab, under Render As. Pick Object, then further down select the object you’d like to replicate from the list (Suzanne in our case). There are a couple of interesting options here, like Global Coordinates and Object Rotation. I’ll leave those unchecked, but enable them and see how it affects our monkeys (or whatever you’re growing).
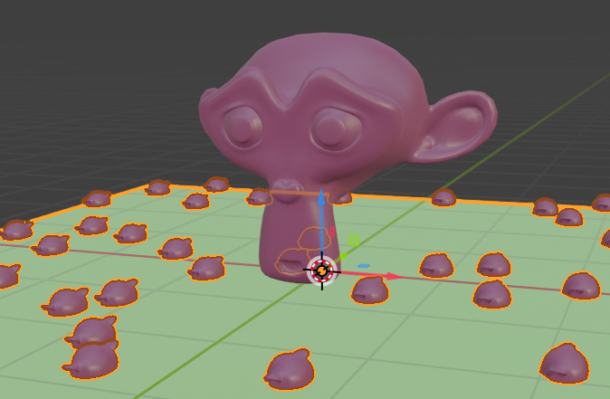
Notice how by default, our monkeys are rotated differently than our main object. They’re also sunk into the ground some, so let’s look at how to correct this.
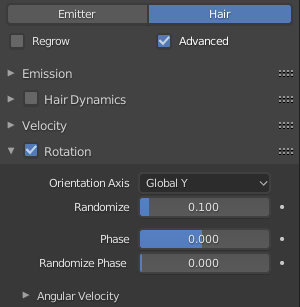
We need to enable the Advance tickbox at the very top, next to the Emitter button (the one we switched to Hair). This will bring up a Rotation menu, in which we can now apply the correct rotation as well as a randomiser. Pick how far the rotation shall deviate from the norm to bring a bit of life into the uniformity of the digital preciseness.
The Orientation Axis will determine how your monkeys will rotate, and Global Y works to bring them inline with the main object (depends on the circumstances of course).
While our monkeys are now facing the right way, they’re still half sunk into the ground. That’s because their origin is in the centre of the Suzanne object, and they’re being replicated from the origin point.
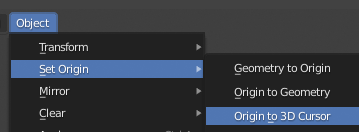
The solution is to select the object to be replicated now (Mother Suzanne in our case) and tweak the origin point. I’ll tab into Edit Mode for that, select the bottom vertex and then press SHIFT + S to choose “Cursor to Selected”. Back on Object Mode, I choose Object – Set Origin – Origin to 3D Cursor. Now our monkeys are no longer buried in the ground.
One last thing we may want to introduce is random scale. That setting can be found under Render – Scale Randomness. You’ll be able to grow grass and all kinds of other cool stuff on any object.
Distribution Maps
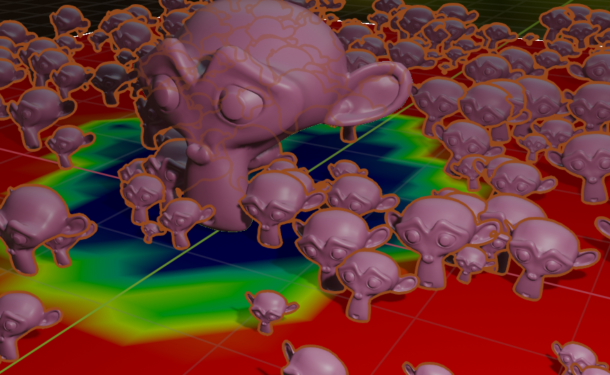
We may not want all our objects to be distributed in the same density across our plane. For example, in the middle of the picture, the smaller monkeys intersect with the larger one. We can use a Weight Map to tell Blender where the replication should be more or less dense. To do that, select the plane and switch from Object Mode into Weight Paint Mode.

With the handy brush that comes up we’ll be able to paint the areas of lower density. Those mysterious colours mean the following:
- Blue = no objects
- Green = some objects
- Yellow = some more objects
- Red = highest number of objects
Note that resolution of the map is determined by the geometry of the object you’re painting in. A simple plane doesn’t have enough geometry, and it appears that you can’t pain on 4 vertices. Subdivide the object in edit mode, then try again if you’re having trouble.
Back in Object Mode, and in the Particle Emitter Tab, we can assign this weight map under Vertex Groups – Density. Chances are there’s only one selectable item called Group, which is the default name for our weight map. Someone told me that this is changeable too, but I’ve forgotten instantly where that is. Once applied, you’ll see the distribution of your objects change.