I get this question regularly, in which new users ask me something along the lines of, “can I make my own clothes for Genesis, and if so, how do I do this?” Little do most people know what a huge undertaking this is, so I thought I’d outline the principle in basic strokes, to give y’all an overview what’s involved in the process.
Note that I’m not a clothing creator myself, so I’m not the right person to ask about details. If I knew the ins and outs as well as some of the PA’s do, I’d sure share it with you as articles or videos, trust me.
Hence this is not a tutorial, but rather a very in-depth answer to a comment I frequently get, in the hopes that it will give readers an overview of the whole process, without getting lost in too many details.
Workflow Overview
Creating 3D objects follows the same basic principle outlined below, however the creation of the geometry differs on the subject matter. It all involves describing a series of points in 3D space, connecting them and building a surface. The points can be created with traditional modelling tools, 3D sculpting, cloth simulation or a combination thereof. For clothing, it usually involves extruding curves and primitives or sculpting tools.
However, the real work begins when the 3D object is made. I won’t go into details on each step, I just want you to know that modelling is only the beginning of a longer journey to turn a static mesh into clothing. Here are the steps involved:
- Modelling (hard surface, sculpting, cloth simulation, etc)
- Retopologising (reducing polygons and optimizing the object)
- UV mapping / unrwapping (describing how a 2D texture can be applied to the object)
- Setting up Material Zones (creating surface descriptions for material setup)
- Exporting the object (so that DAZ Studio can import it)
- Texturing / Material Setup (creating shaders that make the object look handsome in renders, perhaps adding material variations if necessary)
- Rigging where necessary (adding a skeleton so that it can follow the movements of our character)
Types of clothing
As of 2020, we have three types of add-on content for our Genesis figures, no matter what generation. By add-on content I mean anything we can put on our figures, from clothing to weapons, from hair to hats, and anything in between. We have:
- Props, sometimes called Smart Props
- Conforming Clothing
- and Dynamic Clothing
You probably have come across all three in your 3D journey, but it’s not always obvious what item is made as what type. I’ll outline the differences below, and how they’re made in principle.
Props
The easiest types of content you can create are Props. They’re regular 3D objects, as complicated or as simple as you like, setup with materials that work in either of DAZ Studio’s render engines. Think of chairs and tables, scenery items, even landscapes and buildings. Technically speaking they’re all props. Most of them don’t “fit on” a character, but they’re important building blocks of a 3D scene. You load them in as part of a set, or as stand-alone items, and our characters can interact with them: they can sit on a chair, at a table, or do something inside a house.
To make this work, and build a believable scene, we must usually move all items into place rather meticulously with that 3D gizmo, spending hours on making sure things are in “just the right place”. You know the drill too wll. All such items are props.
I’m telling you this because there’s a different type of item, namely the Smart Prop. Those are also simple to make, and they’re sometimes used as clothing accessories. Think of glasses, hats, rings on fingers, earrings, weapons that snap into place, bracelets, that sort of thing. Those are “smart” because they’re saved in such a way that they snap to a body part of our selected figure as if by magic. They may still require manual tweaking, but they’re generally in the right place. The only difference is the way they’re saved, with a character in mind – unlike the Dumb Props, which are saved only with the centre of the 3D world in mind.
Creating them requires no rigging, only a few special tick boxes when saving them. I’ve descibed how to create Smart Props on both DAZ Studio and Poser in these articles:
Conforming Clothing
Conforming Clothing items are a little more tricky to describe, because technically they’re rigged figures. This means they are very much like the Genesis figure itself, which means they contain a skeleton. The bones of the skeleton dictate where an item can bend, and where it needs to be straight. Think of an arm that can only bend at the elbow, and only in one direction, and within a certain limit.
Both the Genesis figure and the conforming clothing item bend at the same point, and more often than not some adjustment morphs and weight maps are necessary to turn this into a usable piece of clothing. DAZ Studio is quite clever: it tries to make sure the clothing (or the outer layer) does not intersect with the geometry of the figure (the inner layer), but the clothing creator needs to describe anything that cannot be adjusted intuitively by DAZ Studio. Otherwise that piece of clothing looks terrible.
Conforming Clothing starts as a regular 3D object, usually modelled or sculpted around the Genesis base figure in an A or T pose. It usually looks pretty good when in that position, but as soon you dial in a custom character morph, or apply a pose, some very strange results can happen – only because DAZ Studio doesn’t know any better and tries its best to “guess” how the static clothing object should deform when the figure moves, or when the figure is deformed with a character morph. When an undesirable effects happen, the clothing creator will have to make adjustments, and repeat the process until he/she is happy. Some adjustments are more difficult to make than others.
Such adjustments are made either as morphs or weight maps (or both). The process involves sending a deformed version of the figure back into the modelling application, making the desired change to the clothing item (static mesh), then sending the change over to DAZ Studio as a morph, so that it can be dialled in when necessary. It can be saved with a name that DAZ Studio recognises, so that when it finds say a “pot-belly morph” in the figure, it knows which morph to use in the clothing rather than guess.
I believe this is called a Control Morph. That’s similar to an Adjustment Morph, however the latter is intended to be dialled on on demand by the user, rather than set automatically by DAZ Studio. Think of the flare of a coat, or the movement of a skirt.
Another principle of changing how clothing behaves is by way of painting Weight Maps. These are a type of image that’s painted on the object, describing how flexible or inflexible it is in places. For example, a leather belt would be less flexible at the buckle than anywhere else.
Weight Maps, Control Morphs and Adjustment Morphs are all created in DAZ Studio, whereas the actual geometry is built and changed in the 3D application used to make the static mesh. Those may include Blender, Maya, Modo, Lightwave, ZBrush, Marvelous Designer and the many others apps suitable for the task out there.
To make our static clothing mesh magically follow our Genesis figure, we need to rig it. DAZ Studio has a handy tool that will transfer the rigging of the selected Genesis figure to a static item of clothing in the same scene. It’s called the Transfer Utility. I’ve written an article on its basic usage a few years ago, it hasn’t changed much since then:
Dynamic Clothing
While Conforming Clothing has a skeletal rig and follows the character’s every move, Dynamic Clothing is draped like a piece of cloth would fall in the real world. Think of a table cloth that’s dropped onto a table, or a blanket that’s pulled over a person. DAZ Studio has its native dForce physics engine to simulate such things, although dForce is said to be developed further into other areas of physics in the future.
The advantage of Dynamic Clothing is the realism it can bring when compared to confirming counterparts, but it can be tricky to simulate, and it can take a while to calculate. Dynamic objects also start out as regular 3D meshes, with special surface properties attached that describe how much friction and weight an item has. With those properties the dForce engine can calculate what happens to the cloth over a series of frames as the item moves. Clothing creators will set this up when you buy a dForce capable item, but with practice, any surface of any 3D object can have these properties applied.
Dynamic items are also build in an external application, usually around the base character, but since the intention is for them to be simulated, they may look a little “off” when you load them into your scene. A dynamic skirt for example may look like a regular circle when loaded, but by the time it’s draped around a character, it’ll look like a very realistic piece of clothing.
Often times, a combination of Conforming and Dynamic Clothing is used, to get the best of both worlds. Think of a dress that’s fitted around the chest (confirming), while its long skirt might be draped (dynamically).
To setup dynamic surfaces, select the surface of your item, then head over to the Simulation Tab and choose dForce – Add dForce Modifier: Dynamic Surface.
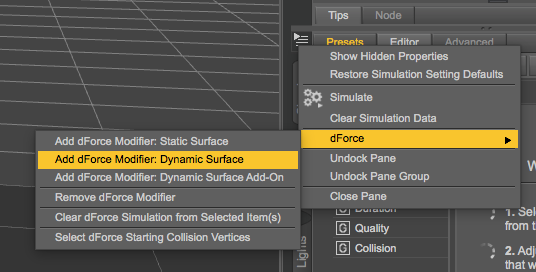
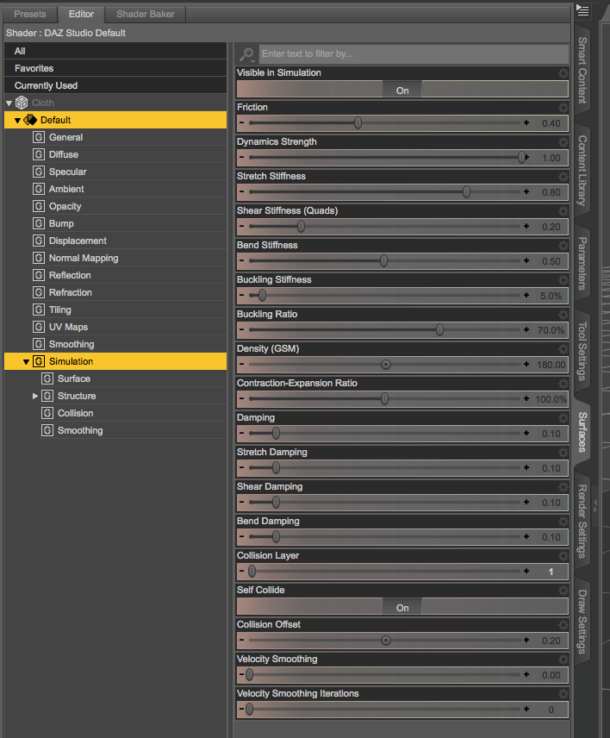
Any adjustable parameters will be available the Surfaces Tab under Simulation.
That’s all I have, folks!
And that’s that’s the basic principle of how 3D clothes come to be in DAZ Studio. It’s a hugely labour intense process, often undertaken by more than one person. If this sounds overwhelming to you, that’s because it is! At the same time, it’s also very rewarding to look under the hood of the internal workings of the products, and have a try at making your own objects.
As I said, I don’t make 3D clothing myself, but many of my friends to. Here are some whose work I think is excellent and inspiring:
- Chris Cox develops clothing items in Blender, for use in DAZ Studio. He frequently streams the process on his Twitch channel, I love watching him model and get inspired for all kinds of projects. I hang out in his chat, so drop by and say hi!
- Christina McKay knows a thing or two about Blender, Photoshop and DAZ Studio. She’s been working in 3D for decades, doing custom 3D work for private clients. Her tips and expertise are invaluable to me. She shares her knowledge on YouTube, runs a Patreon campaign with access to 3D assets, and can frequently be found in my live streams too. Give her a big hand when you see her!
- Biscuits makes some of the best hair props I’ve used. She also makes merchant resource texture packs and accessories. Check out her Renderosity store and her YouTube channel, tell her Jay says 😉