A viewer asked me recently how to get the ZBrush to DAZ Studio connection going step. I’ve explained how to use GoZ in this article, but I’ve not mentioned the pitfalls of the installation process. I thought I’d put this quick article together with screenshots and all.
Prepare Install Manager
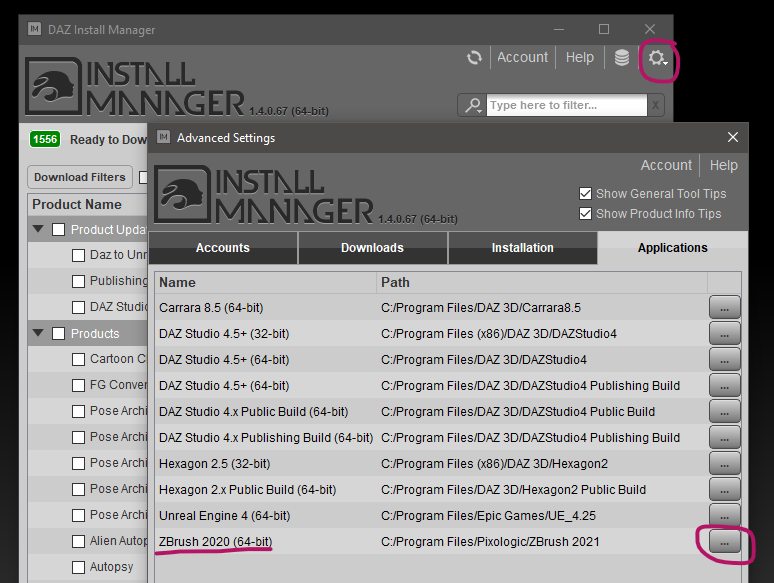
First of all close DAZ Studio and ZBrush before you begin. Open install manager and choose the correct path for your ZBrush location. This changes every few versions. At the top left, click the gear icon and choose Advanced. Head over to the Applications tab and you’ll be able to browse to your version of ZBrush.
Now close this window and type in GoZ into the search box. Pick GoZ for DAZ Studio and start the queue. This will install the relevant files for both DAZ Studio and ZBrush.
Note that if you have the beta version of DAZ Studio, there’s a separate GoZ available that you can install. You can only use it either with the beta OR the release version. Trying to install the GoZ Beta will uninstall the GoZ release version.
Prepare DAZ Studio
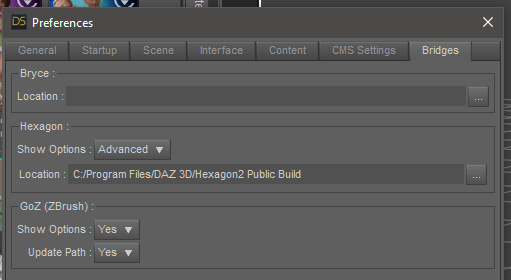
Open DAZ Studio and take a look under Edit – Preferences – Bridges. You should find the ZBrush options in this window. They’ve added a new setting here recently that will let us pick what happens when we send files over to ZBrush. The previous default options (no and no) sometimes launched a new instance of DAZ Studio, so now we can make sure ZBrush sends the changes back to the DAZ Studio instance that initiated the transfer. Very neat!
Set both options to YES and you’re good to go.
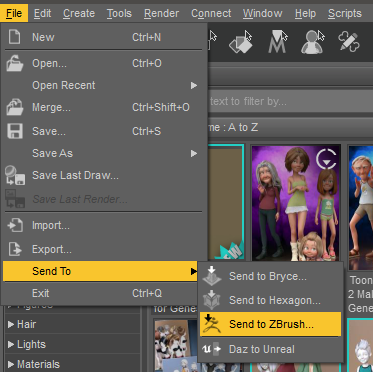
Now you can start sending files over to ZBrush. Load an object, select it in the Scene Tab, then hit File – Send to ZBrush.
Working in ZBrush
Your object will appear as a tool in ZBrush. If you send multiple items (like a character with clothing), various subtools will be available. Drag your new object out, switch into edit mode and make a change. If you want to work on a subtool, ALT click the item first.
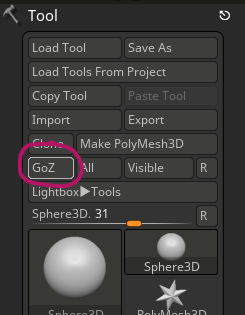
When you’re done, click the GoZ button on the Tool Shelf. This will send your data back to DAZ Studio.
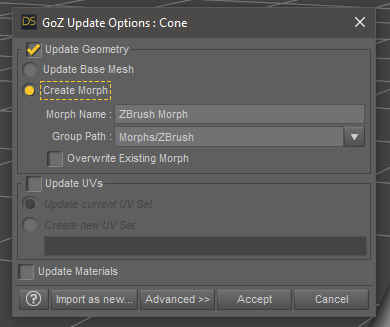
Back in DAZ Studio
DAZ Studio should recognise that a change has been made and offers to create a morph on your object, or alternatively change the geometry. Pick what you need and hit accept.
That’s it! Now you’ll be flying back and forth between the two apps and fix meshes left right and centre. Have fun!
Hi,
I am getting this error with DAZ Studio 4.21 (64-bit)
ZBrush in unable to connect with pixologic tm ZBrush@, check the installation
Regards
Malcolm
Did you give Install Manager the correct path to where ZBrush is located on your system? It’s not something that can be changed in Daz Studio or once the bridge is installed. I’d uninstall the bridge, find the path to ZBrush, specify that in Install Manager and then try again to send something over. ZBrush then needs to know where Daz Studio lives, I have it working fine with Daz Studio 4.21.
Hi,
I have had Problems too. But I have solve them.
Open DAZ and then F2 to open Preference Window,
then click on Bridges in the Window,
then you must click the Hook
at Update Path and Show Options
then click Apply and Accept.
Greets from Sandra