The other day I thought it would be a hoot to bring in some of the wonderfully modelled low-res Synty Assets and use them together with the high-res characters in DAZ Studio. With access to the source OBJ files this worked out rather well, but it’s a time consuming process importing, shading and saving each item on its own. Besides, it means the actual pre-built demo levels need to be painstakingly recreated in DAZ Studio.
It does work though, and it looks nice for the comic project I’m working on. With all Synty Assets combined, the sets would have a cohesive and fun style, no matter where my characters would end up going. The assets are all built to scale and work with Genesis 8 figure height out of the box. So far so good!


The one thing that the Synty source files do not provide is the pre-built demo levels. Those are available with the game projects only. I was wondering if there’s a way to extract them from the Unreal projects in a way that makes them usable as a complete set in DAZ Studio. By that I mean, individually split objects that I can move around and hide if necessary, rather than have a single large OBJ as a set. After spending several days testing and trying, here’s the workflow that I’ve come up with:
- open the demo map in Unreal Engine
- select all static meshes in the World Outliner (SM prefix)
- head over to File – Export Selected and choose OBJ
- open this single OBJ in Blender and make sure it’s split by object on import
- let Blender export all separate OBJ files with a batch script
- import all those OBJs into DAZ Studio using another script
- apply shaders, and group as needed
Let’s see how to do this step by step. I’m using the Office Pack for this example.
Export from Unreal Engine
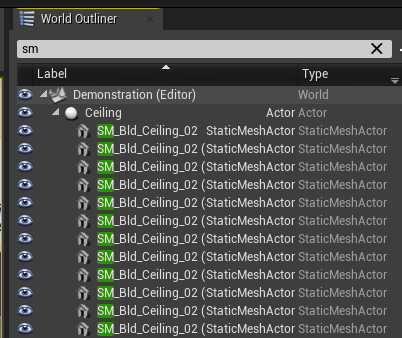
Once the demo level is open, head over to the World Outliner (top right) and search for SM. This will filter out all static mesh objects. This is necessary to do, otherwise Unreal Engine will default to FBX export as it’s trying to preserve morph targets and rigging (unsuccessfully I might add). By only selecting static mesh objects, we have a choice of format upon export. Neat, huh?
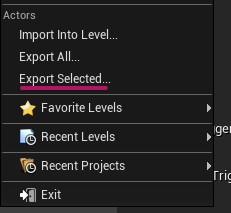
Press CTRL + A to select all filtered items, then head over to File – Export Selected. Pick the OBJ format and a folder of your choice. There’s no need to export the maps and save some time, we’ll reference the original textures that come with the source files. This will generate one huge OBJ file.
Import and split in Blender
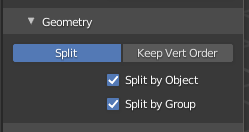
In Blender, delete everything from your scene and import the OBJ file made by Unreal Engine. Carefully check that you split by group and object. It doesn’t hurt to preserve polygroups at this stage too (under Keep Vertex Order).
Blender will take some time to process all objects and will have re-created the complete level. Don’t worry if it appears to hang, there’s a lot of work happening under the hood. When Blender is done, you may encounter some weird clipping issues.
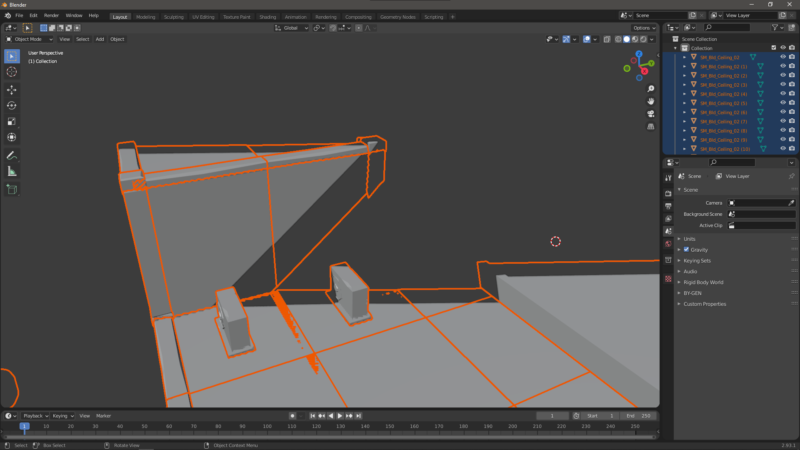
This is happening because the objects are 100x larger than then should be. You can fix the clipping issues by opening the Toolshelf (N) and adjusting the Clip End by a factor of 10, but this step is entirely optional.
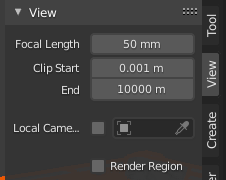
Alternatively, don’t worry about it and fix the scale of all selected objects – we need to do this anyway. After import, everything is selected by default (if it’s not, make sure that it is), so type S 0.01 and hit Enter. That should turn everything into the correct size (check on the item tab).
Batch exporting from Blender
We need a way to tell Blender to loop through all objects in our scene and export them as separate OBJ files. By default (much like Unreal Engine) it would merge everything together into one large object and we don’t want that. Although this would work in DAZ Studio, it’ll be very cumbersome to use. To alleviate this, we’ll use an import script that ships with Blender – if we’d know where to look for that ey? I came across this by pure fluke!
Switch to the Scripting Tab and head over to Templates – Python – Batch Export.
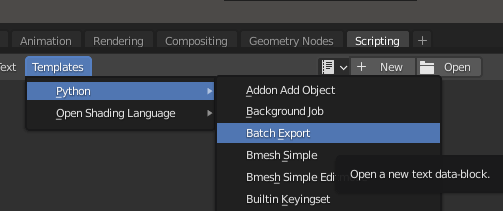
This will open a ready-to-launch script that will do the hard work for us. If you haven’t already, save your scene as a regular .blend file now. Pick an empty folder for this, because that folder is where our script will save the individual OBJ files.
By default the script will save in FBX format. Let’s change line 11 accordingly:
bpy.ops.export_scene.obj(filepath=fn + ".obj", use_selection=True)Here’s the full script just in case the Blender folks have changed it by the time you’re reading this. I may split this section out into a separate post:
# exports each selected object into its own file

import bpy
import os

# export to blend file location
basedir = os.path.dirname(bpy.data.filepath)

if not basedir:
    raise Exception("Blend file is not saved")

view_layer = bpy.context.view_layer

obj_active = view_layer.objects.active
selection = bpy.context.selected_objects

bpy.ops.object.select_all(action='DESELECT')

for obj in selection:

    obj.select_set(True)

    # some exporters only use the active object
    view_layer.objects.active = obj

    name = bpy.path.clean_name(obj.name)
    fn = os.path.join(basedir, name)

    bpy.ops.export_scene.obj(filepath=fn + ".obj", use_selection=True)

    # Can be used for multiple formats
    # bpy.ops.export_scene.x3d(filepath=fn + ".x3d", use_selection=True)

    obj.select_set(False)

    print("written:", fn)


view_layer.objects.active = obj_active

for obj in selection:
    obj.select_set(True)
Now select all objects you’d like to export and click the little play button at the top of the Script Tab. This will take some time again.
Importing multiple objects into DAZ Studio
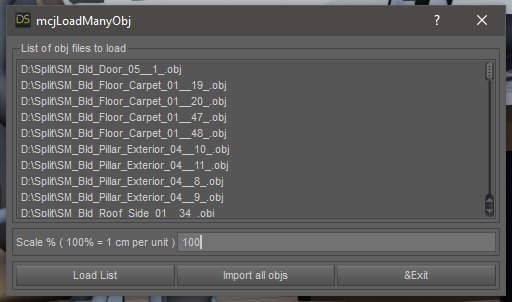
By default the OBJ importer in DAZ Studio can only handle a single file. Thankfully mcasual has a script that can help us. All it needs is a plain text file with the full path to every object we’d like to import on a new line. Shall we type it out? Nah! Windows can help us with that.
Open a command line prompt and navigate to your folder. The following command will create the necessary text file for us in the same folder:
dir /b /s *.obj > files.txtNow run the script in DAZ Studio and open the text file, then watch countless dialogues open and close in record time. It’s very entertaining I don’t mind telling you. Thankfully we’ve already fixed the scale in our earlier step, but if we hadn’t, the script lets us override it. Leave it on 100%.
That’s it! Now it’s just a matter of applying the correct shaders. For that I’d start with a single object and choose the correct texture, save the shader out, then select all objects/surfaces and apply that shader. There’s a lot of work to be done grouping items together by room or type, making the glass transparent, fixing some of the monitor textures, and adding some morphs/rigging so the doors can open. But hey, that’s the fun part of set design.
Thank you so much for the script Jaques, and thanks to hacsart on the DAZ Forum for the directory listing tip!