Here’s a high-level overview on how we can convert existing skin textures from older Genesis figure and use them with another generation, like Genesis 9. The principle is the same for the other direction too, should you wish to use a G9 skin on an older generation or perhaps a different figure altogether, like the Character Creator figure.
We’ll need two tools inside Daz Studio for this: Texture Atlas and Map Maker, and we’ll need our friend R3DS Wrap for the conversion. Note that this is not for the faint hearted, and it’ll take a bit of time to get it right. This guide is intended for content creators and power users. There’s an easier way to use existing textures without conversion on Genesis 9 using Cayman Studio’s Legacy UVs product.
Here are the steps for texture conversion in principle:
- convert both character UVs to a single UDIM tile
- import both OBJs into R3DS Wrap
- import the base texture and wrap G9 around the original character
- use convert and extrapolate the texture for the G9 single UDIM fit
- in Daz Studio, use Map Transfer to split the single UDIM into multi UDIM tiles
Let’s take a look at this step by step, using the Crow 8.1 character.
Creating a single tile UV Map
Our first step will be to give both source and target characters a new UV set that references all UDIMs on a single texture. We’ll need this texture set later in R3DS Wrap to convert it pixel by pixel for use with Genesis 9. In Daz Studio we can use Texture Atlas for this.
Load your source figure and customise the materials they way you see fit. These days we tend to use attachments for eye brows, so try to find an option that loads without them painted on. Same for tattoos, scars, body paint for make-up. With our source figure selected, right-click on the Surfaces Tab and bring up Texture Atlas. Un-tick all items we’re not going to convert, like anything relating to the eyes, then click Auto Arrange at the bottom. You’ll see a preview of how the new texture will look like.
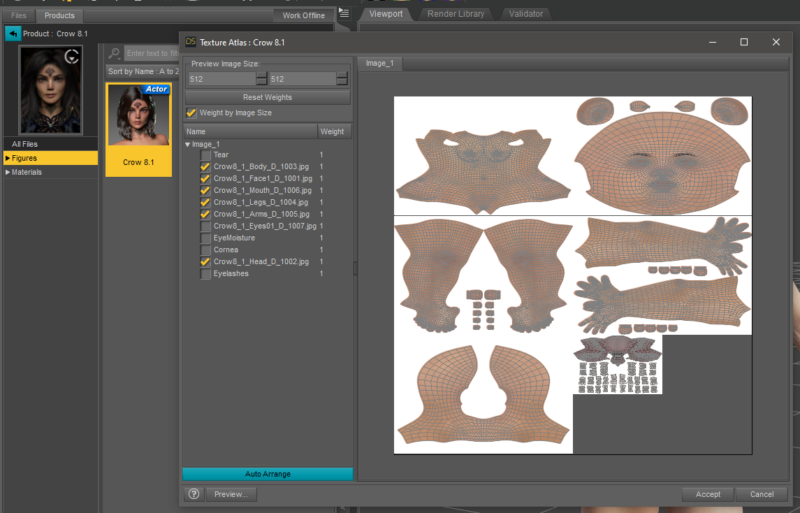
Some items may benefit from a higher texel density, some might not need as much as they currently have. I’m thinking the torso could use a bit more space on the map, so I’ll set it to 2, then hit auto arrange again to see a different layout. Hit Accept when you’re happy.
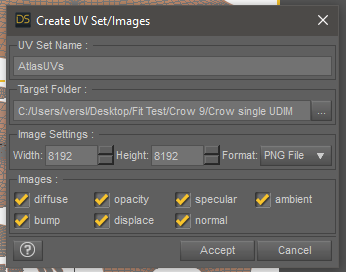
A new window pops up that lets us specify the texture size and location for our new maps, as well as a name for our new UV set. I’ll choose 8192×8192 for my intermediary texture, but you can go higher if you want. The goal here is to preserve as much detail as we can. Leave all the maps ticked and Daz Studio will convert anything it finds.
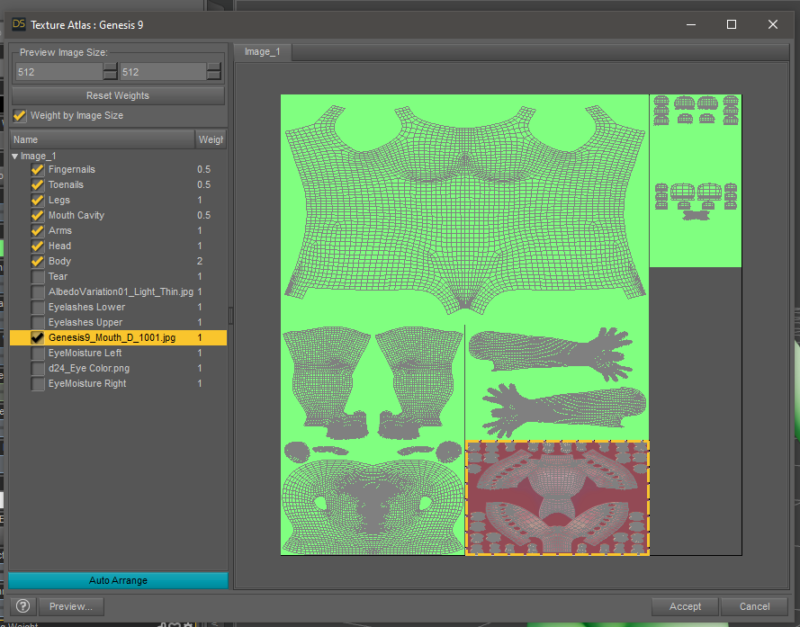
Hit accept to start the transfer process, then repeat the same steps for Genesis 9. Although we have a single tile UV set built-in to the figure, I’ve found that it doesn’t work well for our conversion process. For completion, here’s how my Genesis 9 single tile setup looks like:
Exporting our characters
To make sure the wrapping process works well for all surfaces, let’s use a UV Prep Pose of sorts to give R3DS Wrap a better way to detect things on the insides and in crevices. Both Genesis 8 and 9 have a UV Prep Pose you can use, spreading fingers and toes, closing the eyes, opening the mouth and dialling up nipples. The latter isn’t useful for us, so dial those out. Eyes closed and mouth open are the important things for us. You’ll find the prep poses in the Starter Essentials product, but you can dial these things in yourself if you prefer.
Export both figures at their current resolution without attachments, using the following options. I’m using the Modo scale and filter options:
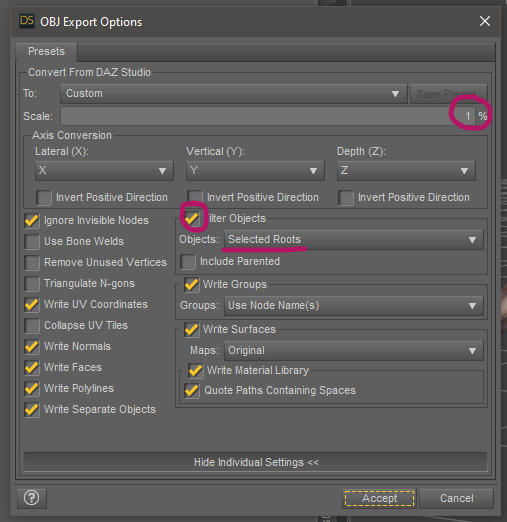
With our objects and maps exported, let’s see how we can transfer the textures in R3DS Wrap.
Wrapping and Texture Transferring
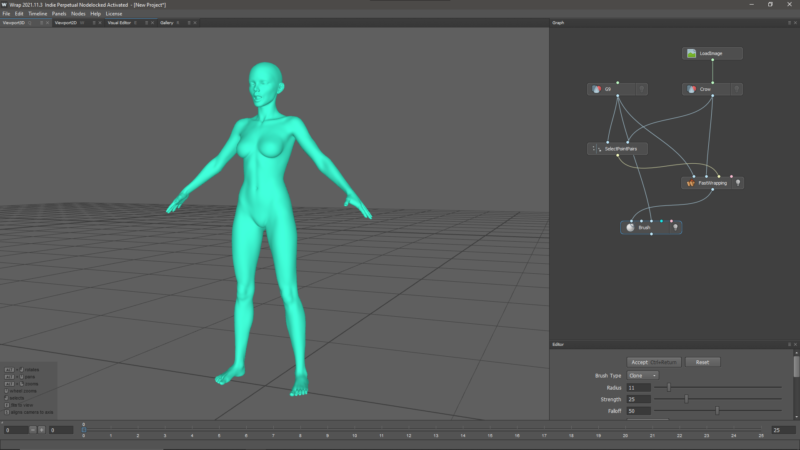
R3DS Wrap requires our target geometry to be wrapped around the source. If we give our source a texture, it can then transfer each pixel from the source UV onto the target UV and generate a new texture map. I’ve explained more about the wrapping process in a previous article, so I’ll focus on the texture related parts here. This is what my scene looks like after the wrapping process:
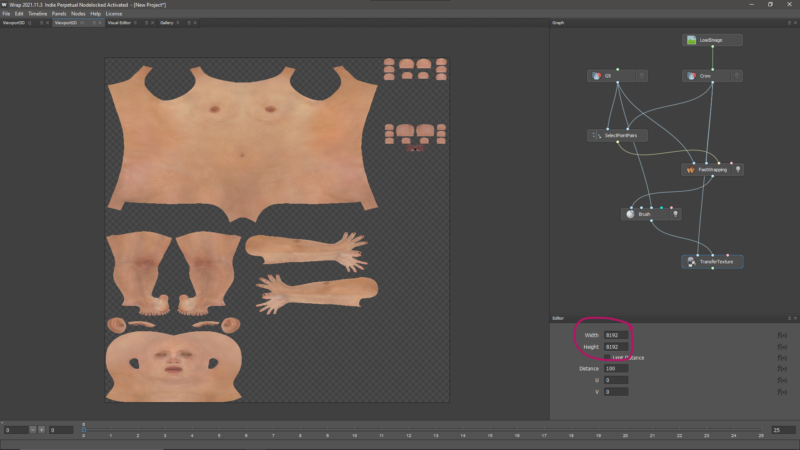
The brush node is optional to restore small details. Since we have an input texture (top left), I can now use a Transfer Texture node, plug in the source and target, then see the conversion in the 2D Viewport. I’ll change the converted texture size to 8192×8192 to preserve detail.
To avoid ugly seams, I can attach an Extrapolate Texture node that will cleverly extend the texture to all the transparent areas. As a final step, I’ll add a Save Texture node, specify an output path and hit Compute Current Frame to save it.
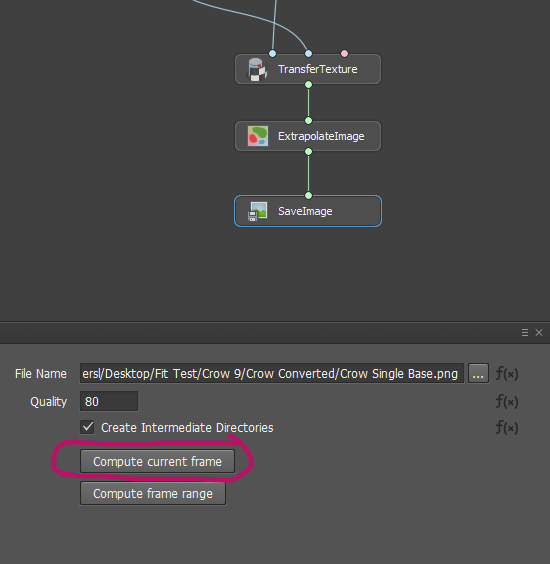
Repeat this process for the other maps in the texture set, simply by loading the new texture in the Load Image node. R3DS Wrap will calculate for a bit, but the wrapping process won’t have to be repeated. Don’t forget to change the file names for subsequent textures and hit Compute current frame to save.
Splitting the single tile into multiple UDIMs
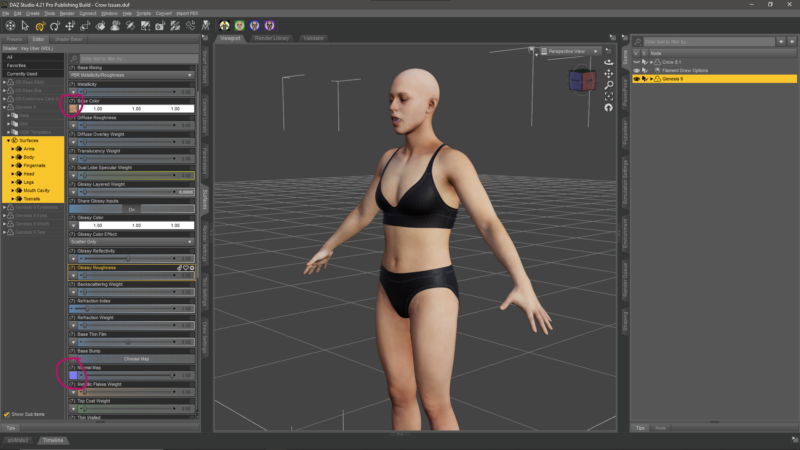
Back in Daz Studio, we can now use our new maps with the Atlas UV set as they are. Let’s apply them on the surfaces tab on all relevant surfaces and see what we get. All I had was a base and normal map, and I’ve changed the base colour to white so the texture shows up. Very neat! However, this is an exotic UV set made by the Texture Atlas, and as such this new material preset won’t be compatible with the Genesis 9 when it loads.
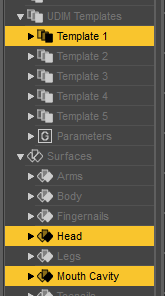
Let’s use Map Transfer to split it into multiple UDIM tiles again. Map Transfer bakes one UV set to another on the same figure. It can be found by right-clicking on the Surfaces Tab, and – I’m not going to lie – it’s a little unintuitive to use. We’ll need to re-create the UDIM templates, which are shortcuts for multiple selection. Each of these will become one UDIM tile. For example, Template 1 is the head and mouth. Template 2 is the body, and so forth.
With Map Transfer open, let’s painstakingly re-create those. Thankfully we can setup the first one, cancel out of Map Transfer, look up the next, and keep adding until we’re done. Josh has a video about the procedure here. You can also save a preset, so this only has to be done once. Here’s what mine looks like at the end:
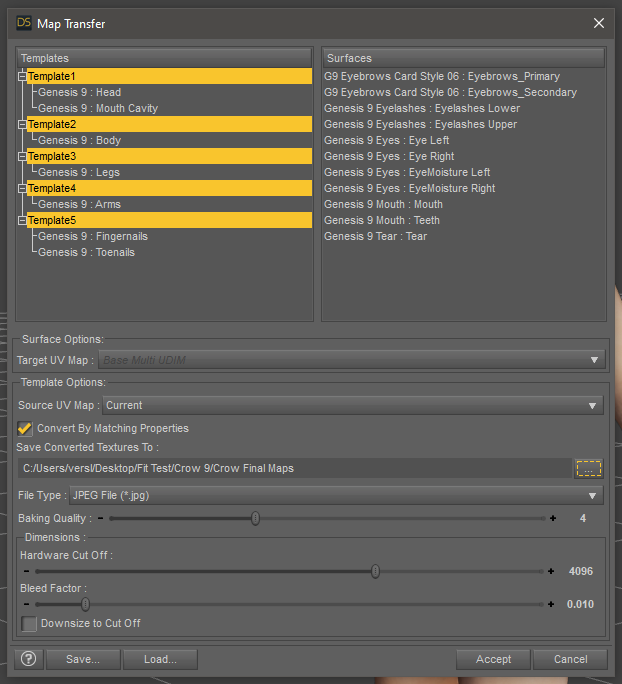
With all templates selected, specify your path for the saved maps, file type and the dimensions. If you leave the default, all tiles will be the same size as your source (8K in our case). Set them to something lower and Map Transfer will downsize them for you. You can also select each surface and select the target UV Set (Base Multi UDIM, greyed out when a Template is selected), but it should be set by default – just worth checking.
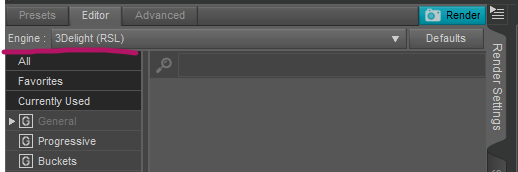
Note that the baking process happens in 3Delight, and as such, our render engine needs to be switched under Render Settings. If we don’t do this, we’ll end up with a long running calculation and black maps at the end. We don’t have to worry about lighting, just cancel out of Map Transfer, switch the render engine, then head back to Map Transfer and start the process. This will take a little while, so it’s time for a coffee.
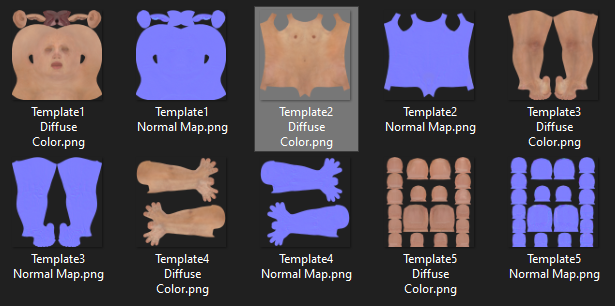
That’s it! Now we have a set of split up maps that work with the regular Genesis 9 figure out of the box.
Further Reading (and watching)
- Cayman Studio’s Legacy UVs is an alternate way to use existing skin textures on the Genesis 9 figure. It uses a combination of geografts and UV sets to make this happen.
- Josh Darling’s video about Map Transfer
Does either way the 3dswrap way or caymans way keep the high res. detail of genesis 9 ?
You mean the additional 8K skin details? They’re added via the Details channel in the new Genesis 9 skin shader, so if you use the R3DS Wrap method, it’ll work. If you use the Cayman Legacy product, it will apply the old shader from the original figure. Neither G3 nor G8 had the detail channel. 8.1 introduced it, and some figures came with their own details normal (like Crow). I would imagine those could be replaced with the details normal from G9, but I haven’t tried that out. The safest and most future proof method would be to convert the textures with R3DS Wrap. Hope this helps!
Do we really want to export Genesis 9 figure without mouth attachment? In that case G8 character will have teeth and tongue, but G9 will not. Will that not ruin wrapping process and texture map?
Good question! The G9 teeth are a separate object with their own UV map on UDIM tile 1, just like the G9 head. If you were to combine them, the UVs for the head and the teeth would overlap and give you a mangled unusable texture. I find it easier to use the stock G9 mouth textures, but if you ever want to convert them from G8 you’ll have to do it “like for like”. This means stripping away everything except for the teeth and gums from G8, then wrap that figure around the G9 teeth and convert those textures separately. The same goes for the eyes.
Why am I only getting the normal, diffuse and bump textures using texture atlas, I mean it seems that the translucency, roughness is lost. Is there any way to get them also when using texture atlas. Anyway , thanks a lot.
Good question Mark! I guess it’s because Texture Atlas is a seriously old lady that was introduced long before Iray, which means it doesn’t know what a roughness or translucency map is. As a workaround you can assign those maps to channels that Texture Atlas knows and let it convert them that way (Specular and Ambient are good options as they’re usually empty in Iray). To assign them, convert the shader to 3Delight Uber Surface, plug in the maps, then run Texture Atlas and boom – those maps get converted.
Genius idea, you just save my life! I can’t wait to do as what you taught.
You can convert skin textures from pretty much any figure provided you have a clone shape without having to use R3DS Wrap.
Blender can bake the textures you want without seams (it does so better than older versions of R3DS Wrap. I haven’t used the more current ones) and it’s free, which R3DS Wrap isn’t, despite being a truely spectacular software.
It’s also easier to get into grips with Baking in Blender than the Node workflow of R3DS Wrap.
The biggest advantage of R3DS Wrap is converting shapes. It excells at that.
Regards
The improvements in workflow that Wrap 2023 brought completely blow Blender and other DCC texture transfer solutions out of the water. Blender has a permanent place in any toolbox, but really it shouldn’t be suggested when it comes to texture transfer with human figure topologies, especially so when Wrap is in the conversation. The only advantage it has is it’s free…if you ignore that Wrap has a 30-day no strings attached free trial that can be extended with some know how…
Also it’s 2024. Are we really still acting like node workflows are hard and aren’t a part of every single standard CG application in the pipeline? Heck, even Blender is adopting everything-nodes.
Jay, great tutorial as always on some of the more ‘uncharted’ parts of Daz! I have a suggestion that I just confirmed works for my workflow. I’m rendering outside of Daz and only care about the textures being for the G9 UV space, not the morphs, so I don’t care if everything is done with a zeroed Genesis 9 mesh.
You can bypass the geometry wrapping headache by creating your source mesh from using the Legacy UVs product you mention at the beginning of the article. You then have a very very nearly geometrically exact (not vertex exact) Genesis 9 source model with the older generation UVs. Now texture transfer in Wrap (after collecting the UDIMs to a single tile). As you know in newer versions of Wrap, only the source geometry need have a single UDIM tile. That change saves us even more time in the pre- and post-processing stage.
This method completely skips the manual geometry wrapping part and goes straight to the texture transfer process. One less step to introduce inconsistency. Fingernails and eyelids look pretty great too without modification. Best of all, no setting up the point pairs.
A caveat that might be an issue is that you’ll likely see some UV island stacking when exporting the source G9 mesh on account of the Legacy UV geograft. I don’t think it should be an issue since the projection itself doesn’t “see” it, but perhaps it may be an issue for other use cases. I also haven’t tried this with any anatomical element grafts.
At any rate, take care!
That is a pretty cool find, thank you for sharing! I’ll try this out on my next Wrap adventure.