I’ve recently made the above video about converting Genesis 8 characters to the new Genesis 9 figure. It’s been a runaway success and I felt we all might benefit from written instructions in addition. These are easier for me to update as new tips and tricks come to light, and link to other relevant resources at the bottom. There are a lot of steps to the process, some of which I’ve not mentioned in the video:
- load Genesis 8.1 and 9 into the scene
- dial up the G8 fit clone in the G9 figure
- export G9 as OBJ without attachments, then import again
- run Transfer Utility from G8 to the G9 fit suit
- fit to G8.1
- dial up your character shape on G8.1
- export the G9 shape, import as a morph on a fresh copy of (
- match skeleton to shape and ERC freeze
- fix eyes if necessary, then save the morph
The process is very similar for Genesis 2/3 figures, but I’ll highlighted those bits in another article. While this is neither a perfect solution, nor a one-click affair, it does give us a good starting point for a base conversion that can be refined in a 3D modelling app. Let’s go through this together step by step.
Creating our Genesis 9 Fit-Suit
Here’s the plan: we’re going to turn the G9 base figure into a tight bodysuit that our G8 figure will wear, taking on the shape of our desired custom character. A Fit-Suit in this context is something that has the geometry of our target figure, but can follow another shape. Once done, we’ll import this new G9 fit suit shape as a character morph on the base figure so that it can be dialled in and wear native G9 clothing.
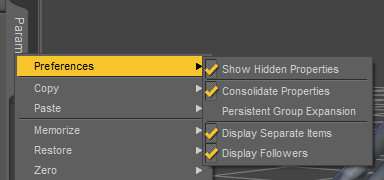
To do this, let’s import both G8.1 and G9 figures into the scene. Set the G9 figure to Base Resolution to avoid geometry mismatch issues in Morph Loader later. Make sure Hidden Properties are enabled on your Parameters Tab.
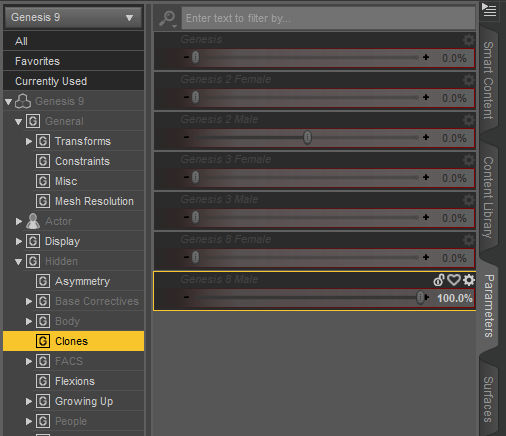
With your G9 figure selected, head over to Parameters – Hidden – Clones and dial up your appropriate G8 male or female fit clone. This will morph G9 into the shape of the G8 base figure, or at least the top part of the body.
The legs don’t quite match up, so we need to adjust the following parameters manually:
- Left Thigh Rotation: 6.5
- Right Thigh Rotation: -6.5
While this doesn’t line up 100%, I find it sufficient to get adequate results. You can do more fine tuning at this point, like Chris does in his demonstration by moving the bone positions, or try other values, but I’ll leave it up to you.
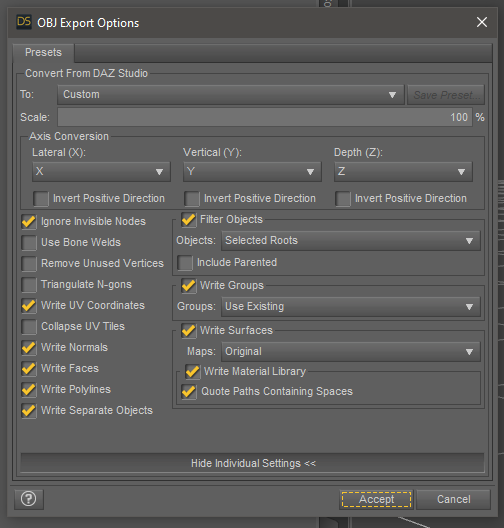
Export the G9 figure with the following settings at base resolution. This assures that you’re not exporting any attachments like eye lashes, mouth or eyes. Call it G9 Fit Suit or something equally memorable.
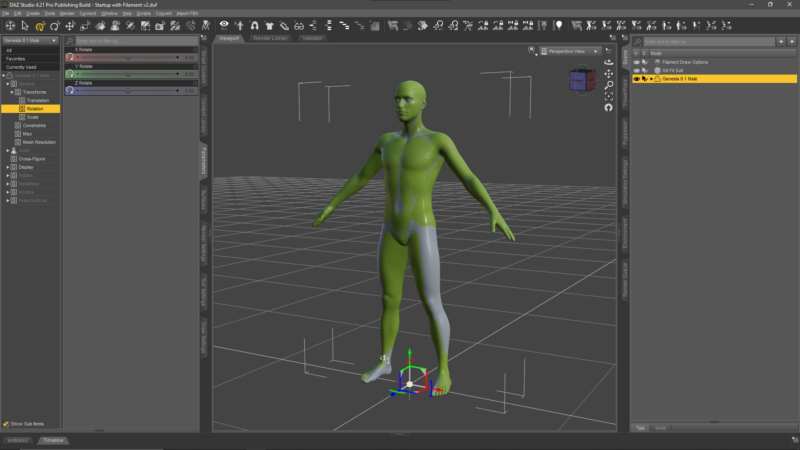
Delete your posed G9 figure from the scene an import the OBJ with the same scale as you’ve exported it. I’m using the Daz scale on export, so I’ll use the same on import. You should see the two figures in your scene once again, lining up closely as before. I’ve coloured G9 green to tell it apart from the grey G8 figure.
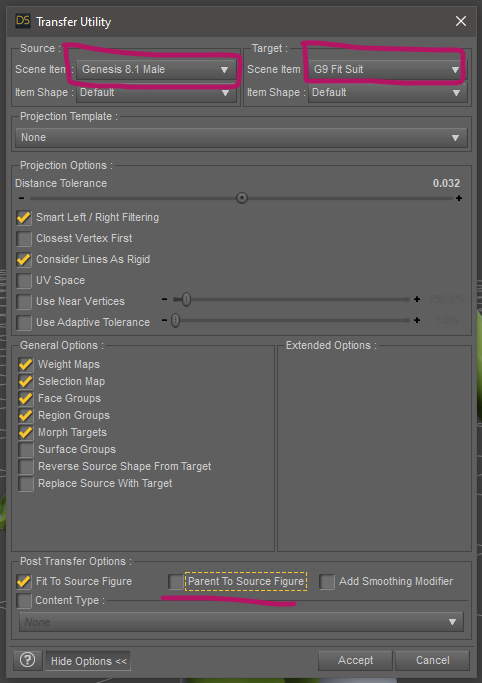
Now we run Transfer Utility to bring the G8 rigging and weight maps over to our un-rigged G9 figure. Right-click on the Scene Tab and navigate to Assets – Transfer Utility.
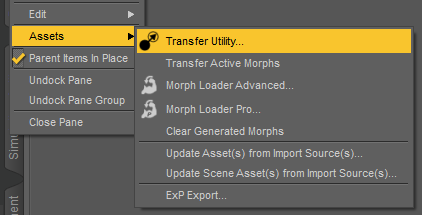
This dialogue is more intimidating than it looks. We’ll leave the defaults, aside from one tick box at the bottom as I won’t want to parent my fit suit to the G8 figure. Choose Genesis 8 as the source, and the G9 Fit Suit as the target and hit accept.
Dialling in your Custom Character
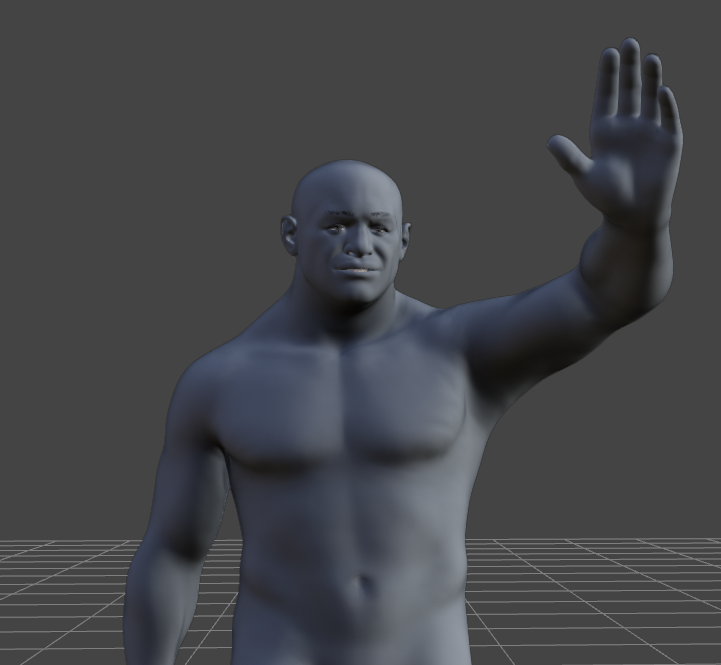
Once the transfer is complete, I like to select my G8 figure, make it invisible and dial in the character I’d like to convert. You should l see the G9 fit suit take on the shape of your G8 character now, which is what we want. To avoid distortions, some features may have to be dialled out at this point, such as belly buttons and finger nails. It will largely depend on the features of your characters. Experimentation is key, be prepared to do this multiple times.
Some features like eye sockets are prone to distortions, but these can be cleaned up in your favourite modelling app. Here’s Underbelly 9, looking radiant!

Now we’ll export this new G9 version of our character as OBJ. Make sure it’s selected and switched to base resolution if it isn’t already, and use Daz Studio scale on export. Feel free to save your scene at this point, then start with an empty scene for the next step.
Importing the Genesis 9 Morph
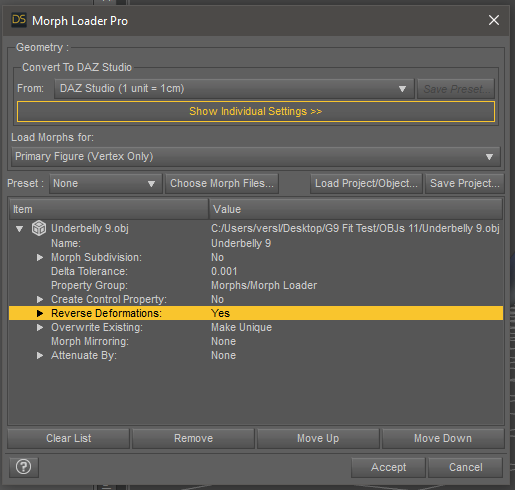
Load in a fresh G9 figure, select it and choose Edit – Object – Morph Loader Pro. This interface may seem a little confusing, but don’t let that deter you – it has a lot to offer. Pick your exported character OBJ under “choose morph files”, then set Reverse Deformations to YES. Not strictly necessary, but advisable in pretty much every situation. Hit accept and be greeted with a success message (hopefully).
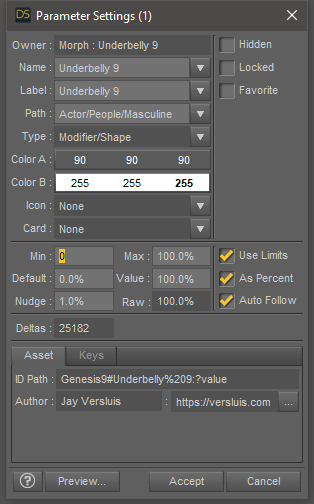
Your morph dial can be found under Parameters – Morphs – Morph Loader.
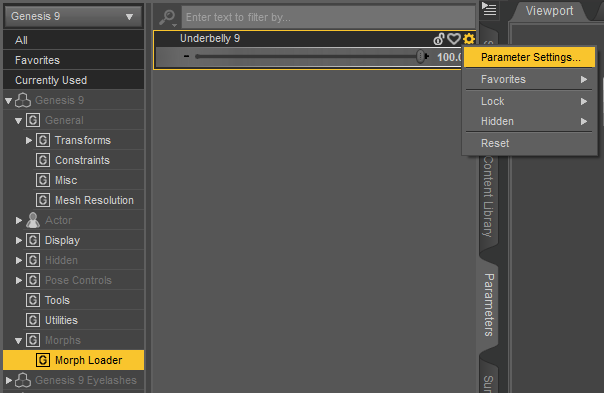
Note that the dial will allow a -100% limit by default. I tend to disable that under Parameter Settings. Feel free to adjust the path to this dial to something else, like Actor/People.
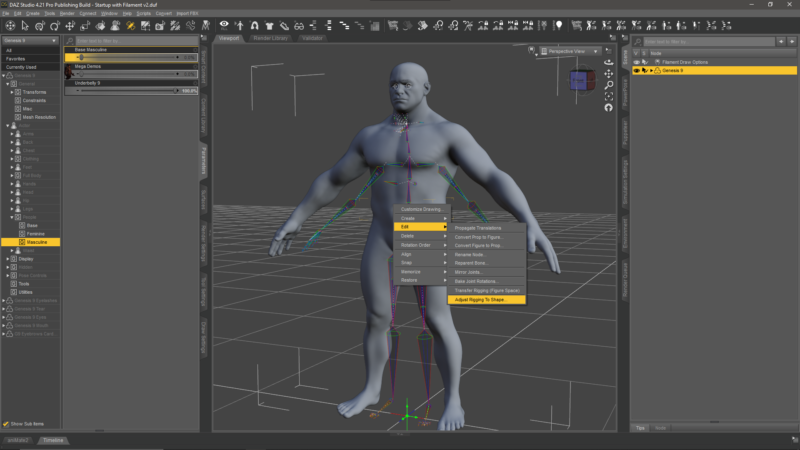
Switch to the Joint Editor Tool and notice that the skeleton doesn’t quite match up with our character shape. This will lead to ugly distortions when we dial in a pose. Let’s fix this by right-clicking on the figure and select Edit – Adjust Rigging to Shape.
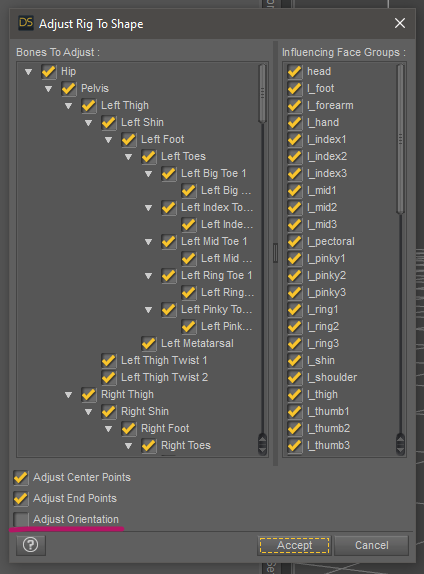
A new dialogue pops up. The defaults will work fine. Note the small tick box called Adjust Orientation. This will adjust the bones to follow the figure shape. Most of my G8/8.1 conversions worked fine with this option enabled, but know that it can cause issues with eye rotations on some characters. Experiment with it and see if your eyes behave correctly when you move them up/down/left/right. If you have trouble and they move the opposite way to the rest of the body, disable that tick box.
Hit accept and the skeleton snaps right into place. Result! While poses will now work great with our slider set to 100%, the skeleton does not adjust if we dial the morph down. Let’s adjust this next with a technique called ERC Freezing. This will tell Daz Studio to calculate the position of the skeleton on the fly as we blend in our shape.
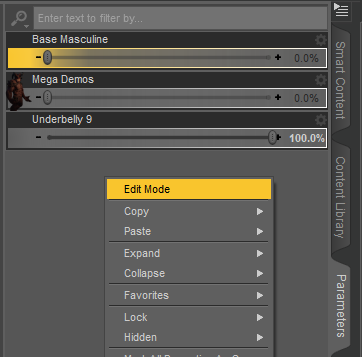
Right-click somewhere inside the Parameters Tab and choose Edit Mode. Notice a little M icon appear in front of every morph dial.
Right-click on your slider and choose ERC Freeze. Another slightly intimidating window appears. Undeterred, we accept all defaults and click accept.
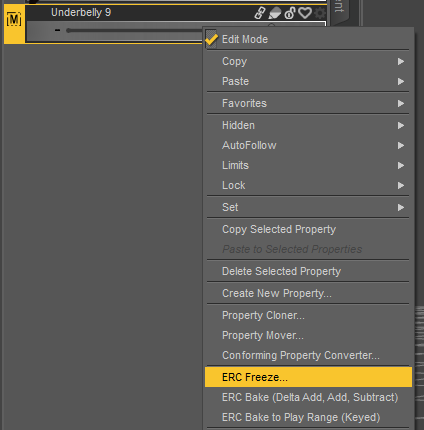
That’s it! Disable Edit Mode on the Parameters Tab again and see your skeleton move into position as you move your slider. Try out some poses and test the functionality of your new Genesis 9 character. You may notice that the eyes and teeth need adjusting, which requires additional morphs to be created in the new separate eye and mouth attachment. I’ll deal with this in another article, let’s assume everything is working fine for now.
Saving your Morph
Save your current scene before proceeding, just in case something goes wrong in this step.
We need to save our morph so that a new Genesis 9 figure will load with it in place, and at 0%. Hence, dial your morph back to zero before proceeding. I strongly recommend saving your morph in a separate empty library rather than adding it to your default library. It’ll make fault finding so much easier later.
With your figure selected, head over to File – Save As – Support Asset – Morph Asset. This brings up a dialogue that lets you specify some aspects about your morph, and most importable select it. Take some time to ponder over this before proceeding. This dialogue is designed for content creators and hence does some scary stuff under the hood we need to understand.
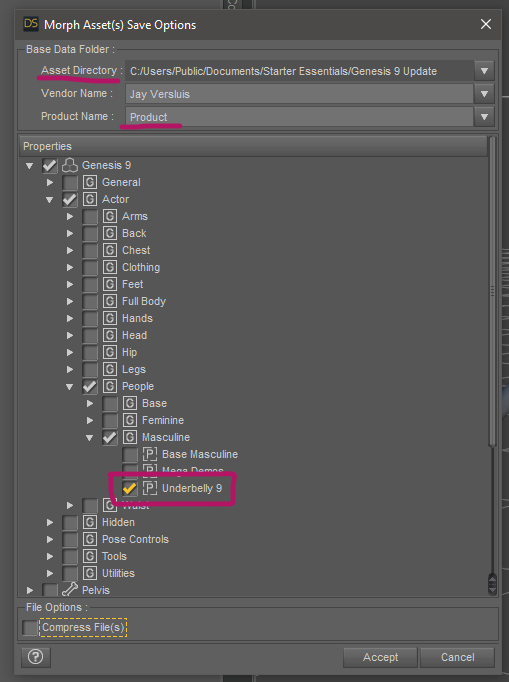
Under Asset Directory, pick where you’d like to save the morph. As I said, it is advisable to choose a custom folder here rather than the default My DAZ 3D Library folder, especially if you intend to distribute or backup your morph. Daz Studio will create a data folder inside this folder, underneath which your morph will be saved in the following structure:
- /data/Daz3D/Genesis 9/Base/Morphs/Vendor Name/Product Name/YourMorph.dsf
Specify your Vendor and Product name accordingly, then drill down and select only your morph from the list. This will assure you only save a single file rather than overwrite every single setting and introduce all kinds of potential issues.
That’s it! Now you can load a new Genesis 9 figure and find your morph in the list of Parameters with all the others. With it in place, you can dial it up, slap a skin texture on it and store it as Shape or Character Preset to your Content Library to create user-facing one-click load options.
Further Reading
I have various other videos and articles on related topics, as well as links to resources that may be of interest:
- my video about the G8 to G9 conversion process: https://youtu.be/jROlY34tNNU
- my video about converting G2/G3 characters to G9: https://youtu.be/ak6Nlfid5CQ
- my video about importing an eye/mouth follower morph: https://youtu.be/gvh1bWTof8I
- Chris Cox’s video about converting G8 characters with additional tips: https://www.twitch.tv/videos/1630246292
- Canary3D’s video about creating an eye follower morph: https://youtu.be/7wR_nQVFJ2Q
Hello. I watched your video on converting G2/G3 to G9. I tried the same approach to convert the Girl 6 (my favorite character) to G8F. Everything worked perfectly except the teeth. Next, I tried converting her to G3 then G3 to G8. Nope! After days searching the internet and trying suggestions with no success, I decided to contact you. Could you provide a tutorial on how to correct teeth after converting a G2 character to G8? Thanks for your time and all the wonderful tutorials.
Hi Courtney, I like the Girl 6 too, there were many iconic characters in past generations. I’m glad there’s a home-brew way to use them with the new Genesis 9 figure. For the eyes and teeth, you’ll have to find a way to correct their shape/size/position and import that change back into the respective figure. I’ve explained the principle in this video for eyes, but it’s the same for teeth: https://youtu.be/gvh1bWTof8I
I’m not showing how to make the change itself, as this will depend on the figure and the modelling tool you use. I like doing this in Blender, but it can be done directly in Daz Studio with the many size/shape dials we have. Export at base res, then import with morph loader and overwrite the one that’s called like your figure morph. Good luck!
Hello jay it is very good and very detailed though. There are people like you who would be interested in being able to make the body and the head separately to inject them as appropriate. Thank you
Thank you! To split the head and body morphs out, I recommend a tool called Shape Splitter. It works great with Genesis 9 and older generation figures, it’s very easy to use. I’ve made a video about this here: https://youtu.be/PnPOD_d2GOs
Thank you very much Jay I will try everything… Greetings from Barcelona
It worked, but G9 poses make the hands monstrous bt distorting the mesh.