Blender has a very powerful yet somewhat confusing re-timing feature. This comes in handy when you want to render animations at a different frame rate than they were designed to be in. As an example, you may have setup your scene with 24fps in mind, but want to render out a 60fps version, or vice versa, or any other combination thereof.
There’s a lot of conflicting information on the web, and I thought I’ll bring clarity to the situation by showing a few different use cases. I’ll talk about re-timing the whole animation, as well as re-timing individual tracks, both with keyframes as well as NLA strips (that’s three completely different scenarios).
Rendering with a different frame rate
The most common use case is that an animation is completely finished and works well in one frame rate, but needs to be rendered out at another. This can be set without any changes to the objects in our scene. Head over to the Output Properties under Frame Range – Time Stretching. In versions prior to Blender 3.0 this value was called Time Remapping.
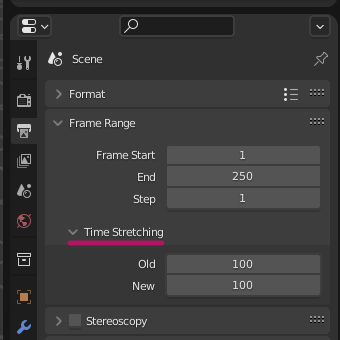
I had great difficulties grasping the concept at first, but it’s super easy to do complex calculations with these two fields. If both Old and New are set to the same value, the animation is rendered as is (1 frame on the timeline equals 1 rendered frame). The actual value doesn’t matter, so you could change this to 50 and 50, or 400 and 400 and it wouldn’t change anything. Integers only though, no fractions are allowed.
Re-timing happens by changing one or both values as follows:
- Old 100 / New 200 will render twice as many frames
- Old 100 / New 50 will render half the amount of frames
Arbitrary values can be inserted to let Blender calculate how many additional frames need to be rendered (or left out). To make it easy to remember:
- Old = Source Frame Rage (current)
- New = Target Frame Rate (desired)
As an example, if you had a 24fps animation that needs to rendered at 60fps, those values can be used for Old and New respectively. Notice how the behaviour of the play head changes when you do this, as do the number of frames that need to be rendered. Say you had a 100 frame animation timed at 60fps, and you’d like to render it out at 24fps, this results in only 40 frames to be rendered. Move the play head to the end and the blue line and the blue number will no longer be in sync.
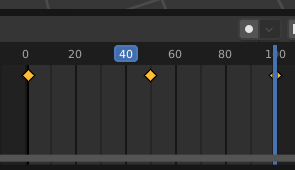
Pro Tip: to figure out the last frame of the re-timed animation, set both values to the same number, then park the play head on the last frame of your animation. Now change the numbers to your needs and watch the blue line move to the new value. That’s the last frame of your animation, and it needs to be specified as end frame when rendering up to this point.
Re-timing keyframes per object
When you’re building an animation with objects imported from different external sources, it can happen that their respective frame rates differ. One character may have a 30fps walk cycle attached, while another one may have been animated with 60fps. You can re-time the keyframes on the timeline by scaling (S).
To do this, select the object and park the play head on the first frame of the keyframe sequence. The play head acts as anchor point from where things are scaled. Now select all keyframes (A) and type S followed by the desired value. 2 would make the animation twice as long and half as fast, while 0.5 would do the opposite.
Determine the scale value by dividing the source and target frame rates.
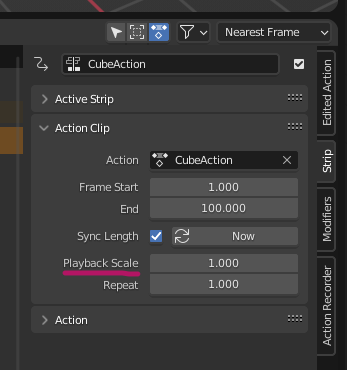
Re-timing an NLA track
Blender’s Non-Linear Animations can also scale action strips with the same principle. To do this, head over to the Non-Linear Animation timeline, select a strip and take a look on the Tool Shelf (N). On the Strip Tab, there’s a Playback Scale value that does what it says. 1 means 100% speed, 2 makes it twice as long and 0.5 would make it twice as fast. Determine your desired value as described above.
I hope this helps get your animation timings just right.
Hello,
How are you doing Jay? I would like to discuss partnership with you, I couldn’t find anywhere else to reach you, please send me an email if you are interested.
I’m fully booked and unavailable for partnerships or collaborations until mid 2026 at the moment. Please reach out again at that point, best bet is a message through Patreon or Ko-fi (everything else tends to be spam these days, especially via email).