The Media Plate actor is a new object that UE 5.1 and above can automatically create when you drag an image sequence into your scene. Most of the heavy lifting is not exposed and happens under the hood, which is why I’ve had some issues playing the sequences back in Sequencer, due to the lack of cue-able Media Player object. Here’s how to do it:
- import the image sequence
- drag it into the viewport, creating a Media Plate actor
- in Sequencer, track the selected Media Plate actor and disable auto play
Let’s see how to do this step by step. If you’re using an older version of Unreal Engine, check out my article on the traditional image sequence workflow.
Importing the Image Sequence
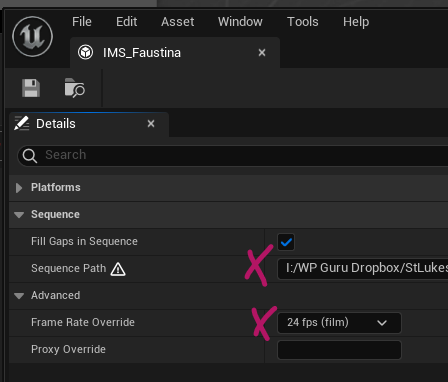
Just as a refresher, right-click in your Content Browser and head to Media – IMG Content Source to create the Media Source object. Open it and select the first frame of your sequence. The images do not need to reside in the project directory, although you get a warning if they don’t. Set the frame rate here for the correct playback speed.
If you have a video file, you can just drag it into the Content Browser to create a File Media Source object that will work the same way.
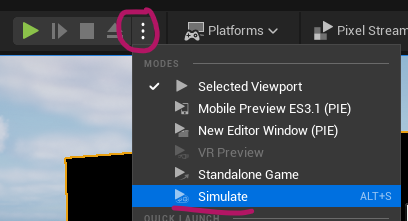
Drag this object into the scene and notice a black square. You can see a live preview of your media by switching UE into Simulate mode (ALT+S). Note that when you disable Simulate, the aspect ratio will go back to the plate’s original square shape. We’ll fix this below, but for now it’s good to see a moving image.
Animating via Sequencer
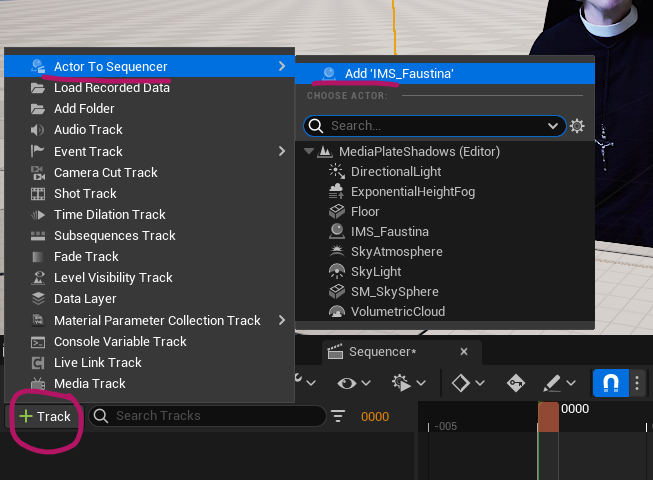
For cinematics, we likely want our media plate to move with the playhead on the timeline. Let’s create a new Sequencer object, select our Media Plate Actor and add it with Track – Actor to Sequencer – your media plate. Voila!
With Simulate mode active, we can move the playhead and our sequence moves. That’s great, however, we can’t render the sequence out with Movie Render Queue because we need to switch UE back to Current Viewport, which will set our plane back to a square, potentially obliterating our aspect ratio.
There are two ways to fix this: either on the Media Plate actor’s details, or by manually changing the scale value. The first option is great if you have a standard aspect ratio that can be chosen from the built-in drop down. Mine is 16:9, so that’s easy.
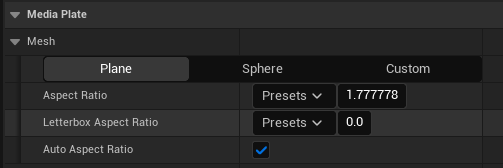
Alternatively, for those uncommon aspect ratios, I like to use a little trick that doesn’t require calculations. Say my source footage is in 16:9, I’ll figure out which axis is 16 and which one is 9 and just type in the values like so:
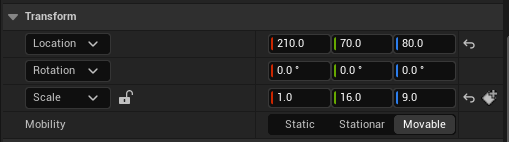
This will likely make my plane too big or small, but the aspect ratio is correct. You can type in any value really, just make sure it matches the source footage. Now click the lock icon to enable uniform scaling. This lets you adjust all values at the same time, no matter which one you change. Adjust any one of them until your object has the correct size, or use the scale widget in the viewport.
Now we can frame up and preview the Media Plate, then render with Movie Render Queue without Simulate being active.
Pros and Cons
Compared to the traditional way of bringing image sequences to flat planes, this new way of working is a lot more streamlined, with less manual creations and connections under the hood. However, by default shadows and reflections don’t work with Media Actors by default. Thankfully there is a way to bring them back (sometimes), and I’ve described how to do that in this article.
Thankfully the older/traditional workflow still works and has advantages, like being able to bring animated textures to 3D objects.