We’ve been working with multiple 4K image plates in Unreal Engine, which is a great way to combine live footage with 3D environments without the overhead of a fully fledged virtual studio production. The more plates we used, the slower UE got – much like a video editor would if you stacked more tracks onto the timeline.
To keep the viewport performance snappy, we can use low-res proxy footage for our viewport and previews, then let UE switch over to the high-res footage for rendering. This feature is called Proxy Workflow, and the principle is the same as it is in video editors. Setting this up on your image plates isn’t exactly intuitive, so let me show you how to make it happen.
Defining Proxy Settings
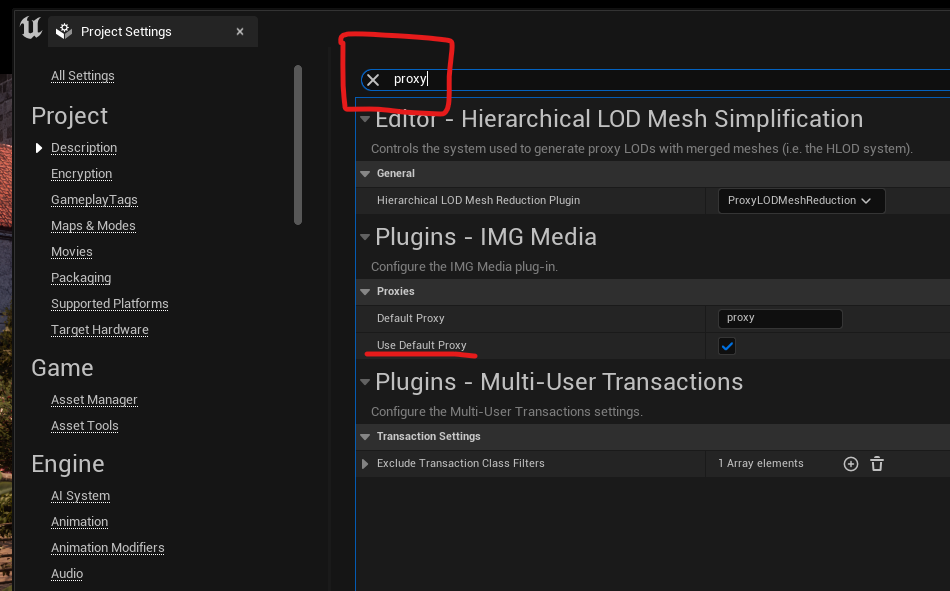
The first thing we need to do is to enable Proxies in our project settings. Head over to Edit – Project Settings, then search for “proxy”. You’ll find the option under Plugins – IMG Media. Without this enabled, no matter how hard you try, UE won’t look at your proxy footage.
Attaching Proxy Footage
When you create an Image Media Source, you can define the path to your high-res footage under Sequence Path. Ideally this is a directory inside your project folder (even more ideally under the Content/Movies section) so that it becomes portable and easily archive-able, but it’s not essential and sometimes not even possible. UE will give you a small warning about this next to the Sequence Path.
Absolute paths will work (in which case you’ll see the drive letter in that field), or if it’s a relative path it’ll begin with nothing like in my example. Directory traversal will work Linux style (../ would go up a directory), as do variables such as {engine_dir} and {project_dir}.
In the Advanced section underneath, you can specify a Proxy Directory. This is the super unintuitive part though: it’s not the full path, just a single directory inside your high-res footage directory. This was seriously confusing to me until I figured it out.
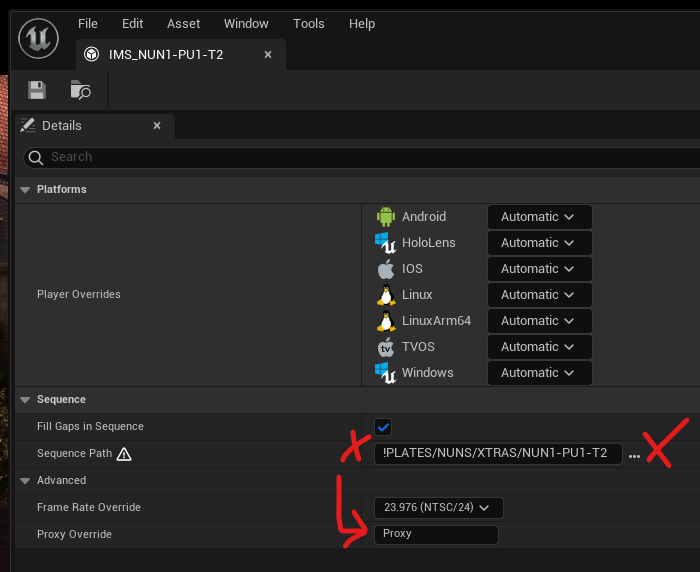
As an example, say you had your high-res image sequence in a directory called “C:/Footage”, you’d have your low-res proxy footage in a directory like “C:/Footage/lowres”, which which case you’d type “lowres” into the Proxy Override field. Note that the proxy footage must have the same number of images to work properly, even though it can be called something different (so your high-res footage can be called “image0001.exr, image0002.exr”, while your proxy footage may be called “lowres0001.png, lowres0002.png”).
Remember a proxy field in the project settings? If you always have a particularly named proxy folder inside your main footage, you can define it there once and UE will automatically find and attach proxies as you work.
That’s it! Once enabled, you can have as many image sequences as you like, with minimal performance overhead in the viewport. Find out more about using image sequences in my article about the Media Plate Actor.