Ever since I’ve explained how to convert Genesis figure shapes between character generations in several videos, many of you have been asking the same question:
How to we transfer the textures?
Rather than typing a variation of the same answer out every time, I thought I’ll explain all the options in one handy article that serves as a reference for this rather complex (and often unnecessary) task. I’ll describe several approaches, with pros and cons for each so you can choose what might work best for your project. Links below go directly to the chapters in this article:
- List of my Conversion Videos
- The problem with texture conversions
- Using a native skin set (not converting at all)
- Using the Legacy UV products
- Converting natively with Faceform Wrap
- Converting with a script by Mr. Burns
Conversion Videos
Here are all conversion videos I’ve made so far, in case you want to catch up on how to convert a Genesis figure of an older generation to a newer one, or downgrade a G9 character back to G8. If you don’t want to do this manually, ManFriday wrote a script based on my methods, making this procedure much easier and less error prone. The script is no longer for sale though, and has been integrated into Daz Studio Premier (subscription required).
Here are all the conversion videos I’ve made:
I’ve even made a couple of German versions too:
The Problem with converting Textures
You may be wondering why converting textures is actually such a problem in the first place. Why can’t we just use a G8 material preset and slap it on G9? Do they make it deliberately difficult?
Well no, because every new figure has a different UV layout than the previous generation. In fact, every figure generation (aside from Genesis 3 and 8) have a different UV layout. Prior to Genesis 8, some characters in the same generation even had different UV sets for figures of the same generation. This means that the mapping coordinates from one texture set do not match the next (Rune 7 textures for example are not compatible with say Victoria 7, unless you also use the necessary UV set), and a conversion is necessary to make this possible.
There’s also the fact that the texture position of say the G8 head doesn’t exactly match where the ones for say G9 begin and end, so some part of G8’s head are actually on the G9 body texture and vice versa, so even if we apply the G8 head texture to G9, some parts are missing. This creates problems that can of course be solved if you know how, but the amount of work, learning, software and time cost involved is often prohibitively expensive compared to easier solutions.


Hence the reason for my writing this article. We don’t have unlimited amounts of time left on this planet, so make sure to spend it wisely on what makes you happy, rather than on tasks that make you unhappy.
Using a Native Skin Texture
The easiest option to get handsome looking skin on your converted character is to actually not convert anything at all. Just find a texture set from the Genesis 9 Starter Essentials, or pick one from your favourite G9 character, then apply the full skin material. These are ten a penny and even give you the advantages of all the newfangled goodness like PBR skin shader improvements, 8K normal details and anything else the new figure generation has to offer. After all, we want to tap into the benefits of the new shaders as well as the shape.
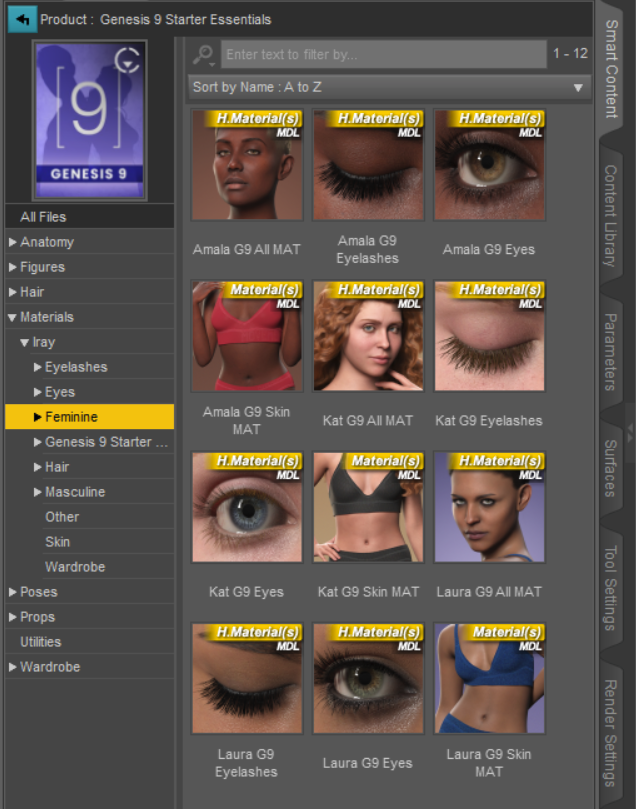
To do this, select your new figure in the Scene Tab, then open the G9 Starter Essentials and navigate to Materials – Iray – Feminine and Masculine respectively. Take a look at the “all MAT” presets. Those will apply just the skin textures to a selected character, including attachments. Every custom character has such a folder, and you can apply skin textures like that from any figure of the same generation.
If you don’t like the idea of an off-the-shelf character, take a look at the many Merchant Resources out there and build our own skin for the character, and potentially re-sell the tweaks. Make some tune-ups while you’re at it with products like the Texture Booster or use Photoshop and Substance Painter for tweaks.
Using Legacy UVs
If you absolutely must use the exact skin textures of an older character, be prepared to invest some manual labour. There’s no one-click solution to make this happen, but there’s something that comes fairly close: the Legacy UV’s series of products by Cayman Studios.
These are designed to apply an older generation’s material preset directly onto the new figure and apply a new UV layout to the G9 figure for the missing bits I’ve described above. The product uses Geoshells to fill in the gaps and load the missing parts of the texture. This will use the existing (old) shaders, so you won’t get any improvements like PBR Skin or Micronormals, meaning you can retain the look of your older figure shapes exactly.
While this works for most figures and renders inside Daz Studio, this approach is unsuitable if you intend to export your figures and render in other applications like Blender and Unreal Engine. This is because Geoshells are not supported anywhere but Daz Studio (at least at the time of writing in March 2024). If you’re planning to render outside of Daz Studio, this approach isn’t going to work for you.
However, if you know how to use the products, it’s a nice way to apply an existing material preset quickly onto a different figure generation. I’ve made a video for the Daz channel that shows how this works in principle:
There are several products in the series, each of which lets you convert a particular generation onto another. There are currently no bundles available, but you can pick and choose what you need instead. Here are some of the popular products for the current G8/G9 generation:
- apply G3, G8 and G8.1 Male materials onto G9
- apply G3, G8 and G8.1 Female materials onto G9
- apply G9 Materials onto G8 and 8.1 Female
- apply V4 materials onto G9
There are many other variations for older generations available too, check out Cayman Studio’s whole catalogue here.
Converting Skin Textures natively with Faceform Wrap
There is also an option to convert all textures from one figure generation to another by using a fascinating tool called Faceform Wrap (formerly known as the Russian 3D Scanner). This works by first wrapping the target geometry around the source, thereby creating an approximated shape, much like we do with the Daz conversion method. Once Wrap knows what parts correspond on both figures, it can then transfer the textures from this information.
Here are the steps involved in make it happen:
- combine all source textures onto a single UDIM tile with Texture Atlas in Daz Studio
- export the source figure with new UVs
- export the target figure as usual (both as OBJs)
- import both models into Wrap, define matching vertex points
- wrap, then convert the textures
- export each new UV tile for every texture
- fix small details in Photoshop (eye lids and nails don’t convert well)
- apply every single texture to the corresponding surface in Daz Studio
I’ve done this several times and it’s certainly possible for the learned 3D professional, but trust me when I say the amount of work involved is not for the faint hearted. Neither is the one-off cost of Faceform Wrap (retails at around $500, although they do have deals around Christmas time). There’s no automation involved for the export process, only a limited helper script courtesy of Brian aka 0Calvin. I’ve described how to use it here.
I did a Daz+ live stream showing how to work with Wrap (Episode #11) that explains the gory details in real time:
Converting with a convenient script by Mr. Burns
There’s now a convenient script by Mr. Burns on Renderhub that can do the heavy lifting for you! I’ve just found out about it, but haven’t tested it out. Even if it’s not 100% perfect (no conversion is), it’ll get you 90% there, including splitting into G9 UDIMs.
Check it out here: https://www.renderhub.com/mrburns/mb-skin-transfer-helper
Conclusion
I hope this article gives you inside into the options you have in getting skin textures onto your converted character. I’m sure there are other ways to convert textures too, probably involving Blender, but I’ve never looked into it. If you know any other methods, leave a comment and share it with other readers.
Let me leave you with one last thought, especially for those of you who are thinking, “why do they make it so difficult”: Remember that you’re not really meant to do any of this, nor are you expected to. This is true for clothing conversions, and for exporting content into other apps. While it’s all certainly possible, a product is meant to be used with the figure it’s designed for, and in the app for which it was designed for. G9 clothing on G9, rendered in Daz Studio = no problem. G8 clothing on G9, rendered in Blender = massive problems (it’s not designed to be used that way).
Thanks for reading!