Render pipelines typically work by way of using the same colour profile between applications that need to process image data. When you’re working on your own even across multiple applications this is less important as you just grade the final output the way you want. However, if you’re working as part of a team and across multiple stages of image processing, colour accuracy must be ensured for every stage, or at least there needs to be a way for App A to reproduce the colours created by App B.
Take this workflow as an example:
- shoot actors with a camera
- import them into Unreal Engine as reference
- render the background from Unreal Engine
- composite the camera’s output and the render in Resolve/After Effects/Nuke
- export from there and give it to a colour grading specialist
We can use Unreal Engine to render to EXR files, using the ACES colour space and retain much more information for post production and compositing, without clipping vital detail as would happen with the default sRGB colour space like REC 709.
This presents a problem though: our viewport will look different than the default (non-OCIO managed) viewport, which is calibrated to sRGB. The solution to make our viewport match a colour-managed rendered output is to create an OCIO profile and enable it at render time, with information which colour spaces need to be translated.
The following recommended workflow is based on William Faucher’s excellent explanation in this video, in which he explains how he renders using the ACES colour space from UE for compositing in DaVinci Resolve.
Creating the Colour Profile
Right-click in the content browser and create a new OCIO profile. You’ll find it in the Miscellaneous category.
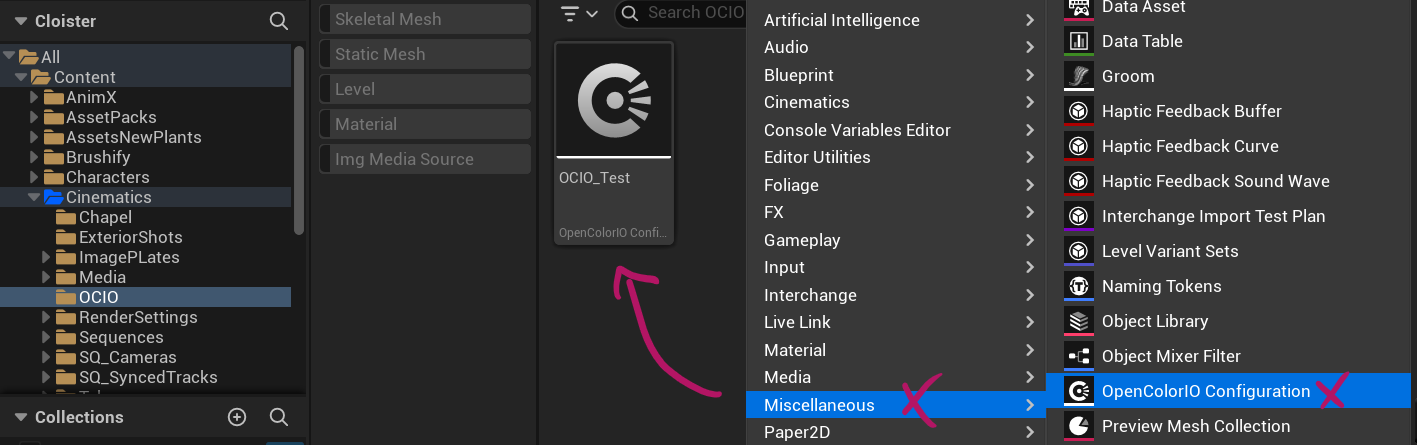
Open it and add two entries to the section labelled “Desired Color Spaces”. Add the following entries:
- Linear Rec 709 (sRGB) – found under “Utility”
- ACEScg – found under “ACES”
Now add one entry to the “Desired Display-Views” array:
- sRGB – Display ACES 1.0 – SDR Video – found under “sRGB Display”.
We’ll use this profile for both our monitor and our render settings.
Setting up the Viewport
Ideally you do this when setting up the project. Doing this afterwards means your viewport may change what existing projects used to look like. Typically this isn’t a major issue for project that will be colour corrected after rendering, but may lead to additional work if you’ve not previously colour managed your workflow.
Open the View Mode menu (the one that typically says “Lit”, top left in Unreal Engine 5.5 and below, or top right in 5.6 and above). In the last entry that reads OCIO Display, enable it and pick your colour profile.
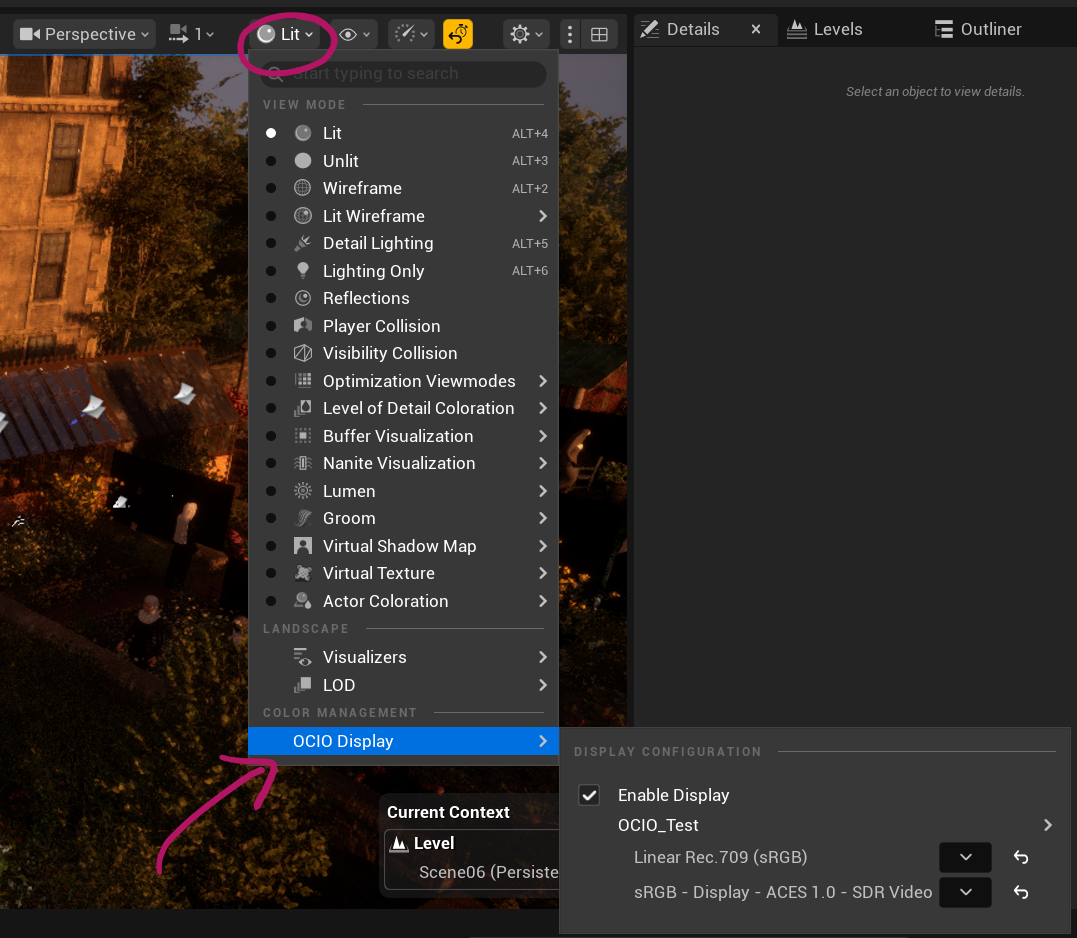
- for the top entry, pick Linear Rec 709 (sRGB)
- for the bottom entry, pick sRGB Displat AVES 1.0 – SDR Video
This will now translate the ACES colour space to the Rec 709 colour space for our viewport. We do this so that under the hood, Unreal Engine can work with a much wider gamut and render to a larger colour space than it would by default. As a result, details that would be clipped by the Rec 709 workspace can be retained and brought back in post production.
Rendering with MRQ
Movie Render Queue also needs to know about our colour profile. This will only work when we render in EXR though, as the 8-bit PNG and JPG formats cannot store the additional information we’re trying to preserve.
Add a Color Output node, then enable OCIO and select your colour profile.
- for the source, choose Linear Rec 709 sRGB
- for the destination, choose ACEScg
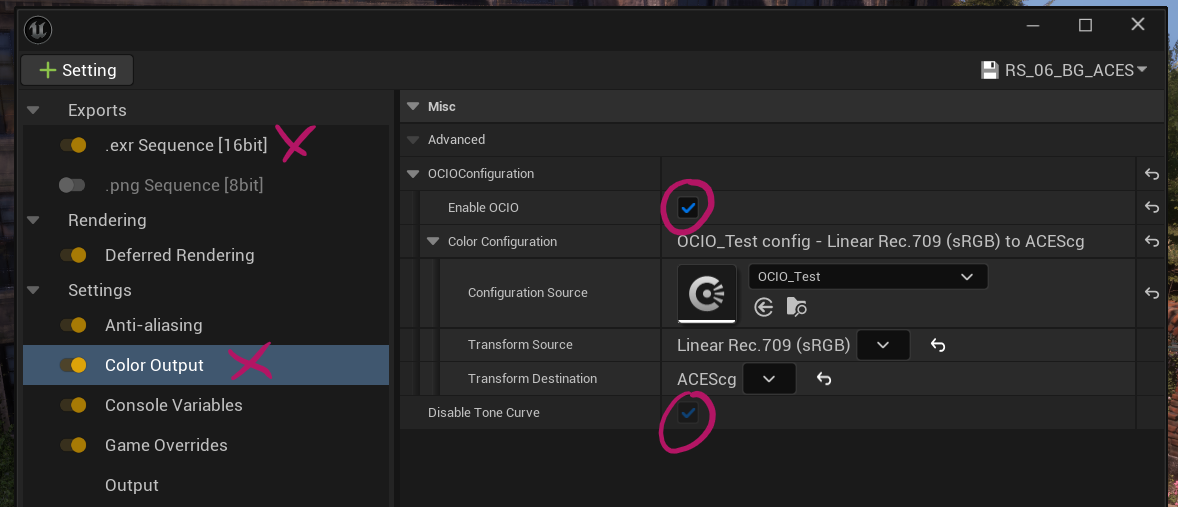
Note that it is recommended to disable the Tone Curve option. This will allow for linear exposures that are easier to colour correct in compositing. Also note that when using OCIO, the Tone Curve will be disabled by default in UE 5.5 and above. In earlier versions this can be set independently.
And that’s it! Now we’re rendering 16-bit colour managed EXRs that are compatible with any application that supports ACES.