When I started moving my Fortnite highlight editing from Premiere Pro to DaVinci Resolve, playback performance was one of the first things I wanted to optimise. My source material is the worst case for any NLE: three-hour stream recordings in long-GOP H.264, from which I pull a dozen or more highlight clips per session. Resolve offers not one but three tools for smoother playback — timeline proxy resolution, optimized media, and proxy media — and the differences between them are not obvious at first glance. Here’s what I learnt, including a few expensive mistakes so you don’t have to make them yourself.
Why proxies exist in the first place
H.264 and H.265 are long-GOP codecs: only occasional keyframes are stored as complete pictures, and every frame in between is reconstructed from its neighbours. That’s wonderfully efficient for storage and streaming, but it punishes editing. Every time you jump to a new spot in the file, the decoder has to walk back to the last keyframe and chew forward through the group of pictures to rebuild your frame. Forward playback is usually fine; scrubbing, shuttling and reverse playback are where it hurts, because the decoder does that keyframe walk constantly.
Proxies solve this by transcoding your footage into an all-intra codec like ProRes, where every frame is a complete picture. Seek anywhere, decode instantly, no walking. The resolution reduction that usually comes with proxies is a bonus; escaping long-GOP is the real win.
Before anything else: check your timeline resolution
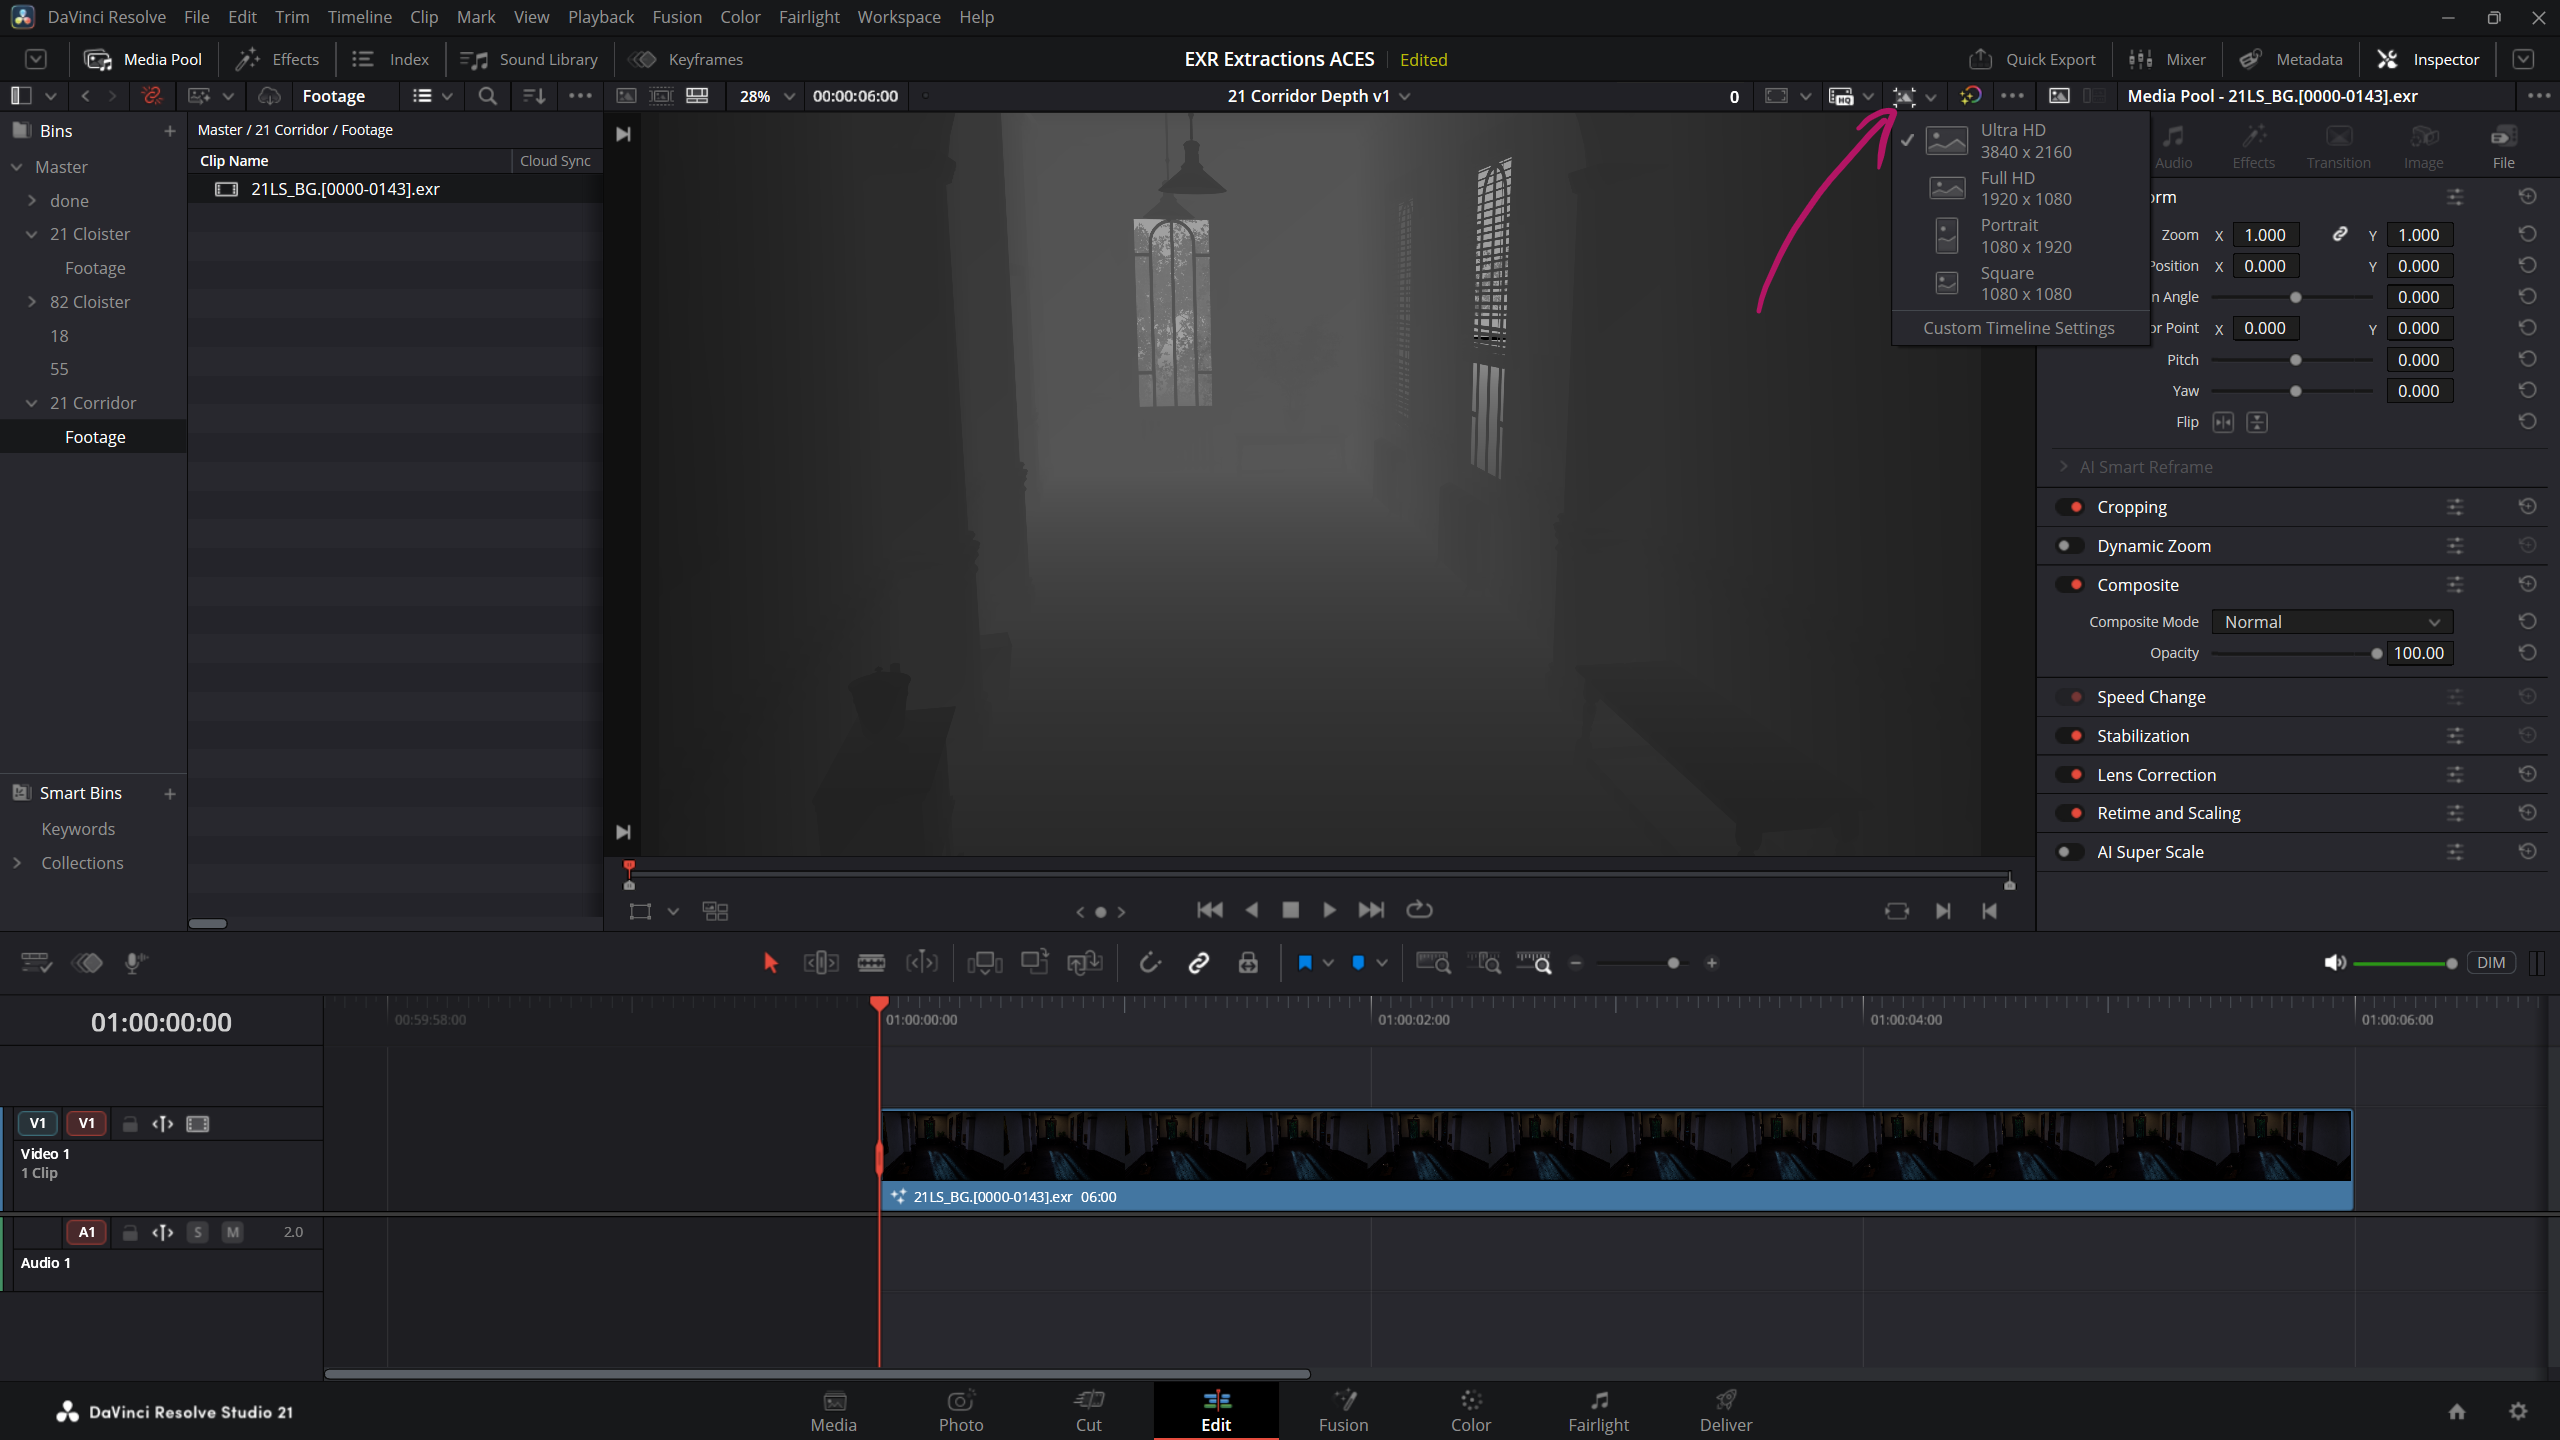
A quick detour that turned out to be the biggest performance win of all. Resolve processes everything at your timeline resolution — if your project defaulted to UHD but your footage is 1080p, the GPU composites and scales 4x the pixels on every frame, for no visual benefit. Mine had done exactly that. Dropping the timeline to Full HD (the dropdown at the top of the Cut page viewer, or Timeline Format in Project Settings) made playback dramatically smoother before a single proxy existed. Resolve is resolution-independent — transforms are stored parametrically, so you can flip the timeline to UHD for the final render and everything rescales correctly. Fix this first, then decide whether you still need proxies.
Proxy Media vs Optimized Media: what’s the difference?
Both features transcode your footage into an edit-friendly codec, and Resolve automatically switches back to the camera originals when you render. The difference is where the files live and how they’re managed:
- Optimized Media is Resolve’s internal cache. The files are invisible to you, live in the cache location from your Project Settings, are tied to that machine, and can be purged like any cache. Set-and-forget, but nothing travels.
- Proxy Media creates real, visible files on disk — by default in the proxy generation location set in your Working Folders (or next to your originals, if you point it there). They’re portable, they survive cache purges, other machines can pick them up, and they can even be generated externally and attached. This is the newer system, and the one Blackmagic has been actively developing.
The two can coexist, but there’s no reason to generate both. Coming from Premiere, proxy media is the familiar concept — just without the Media Encoder handoff, because Resolve does all transcoding itself.
Check your settings before generating anything
This is where my expensive lesson lives. All the relevant settings are in Project Settings (gear icon) → Master Settings → Optimized Media and Render Cache, and the factory defaults on the Mac are ProRes 422 HQ with resolution set to Choose automatically. Both of those are traps for this kind of work:
- “Choose automatically” picks the proxy resolution relative to your timeline resolution. With my timeline still set to UHD and 1080p source, automatic resolved to full resolution — no downscale at all.
- ProRes 422 HQ is a mastering codec, not a proxy codec. At 1080p60 it runs around 550 Mbps.
The result: my 8 GB, three-hour stream recording produced a 500 GB proxy file. A second attempt at Half resolution but still at HQ produced 200 GB. Only after setting Proxy media resolution to Half and Proxy media format to ProRes 422 Proxy did the files land where they should. Real-world numbers from my sessions since: a 2:43 stream came out at 47 GB and a 1:34 stream at 27 GB — almost exactly 17 GB per hour of 1080p60 source, a tenth of what the HQ defaults produce. For 1080p source, half-res ProRes Proxy (960×540) is plenty for editorial decisions, and as a bonus the slightly softer image doubles as a visual indicator that proxies are actually active.
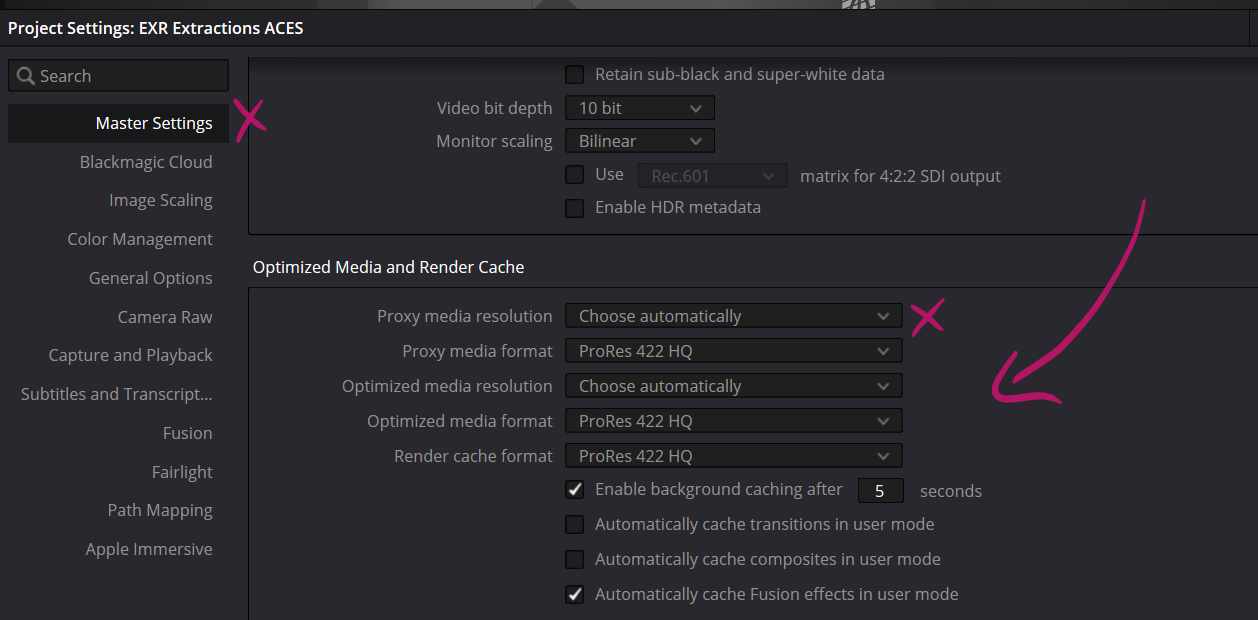
One more thing worth knowing: these are project settings, not application preferences. Every new project starts from the factory defaults again — I found this out when a later project quietly produced another 300+ GB proxy for a 90-minute recording. To make your corrected settings stick, set everything the way you want it, then open the ••• menu in the Project Settings window and choose Save Current Settings as User Default Config (the wording varies slightly between versions) — new projects will inherit it from then on. Existing projects keep whatever they were created with, so check each one before its first generation run.
While you’re in that settings panel: Render cache format is a different animal — it’s the codec Resolve uses when background-caching rendered effects (Fusion comps, noise reduction and the like), and that cache can stand in at render time. Leave it on a high-quality codec; it’s the one place the fat default earns its keep.
Generating proxies and optimized media
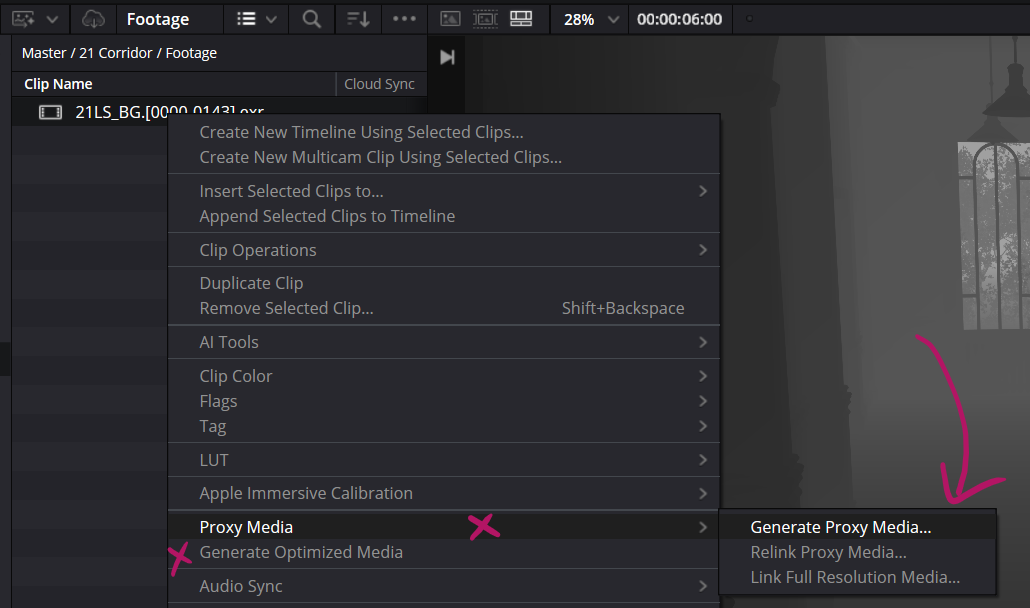
Select clips in the Media Pool, right-click, and choose Generate Proxy Media or Generate Optimized Media. One quirk: proxy generation is only exposed on the Edit and Media pages — the Cut page’s context menu offers Generate Optimized Media and even Relink Proxy Media, but not Generate Proxy Media. Hunt accordingly.
Unlike Premiere, there’s no external queue: a progress dialog blocks the interface until the transcode finishes or you cancel. The saving grace is that generation is resumable — cancel partway and the completed proxies stay attached; running Generate again later only processes what’s missing. Note that superseded attempts are not cleaned up automatically: after my three-generation saga, the ProxyMedia folder held 700 GB of orphaned files that I had to delete by hand. Worth checking after any failed or repeated run.
The Super Scale trap
One more gotcha that cost me an attempt: my third generation estimated 3.5 hours for a transcode that should have taken ten minutes. The culprit was Super Scale, still enabled in Clip Attributes on the source clip. Clip Attributes sit upstream of all processing — including proxy generation — so the Neural Engine was being dragged through every frame of the transcode. Disabling it brought the estimate down to nine minutes, a 23x difference from a single checkbox. The sneaky part: the Inspector showed Super Scale as off, because the Inspector controls the timeline instance while Clip Attributes control the source clip. Before kicking off any long background process, Clip Attributes is the authority.
Switching playback between proxies and originals
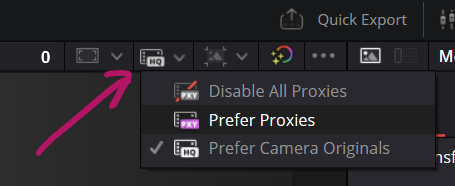
Resolve prefers proxies automatically once they exist, and always renders from the originals. To control playback explicitly:
- Proxies: the proxy dropdown above the viewer (or Playback → Proxy Handling) offers Disable All Proxies, Prefer Proxies, and Prefer Camera Originals.
- Optimized media: the menu bar toggle Playback → Use Optimized Media if Available. There’s no viewer control for this one — the newer proxy system got the friendlier UI.
Relinking and moving between machines
Because proxies are ordinary files, they relink by path. The Media Pool right-click menu offers Relink Proxy Media (point a clip at an existing proxy file, including ones generated elsewhere) and Link Full Resolution Media for the reverse direction. If you move a project between machines, keep the proxy folder alongside the project and relink once if the paths shift. Delete a proxy file and the clip simply falls back to the original — your edit never references the proxy directly, so In/Out points, used-media indicators and timeline references are untouched either way.
So do you actually need proxies?
On my M2 Mac Studio, the honest answer is “only sometimes”. Apple Silicon decodes H.264 in hardware, so with the timeline at the correct resolution, native playback and short-range jogging are perfectly fluid. Where native footage falls apart is hard shuttling deep into a long recording — jumping thirty minutes ahead at high speed triggers that keyframe-walking stutter every time. With proxies active, it’s completely gone. That’s exactly the workload of hunting highlights across a three-hour stream, so for me a ten-minute transcode is cheap insurance per session.
On machines without hardware H.264 decoding, proxies improve baseline playback too, not just the seeks – provided you have a fast enough hard drive that plays ball with potentially large proxy files. The older or weaker the machine, the earlier in the workflow they earn their keep.
The short version: fix your timeline resolution first, set the proxy format to Half / ProRes 422 Proxy before you generate anything (and save it as your user default config so new projects inherit it), check Clip Attributes for stowaway Super Scale, and let proxies handle the deep shuttles. Or, if you have the drive space, leave those proxies at fill resolution and enjoy smooth yet handsome speed editing. Enjoy!