A few years ago I bought Prostudio by Synthetic and Blackhearted. It’s a “light preset kit” for Poser that comes with an extensive manual and many presets to start a good render, but as the author explains you really need to know something about lighting to make renders look their best.
After reading the manual I took some important tips away which I wanted to make a note of, in regards to render settings. It appears they are closely linked to getting good results – so no matter if you’re using this particular light set or not, the following tips apply to any Poser render I guess.
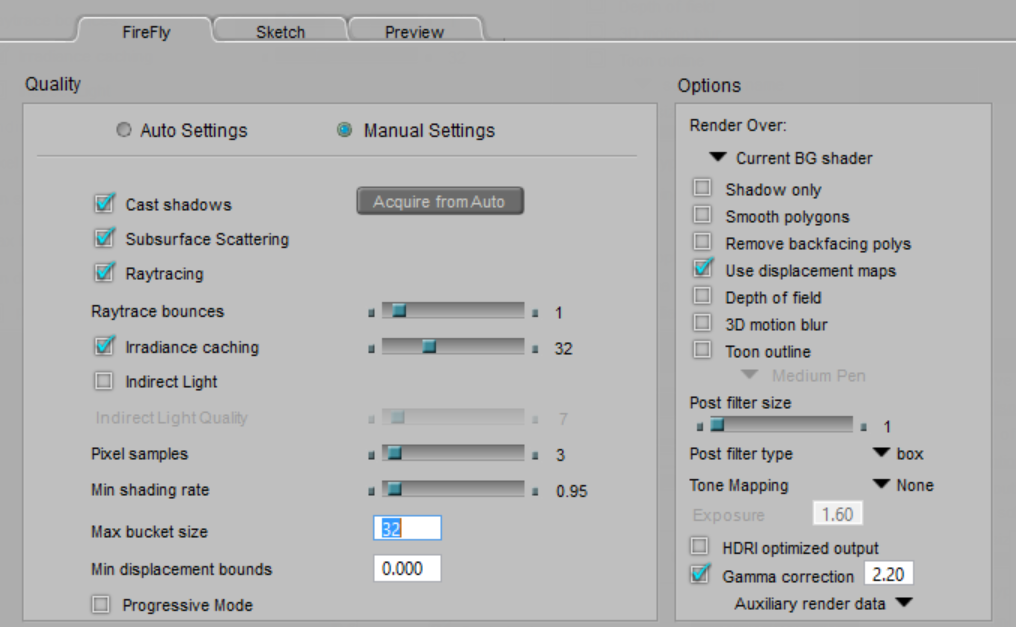
The above are the default FireFly settings you’ll find with a fresh scene in Poser Pro 2014 Game Dev, under Render – Render Settings.
As with all the settings, experimentation is encouraged and not one setting fits all.
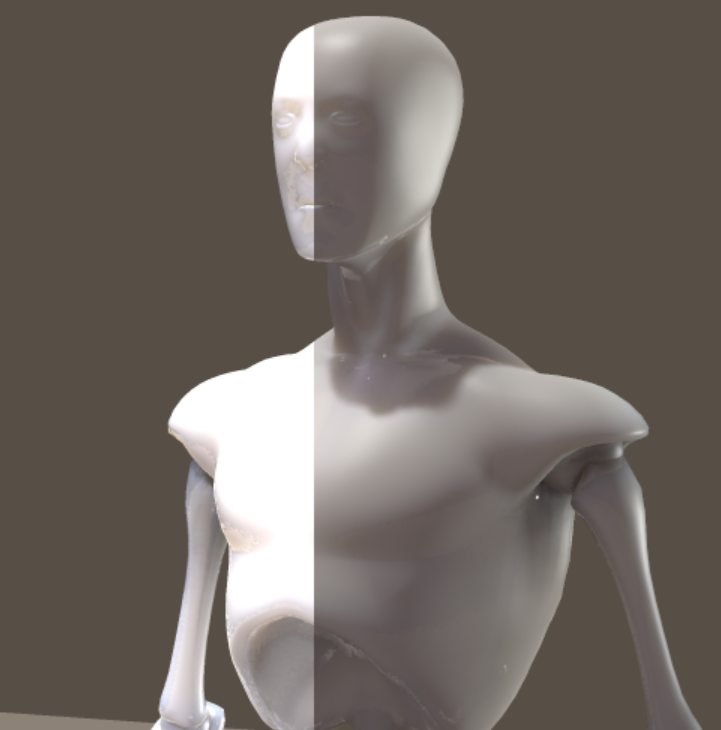
Gamma Correction
Blackhearted recommends to switch off the Gamma Correction for more realistic renders(bottom right). Here’s the difference without (left) and with (right), using the default lights and the Andy2 skeleton figure.
This setting has no impact on render times, just on the contrast.
Pixel Samples
This confusing term controls how anti-aliased rendered objects appear. Less anti-aliasing means a more jagged edge, while more anti-aliasing means a smoother edge.
In Pixel Sample render terms this means:
- Higher Pixel Sampling = more/better anti-aliasing (longer render time)
- Lower Pixel Sampling = less/worse anti-aliasing (shorter render time)
Note than even though the edges and textures appear more jagged, the lighting looks the same. Lower values are good for test renders.
Here’s Andy again, on the left with a setting of 1, and on the right with 20. The highest Pixel Sampling I can achieve on my system is 36.
![]()
This option is not to be confused with Render – Antialias Document, which only applies quick anti-aliasing to the current preview, thereby creating a quick render. Pixel Samples are applied during the “real” FireFly rendering process.
Minimum Shading Rate
With this setting Poser defines how well defined shadow areas are rendered (I think). Lower settings take longer to render, but give a much more detailed and accurate definition on a model. Higher settings render quicker, and again don’t affect how the overall lighting looks – and as long as you don’t see a split render you can’t really tell what’s different between these settings.
Hence here are two full renders instead of a split: the top image is rendered with a Min Shading Rate value of 0 and yields a lot of detail in Andy’s chest cavity. Look at all the small reflections and detail, as well as the thin sharp shadows at his joints.
The bottom image was rendered with a rate of 20 (the highest value) and while not bad, much of that high definition is gone. It’s much quicker to render though.

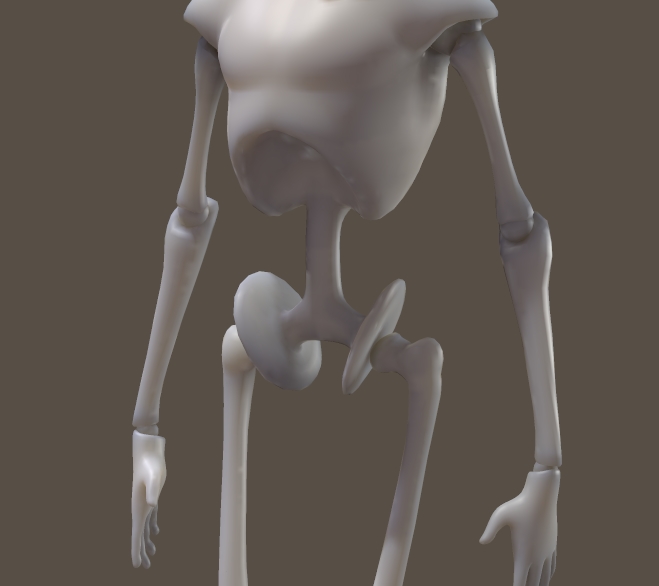
Depending on the shader that’s used on a surface, you can see what Poser is doing during the first render pass (when it says Precalculating Subsurface Scattering): the preview polygons are larger, hence the lack of resolution on higher rates.
The Poser manual has more detailed explanations on all the other settings, but those three above always mystified me most up until now.
Auto Settings
Poser also has an option to adjust all those scary settings with a simple slider, which appears when you select Auto Settings instead of Manual Settings.
Move the slider further to the left for quicker and rougher renders, or slide to towards the right for better quality renders which take longer. You lose finer grained control this way, but it’s a great way to get started quickly.
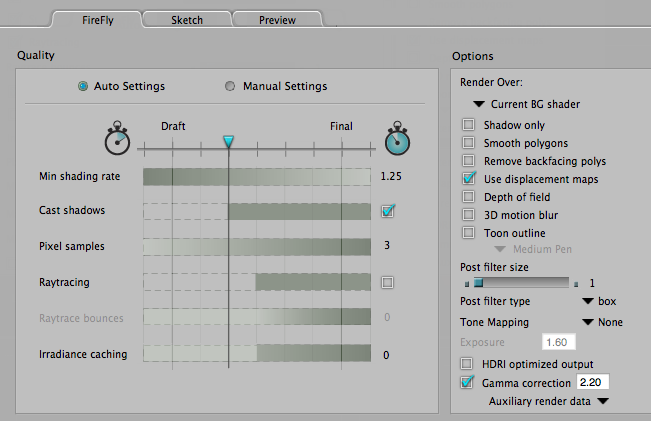
Note that both Auto and Manual do not influence each other: make a change in Manual and it will not affect your Auto settings, and vice versa. You can import your Auto settings into the Manual dialogue by selecting Acquire from Auto – but it doesn’t work the other way round.
Here’s one final tip on how to speed up test renders: while you’re working and setting up a scene, consider reusing your shadow maps (Render – Reuse Shadow Maps). This will prevent Poser from recalculating those every time. Depending on how much you’ve changed in your scene this can be quite a timesaver.
When you’re finished, just untick the box again. To force Poser to recalculate the shadow maps, select Clear Shadow Maps and they’ll be regenerated upon your next render.