Material Presets in DAZ Studio describe the surfaces of your 3D objects. A simple object may only have one material zone, but more complex objects can have several. These zones are also known as Shading Domains, which are setup when the object is created in a 3D modelling application.
Material Presets are closely related to Shaders, in fact they work with very similar concepts. The difference is that a Shader describes a single surface, whereas a Material Preset describes which Shader is applied to which part of an object, or more accurately, which Shading Domain shall be rendered with which Shader.
While you can apply a Shader to any object’s surface, you cannot necessarily apply any Material Preset to any object: Material Presets are object specific, whereas Shaders are not.
Let’s take a closer look at Material Presets in DAZ Studio, how to set them up and how to save them to your library.
The Surfaces Tab
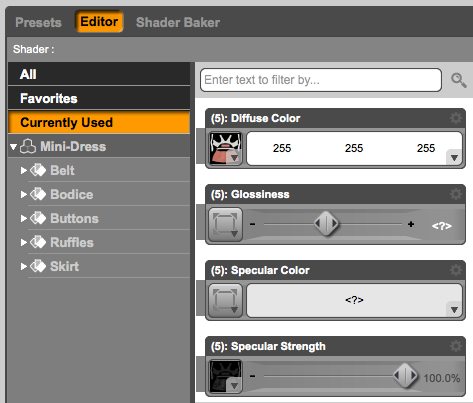
To take a look at all available material zones of a selected object, head over to the Surfaces Tab. Make sure you’re on the Editor Tab, and you should see something like this:
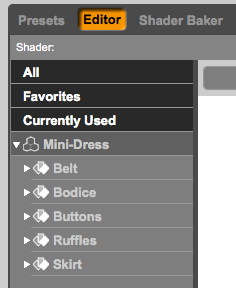
See those disclosure triangles? Make sure to open the top most one to see all the available Shading Domains.
Select the root object (Mini-Dress in my case) and see all kinds of interesting values appear on the right of this tab. These values represent the shader that is a applied to our object (it’s usually a very long list, and the screenshot is showing only the first few options here).
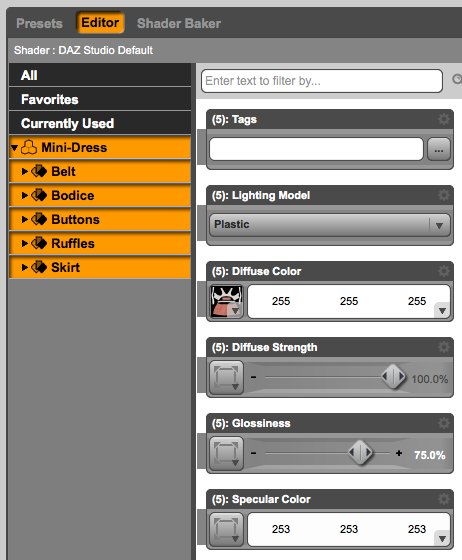
With the root object selected, if you’d make a change to any of the values now, said value would be applied to all zones. That’s not always what you want to do though: some parts of your object may require different values and textures than others, in which case simply select another zone (in my example: Belt, Bodice, Ruffles, etc).
Should you see a question mark while having the root object selected, you can tell that different values have been applied to different zones. If the values are numbers (as shown above), all zones have the same value applied.
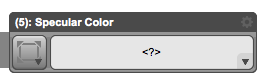
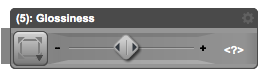
Likewise, if different zones have different texture maps applied and you’re looking at the root object, you’ll see a white square to the left of a value (see below). A grey square on the other hand (see above) means than no texture is applied anywhere. Or, if a texture is applied across all zones, you’ll see a small preview of it (an example in an earlier screenshot is the Diffuse Colour).
Right now we’ll see all available values, even those that are set to zero. To filter this list down into something more manageable you can select Currently Used on the left to list only values that are non-zero.
And finally, you can open any of the disclosure triangles on any of the Shading Domains for a full list of those values too.
Changing Material Presets
Changing any of the values for any surface makes a change to the Shader of that surface. You do this either by moving the sliders, picking colours, or entering numbers directly. Anything with a little grey square accepts texture maps too, for example the Diffuse, Bump and Displacement channels.
I won’t go into detail as to what each channel does, we’ll leave that for another article perhaps. Do play around with them, render your image and see your changes come to life.
Another way to change surfaces in DAZ Studio is with the Shader Mixer, whose representation of surfaces works with Nodes, like the Poser Material Room or the Blender Node Editor. Again we’ll leave the intricacies of the Shader Mixer for another time.
Loading and Saving Material Presets
Usually Material Presets are used to apply a new texture set to an object, perhaps a character or an item of clothing. In DAZ Studio they will usually read “Material” at the top of a thumbnail (it doesn’t always do that though).
You find Material Presets either via the Smart Content Tab (if the product has metadata), or the Content Library. The latter is usually the case for your own presets.

To load one, simply select the object that the preset is made for, and either double-click the Material Preset to drag it into the object.
To create a Material Preset, you have two options. For either approach to work, you must select the object as well as all desired surfaces in the Surfaces Tab.
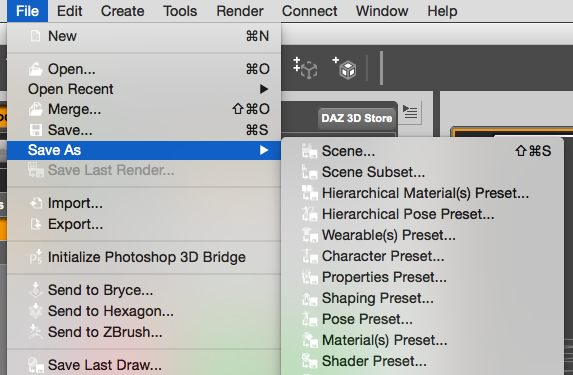
Option 1: choose File – Save As – Material Preset, then navigate to a location on your computer and give the preset a name. The advantage of this approach is that you know exactly where you file will be saved.
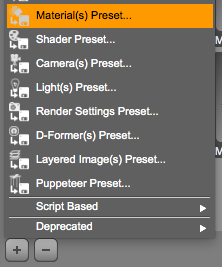
Option 2: use the Content Library to navigate to a folder of your choice and click on the little plus icon at the bottom left, then choose Material Preset. The advantage here is that you will see a visual representation of your object and have direct access in the library.
Either way you’ll be prompted for a file name, followed by a small dialogue window that will let you select which surfaces you’d like to save. Usually you want to leave all surfaces ticked, but you can be very granular here and only save a single surface if you like, or only specific channels in that surface (say only the bum channel of the zipper surface for example).
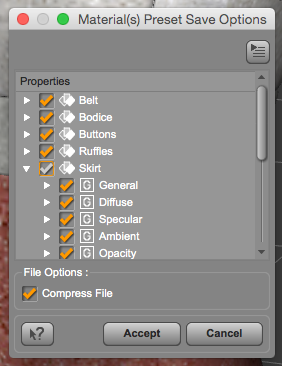
When you hit accept, DAZ Studio will save two files: a DUF file which describes the material, and a 91×91 pixel PNG file that is used as a thumbnail in the Content Library tab. The latter will be rendered via OpenGL, in square aspect ratio, from what your current camera sees. To make those more palatable, position your camera accordingly or replace the PNG file with your own (just make sure it’s 91×91 pixels).
DUF by the way stands for DSON User File (and DSON stands for DAZ Studio Object Notation). Just though I’d mention it.
You can choose to compress the file. This will speed up loading times and saves some hard disk space. If you ever want to peek inside a DUF file, turn this option off and open it in a text editor.
it does not work like this in 4.9 ;-( 🙁 🙁
Yes it does, in fact I’ve written this article using screenshots from DAZ Studio 4.9.