I wanted to put some of my (old) computers to good use by helping them render animations. Everyone is stronger when we work together as a team, no matter if we’re built on carbon or silicone. Sadly though, Blender doesn’t start its GUI via RDP, which means it’s not so easy to speak to the application – unless you employ clunky workarounds.
That’s where the command line interface comes in handy. We can issue a text command to Blender, telling it which file we’d like to render, where to render to, and which frames of an animation to render.
Before I forget how this works, I thought I’d best write it down.
Rendering Stills
Here’s how we can render still images. This is equivalent to pressing F12 in the Blender GUI.
blender -b yourfile.blend -o OutPath -f 1
The above will render the first frame in your .blend file. You must reference the Blender executable directly, either by including it in your shell’s environment variable, or by providing the full path (more on that below). The switches are as follows:
- b specifies your .blend file
- o specifies the output path and/or file name; if you don’t provide a file name, your file name will be the frame number (like 0001.png)
- f specifies the frame of your scene (use 1 if you don’t have an animation)
Rendering Animations
To render a range of frames of an animation, we can use the following format:
blender -b yourfile.blend -o OutPath -s 1 -e 100 -a
Much like for still images, we specify an input and output file (with path), and we’ll tell Blender where we’d like to start and end. Here are those switches explained:
- b specifies your .blend file
- o specifies the output path/file (for an image sequence, a folder is always a good idea)
- s denotes the start frame
- e denotes the end frame
- a tells Blender that we’d like to render an animation
Render Engine
We can specify which render engine we want to use. If this parameter is omitted, Blender will use whatever the scene has been saved with. The following switch will tell us what’s available:
blender -E help
Values in Blender 2.80 are
- BLENDER_EEVEE
- BLENDER_WORKBENCH
- CYCLES
CPU vs GPU Rendering
From what I understand, there’s currently no way to tell Blender what render architecture we’d like to use from the command line (i.e. render with your CPUs or GPUs). This may change, and there may be workarounds, but if there are any I’m not aware of those (please let me know in the comments if you know more about this than I do).
Hence, we need to specify how we want to render in our .blend file by enabling/disabling GPU rendering. Once saved, Blender will use what we’ve saved with that blend file.
The same goes for other render settings, such as the Open Shading Language.
Finding Full Paths (Windows)
It’s a little tricky to find the full path to Blender and to your output locations on Windows. The easiest way I know of is to use the Windows Explorer. Open it and navigate to Blender (usually under C:\Program Files\Blender Foundation\Blender[version]). At the top of the window you’ll see a somewhat stylised version of your location.
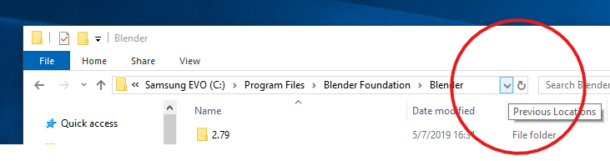
See that little blue arrow next to your location? Click it and Windows Explorer will bring up a selected version of the full file path. That’s what we need!

Although highlit, there’s no right-click context menu to copy the path. Instead hit CTRL + C to copy this path and you’re good to go. Remember this technique when it’s time to find your file output location.
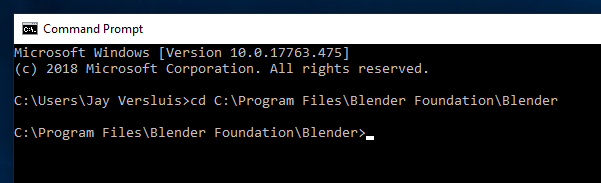
To use this path, open a Windows Command Prompt by searching for “cmd” at the bottom left, in the Cortana Search Bar. Click Command Prompt to open up a scary black window. Now type cd (followed by a space) and use CTRL + V to paste in the full path you’ve copied above. Hit return. You’ll see something like this:
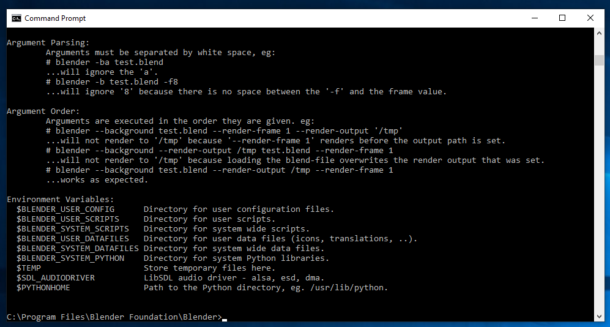
To see if Blender is indeed working, type the following:
blender --help
If all goes well, you’ll get a bunch of text output, describing in more detail how to use Blender from the command line.
Now you can use the commands described above.
Full Paths on macOS
If you’re a Mac user, you may be more familiar with the Command Line Tool. It’s called Terminal on the Mac, and you can find it under Applications – Utilities, or by searching for it. Open it to bring up a very similar window as above.
In addition, open a regular Finder window and browse to the location of your Blender installation. For a release version, it’s usually somewhere inside the Applications folder, but it really depends where you’ve copied the files to. Eventually you’ll find something like blender.app.
Note that on macOS, that’s not an executable file, but rather a folder with other files in it. Technically it’s a Bundle, sometimes called a Package, which is a utility that groups related files together. Anything with a .app ending is a Package. We can peek inside it by right-clicking on it, and selecting “Show Package Contents”.
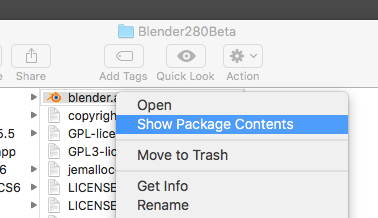
This will open a new Finder window with yet another folder called Contents. Browse inside to reveal a MacOS folder, which contains a lone file named blender. That’s our executable!
Here comes the fun part: type cd followed by a space in the Terminal window, then drag the MacOS folder from the Finder window inside the Terminal window. Now hit return, and you’ll find yourself in the Blender folder, ready to execute a command line render.
MacOS differs from Windows in that we can’t simply type “blender –help”. It’ll most likely give us a “command not found” error, which is little irritating. The system doesn’t know that we would like to execute the command in the current folder, so we need to tell it to look there by prefacing the command with a dot-slash (./) – here’s what we should type:
./blender --help
This will now give us the same information as with the Windows version:
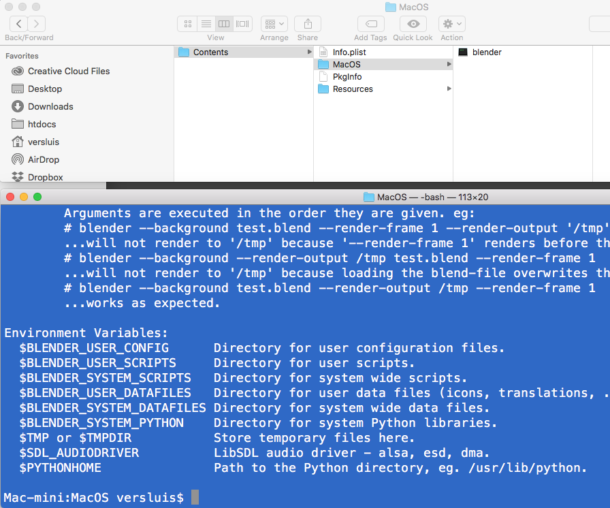
With the ./blender command, you can now use the command line render as described above.
Hey Jay, you truly kick out the jam again!
This is awesome and brings my older non-nFidia and IRay incapable computers back into play, yay!
Didn’t expect the Spanish Inquisition, ahem I mean, a command line render method.
But hey; it’s Blender and yes it blends, haha. 😉
Hmm, now I gotta draw a plan on how to distribute render jobs…
Cheers and best regards,
Sam