Making props for DAZ Studio can be fun and easy. Typically you’ve modelled something in your favourite 3D app, UV unwrapped it appropriately, then you import the object into DAZ Studio and setup your surface properties. You can save your work as part of the whole scene, or you can save your selected item on its own.
Bringing our prop back into other scenes on your own computer will probably work just fine, but if you intend to share your work with others, things get a little more complicated. Let’s take a look how we can do it in this article.
How DAZ Studio saves Props
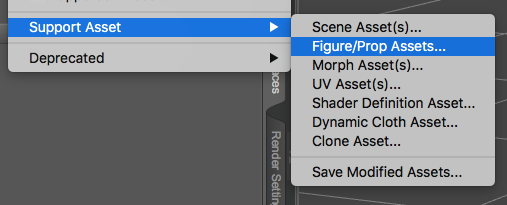
To save our Prop on its own, we use the option Save As – Support Asset – Figure/Prop Asset. A dialogue appress that lets us fill in several details, such as your Vendor name and the “Asset Directory”. That’s a Content Library folder on your drive we need to talk about a little more in a moment.
DAZ Studio creates a .duf file when you save something, which contains the description of your geometry (much like an .obj file does), as well as surface setups. It does not however save texture files. It only saves the relative path to the textures you’ve used. Hence on your computer, loading the prop will work fine, but when you share the .duf file with a friend, they’ll see a grey object without textures.
Mapping a new Content Directory
To combat this, create a new folder for your prop and map it as a new Content Directory. The easiest way to do that is by using the context menu in the Content Library tab (those three little lines in the top right corner). Choose Content Directory Manager.
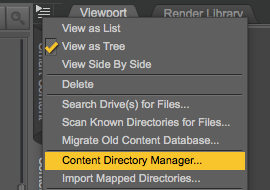
Click on the plus icon in front of DAZ Studio Formats and add your folder using Add under Directory (don’t use New under Content Set). When that’s setup, you should now be able to pick this as an Asset Directory when you save your prop later.
Collating Texture Files
Now that we have a new folder for our prop, let’s make sure all our texture files are copied into it. Technically you can just copy everything into the root directory of your folder, and if all you have is a single texture file this may even seem appropriate. However, if you have several textures (including bump, normal and transparency maps), and several material presets that go with your prop, this could become messy fast.
While there’s no set rule on which files need to go into which directory, I assume that those you share your work with will eventually install (unZIP) your folder into one of their content libraries. Take a look at the regular DAZ Studio Library folder and see how it’s setup. We find subfolders such as People, Poses, Presets, Props and so forth, inside which we find further folders for vendors and their respective products.
I recommend following the same structure so your files can easily be identified at a later date. In our case of saving a simple prop, let’s create a Props folder, inside which we’ll create something with the name of your prop. Once that’s in place, move/copy your texture files into that folder. The full path to this whole thing would look something like YourProduct/Props/YourProp or even YouProduct/Props/YourVendorName/YourProp.
That last thing we need to do before actually saving our prop into that folder is to update the texture files on all surface descriptions. Anywhere we may have referenced files, we need to update those to point to the files inside our new product folder.
Saving Your Prop
Once done, select your prop and save it in the new location with Save As – Support Asset – Figure/Prop Asset.
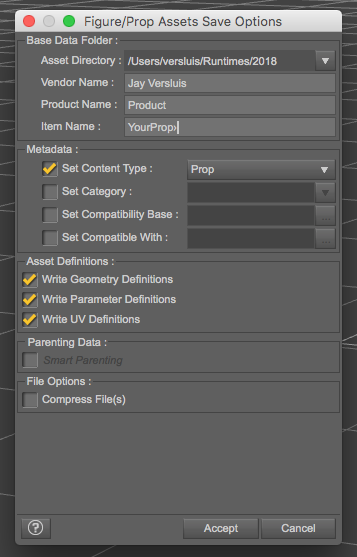
Make sure to pick your Asset Directory and fill out the info for Vendor Name, Product and Item Name. They’re largely cosmetic and for a single prop are not all that important.
At the very bottom there’s an option to Compress Files. Enabling this will save a tiny bit of space on your hard drive, but has the disadvantage that the resulting .duf file cannot be read in a text editor. Unless you have some top secret information in there, I’d recommend leaving this unchecked.
Distributing your Prop
All that remains to be done now is to share your hard work with friends, family and total strangers. It’s as easy as navigating to your new Library Folder and turning it into a ZIP file.
Before you do, you may want to include a license file or some contact information too. Even with freebies that are shared around, it’s nice for users to know if they can use your item commercially or not. If you intend to sell your work, content marketplaces often have boilerplate license files they would like you to use. Typically those files are in the root directory, or in a folder called ReadMe.
When sharing your ZIP file, ask users to unZIP its contents into their favourite (existing) Library Folder. Your files will live in the context of a larger file structure in the right place (thanks to our forward thinking subfolder setup). Alternatively, users can unZIP your file anywhere they like, then map the folder just like we did as an additional Content Directory (recommended for all your beta testers, in case you need to make updates before final release).
Happy Sharing!