I often get questions in regards to Animations in DAZ Studio. It’s a complex topic, because it combines “animating in general”, and “using the animation tools in DAZ Studio”. I recently described my animation workflow to a reader/viewer (Nkem) and thought this information might be useful to others too, so here’s what I said.
Most new users have an issue with the time it takes to both build the animation itself, but also the enormous time it takes to render an animation out. Something relatively short and simple like this is a good example:
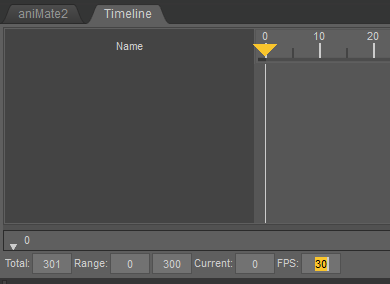
Aside from the setup, rendering an animation frame should be treated differently to a still image. We need to live with compromises, because we’re rendering quite a few images (30 frames per second, on a 10 second animation, that’s 300 images). If each of them would take 6 hours to render, the whole thing would take about 75 days, or nearly 3 months. And that’s a very short animation.
Let’ see how we can trim that down to a few hours or less instead.
A few things to keep in mind while building your animation:
- get into the habit to make quick preview renders (Animatics)
- do NOT use the default render settings for final renders
- use as little Iray iterations as you can to get an acceptable outcome
- do whatever it takes to render faster: optimise hardware, use multiple computers, use lighter resources
- what the viewer doesn’t see, don’t worry about it
- if it’s too difficult to animate, don’t show that part
Preview Animatics
While I’m working, and if I want to see a quick version of the animation, quality isn’t very important. It’s more about seeing how the elements in my scene move, and if changes are required. We use an “animatic” for such quick previews, a term used in the animation industry. It’s essentially a render of the whole animation, but done at a lower quality so that it happens faster. I use Filament or OpenGL (Texture Shaded) to render those, rather than Iray or 3Delight (you can find this under Render Setting, at the very top). Either Basic or Intermediate OpenGL will work, and it’ll give you an idea of the motion in your animation in a matter of minutes.
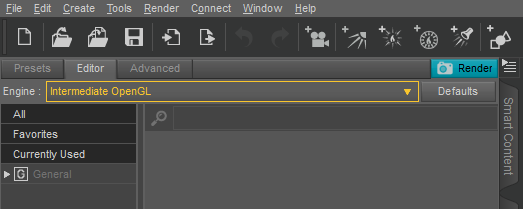
An OpenGL Render will look much like what you see in the viewport, hence it can be rendered immediately. The only difference is that it’ll use the resolution you’ve specified under Render Settings – General (or the Camera respectively).
To speed up OpenGL renders even more, the full resolution of your final animation isn’t really necessary. Rather than rendering at 1920×1080, drop that down to something like 800×480 or even lower. And speaking of speed, the full frame rate is also not necessary at this stage. I often change the target frames per second from 60 or 30 down to 15. That cuts down render time in half.
While I recommend rendering the final animation as a series of still images, I like rendering Animatics as regular video files. It’ll be easier to play them back immediately, and without assembling them in Photoshop or Premiere. An image series has other advantages, and we’ll discuss them below.
Animatics are like test renders for me. I take a look at the first one, I make changes to my animation as I see fit, then render another one. Get into the habit of rendering animatics often, they shouldn’t take longer than a few minutes to complete. If they do, lower your render settings. Here’s an example of an Animatic of my opening title sequence for 3D Shenanigans. It’s a work in progress: low resolution, stuttering frame rates, no lights, but the basics are in place and I can judge if the camera move needs any significant changes, or if anything else doesn’t quite work.
I save all my animatics in this playlist.
Final Render Considerations
Once I’m happy with the animatic in principle, it’s on to the final render. This will take some time, and I probably want to do this in Iray and at full resolution and frame rate, but not immediately. To achieve the right render settings for the scene, it’s important to get an impression of how long a single frame will take to render. From that value I can interpolate how long the whole project will take. As such, it’s important to keep the render time of a single image as low as possible.
I render still frames at key points in the animation first, to see if I’m happy with the look and feel of the lighting. Keyframes are indeed “key frames” of the animation, and the action should look as good as possible at these points. Here’s where we can cut down on Iray render time a lot, by using less samples than the default, under Render Settings – Progressive. It’s important to disable Render Quality, otherwise our max samples will be ignored, and Iray will render until the convergence rate and image quality is achieved. That can take hours, and it’s not what we want for an animation.
When Render Quality is disabled, the Max Iterations field will be obeyed. Try 200 and see how good that looks, and make a note of how long this single render takes. Then multiply this value for each image in your animation and you’ll get an idea how long it’ll take your system to render the whole scene. It’s not uncommon to arrive at a value of “two weeks” or longer for a good looking animation, even at settings that don’t look handsome just yet.
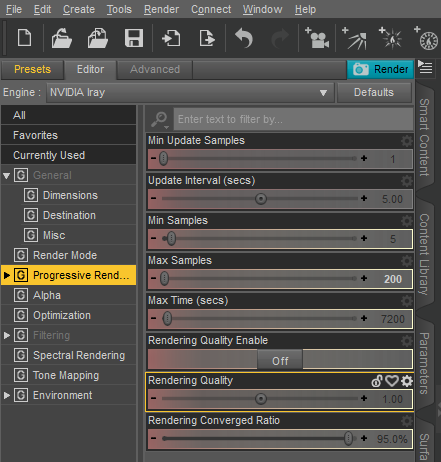
You’ll notice a considerable drop in image quality when rendering at lower iterations (or “ray bounces”, or “samples” as other apps call this value). However, you’ll also notice a huge decrease in render time, as well as a lot of grain. It really depends how much grain is acceptable, so its’ important to do some tests. Each scene/object/light combination is a different case, and what works for one scene does not work for another. You can try to go even lower than 200 samples, say 50, or increase up to 500 and see what it looks like.
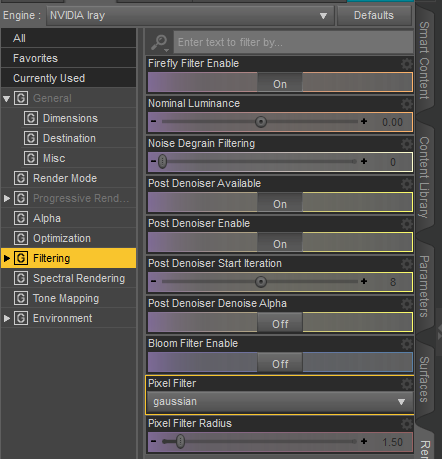
To remove the grain, head over to Filtering and enable the Denoiser. This will introduce artefacts, because the engine is guessing what the picture should look like. It often gets it wrong, but it often gets it right too. The more rendered pixels we give it, the better the results. Try increasing the samples until you get an OK result, with a render time of say 2-3 minutes per frame. Note that you need to enable “Post Denoiser Available” as well as “Post Denoiser Enable” for this thing to kick in.
I render my final animations as image sequences, rather than video files. I do this for several reasons:
- in case something goes wrong, I don’t have to start rendering the whole thing from the beginning
- I can split the workload across multiple computers, each of which rendering a part of my sequence
- video files contain video compression artefacts, and it’s likely that my animation needs video editing, so I’d like to introduce them at the end; compounding video compression artefacts leads to meta blocking and a degradation in quality
- rendering to PNG images allows the use of transparency, to add a background in post production (cutting down on render times)
The final step of an animation in my workflow is to assemble the image sequence, either in Premiere Pro or Photoshop. Both recognise image sequences. In Premiere I can add an audio soundtrack, do edits, add logos and captions, and all the rest of it. Here’s an example of my finished title sequence, with music and lighting. This was done in Blender, using a Daz Studio set, but the principles are the same as outlined here for Daz Studio.
I hope this helps, and I’m looking forward to your animation. Share a link below in the comments if you like!