I was wondering if I could use Blender to make my Substance Painter selections a little easier. I wanted to avoid importing the material zones into Substance, while retaining this information at the same time. Turns out there is a way to do this, but it needs a little manual labour. Josh explains it in the above video
In this article I’ll show you how to vertex paint our material zones and how to turn those into a custom ID Map in Substance Painter, which can then be used to select those regions. This might be helpful as we all figure out the best Substance workflow for our projects.
The whole process looks like this:
- paint vertex colours
- remove material zones (optional, but makes Substancing a little easier)
- export your model as FBX, then import it into Substance Painter
- bake the ID map from Vertex Colours
Let’s go through this step by step.
Setting up Vertex Colours
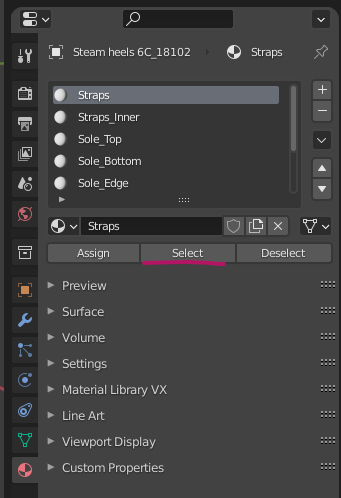
With our model imported and selected, let’s switch into Edit Mode and deselect everything. Head over to the Materials Tab, pick a material zone and hit Select.
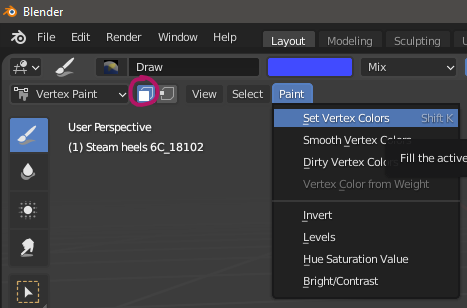
Switch over to the Vertex Paint mode and pick a colour. Enable the little mask icon, then select Paint – Set Vertex Colors. The mask will make sure only the selected portions of your model will be painted.
That’s it – now all we need to do is go back to Edit Mode (Tab), select another surface area, head back to to Vertex Paint mode, pick another colour and hit SHIFT+K to paint in the new selection. Rinse and repeat until all surfaces have been coloured in.
Removing Material Zones
You don’t have to remove the existing material zones, but leaving them in place will create multiple maps when it comes to export them from Substance Painter. There are workarounds like the Submerger script, but we can avoid the additional step of manually combining maps by avoiding them in the first place.
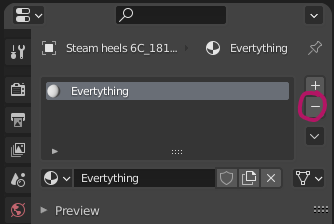
Back on the Materials Tab, hit the little minus icon to remove each material zone until you’re left with a single one. This will automatically be assigned all vertices while leaving the UVs intact. Feel free to rename it into something meaningful (like Everything).
Let’s export our model as FBX so that the vertex colours stay intact (the Wavefront OBJ format does not support this feature by default).
Baking the ID Map in Substance Painter
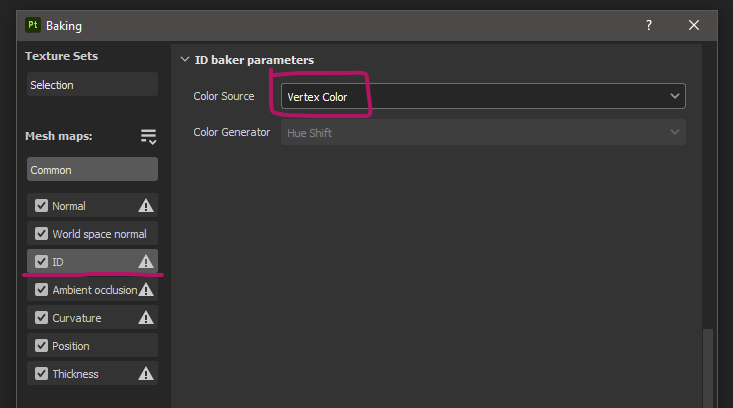
Once imported into Substance Painter, head over to Edit – Bake Mesh Maps. Select the ID Map and change the Colour Source from its default to Vertex Colour and bake.
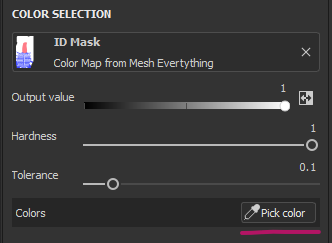
To make a selection using this map, right-click on an existing layer and select Add mask with colour selection.
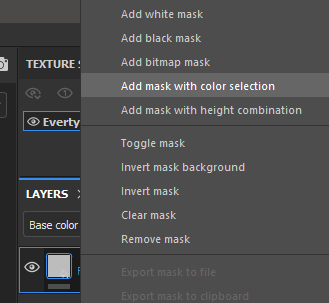
Under Colour Selection, choose the eyedropper tool and see the viewport magically switch over to display the ID Mask on the model. Pick a colour to mask this section off. Pick another colour to add to this selection until you’re done.