I was wondering if we could bake normal detail into the 3D mesh, for either printing or further refinement during sculpting or whatnot. Turns out Blender has a relatively easy way to make it happen, although the process is not without flaws (after all, normal maps are rendering fake rather than an archival data storage device).
In principle we need to
- convert the normal map into a displacement map
- use it in a displacement modifier
- use a subdivision or multires modifier at the top of the stack
Let’s take a look at this process step by step.
Creating the Displacement Map and Modifier
Blender’s Dispalcement Modifier can take a normal map directly as input, but the results aren’t great. It’s better to convert to a black and white displacement map first. There are several options available online and free, such as NormalMap-Online or a stand-alone app like Normalizer.
Now head over to the little wrench icon, and with your object selected, add a Displacement Modifier. Your object will look puffed up and we’ll have to tweak some settings, but here’s what the defaults look like:
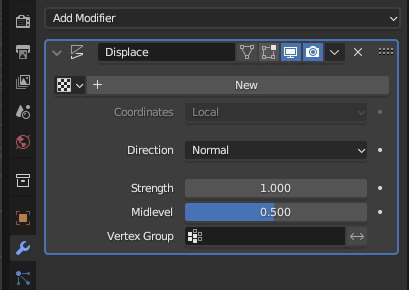
Strength is probably too high, it’s the amount of bump that’s generated from the map we’ll attach in a moment. Set this to 0.1 or 0.05 for now and tweak as necessary. Midlevel can stay at 0.5, I don’t actually know what it does but I believe it to be the midpoint between black and white levels that will cause a normal going in or out respectively.
If we want the displacement to be applied to a particular portion of our model, we can define a Vertex Group. A good example would be a character with several UDIMs, each of which would have its own displacement modifier in the stack, each of which referencing a different tile, and each tile is applied only to the portion of the model covering the UDIM. In that case, say the arms and legs get a separate vertex group, and two modifiers can take maps for each zone.
At the very top of our modifier is where we apply the texture. This is a little tricky to understand, but “texture” doesn’t actually mean the map we’ll apply. Rather, Blender refers to a “texture object” we select on the modifier, into which we can load an actual “texture map”. Yeah, that’s not confusing at all. Essentially, click New to create a new texture object called Texture by default. Rename it to something sensible, then click on the little texture icon and load a texture map into it.
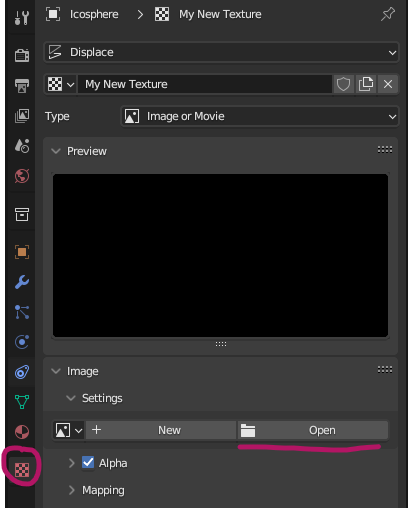
Switch back to the Modifier Stack (wrench icon) and notice that the previously greyed out coordinates section has become available. Switch it to UV and pick the correct UV Set if you have multiple, and your displacement map will generate geometry.
Subdividing your base model
The displacement likely won’t look very exciting right now because our model is too low res. Add a Subdivision Surface modifier to the top of your stack and add divisions to it. Try 3 or 4, with each additional level adding 4x the amount of vertices to your model on the fly. You should see the effect of the displacement becoming more clear with each subdivision. Adjust the Displacement Strength to taste, it’s easy to add “too much”.
Alternatively you can use a Multiresolution Modifier at the top of the stack. I find the results to be much the same, but I have read that for 3D printing, the multi res is preferred.
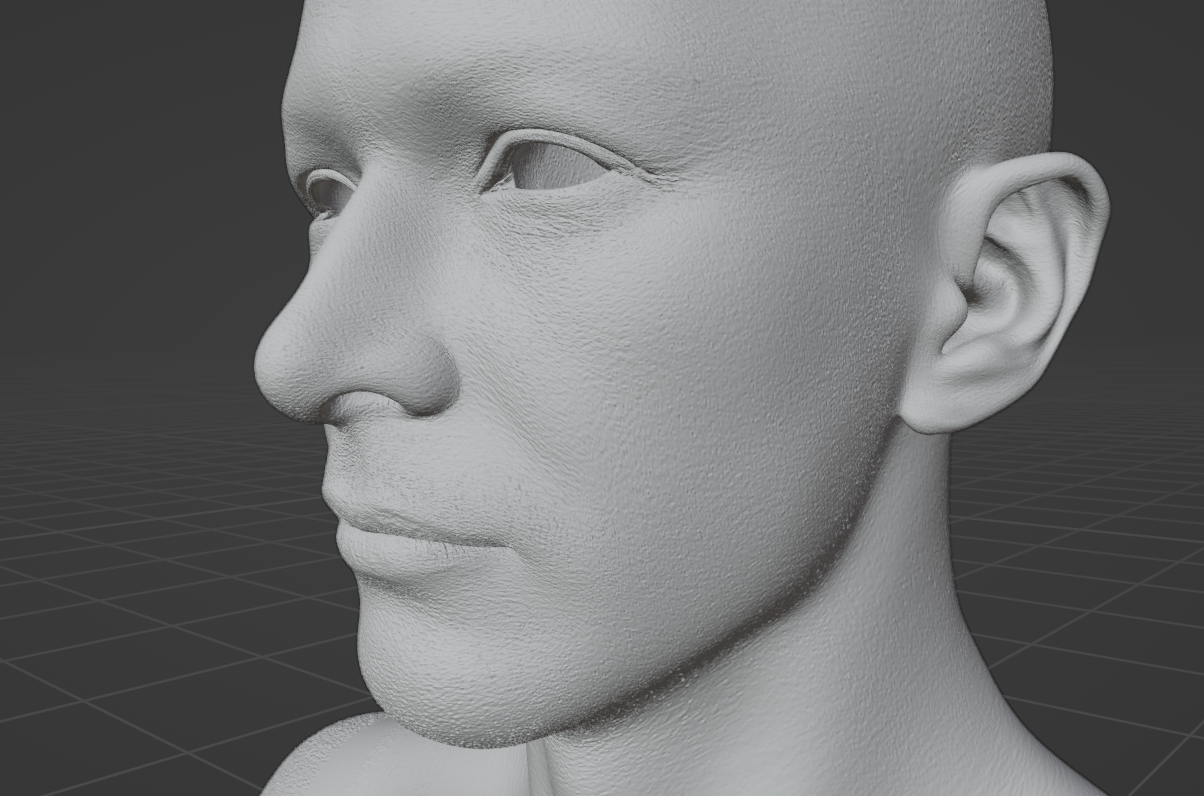
And there we have it! Normal data is now turned into mesh data – or at least a good approximation of it. This method isn’t perfect, and will likely need refining in sculpt mode.
Thanks for this useful workflow. Since the article mentions NormalMap-Online, I wanted to share two newer browser-based options I develop that may help readers with the same process.
NormalMap AI (https://normalmap.ai) can convert an imported color/albedo image into normal, height, roughness, ambient occlusion, metallic and ORM maps, with a real-time 3D preview. The image-to-PBR workflow runs locally in the browser and is free.
PhotoQuill (https://photoquill.com) is a free web image editor that can be useful for cleaning up source textures, adjusting contrast and preparing 2D assets before generating maps.
I hope these are useful additions for Blender artists, and thank you again for the clear tutorial.
Thanks for sharing, appreciate it!