Decals are a wonderful way to project a flat image onto existing geometry without touching the underlying material. I’ve just used one on my Heart of Mercy project to place a statue graphic onto a mosaic wall, and since it’s been a while since I’ve set one of these up, I thought I’d write down the whole process while it’s fresh. There’s also a fun bit of trivia in here about how the workflow has changed since Unreal Engine 4, which explains why so many older tutorials mention options that no longer exist.
Preparing the Texture
Export your image as a PNG or TGA with an alpha channel. This works from Photoshop or Substance Painter alike. The alpha is important: everything outside the shape you want to project needs to be transparent, because the decal will use the alpha as its opacity mask. For a flat “painted on” look, the base colour is all you need — no roughness or normal passes required (more on why that’s a feature rather than a limitation in a moment).
Creating the Decal Material
Import your texture, then create a new Material and set the following in the Details panel:
- Material Domain: Deferred Decal
- Blend Mode: Translucent
In the graph, plug the texture’s RGB into Base Color and the alpha channel into Opacity. That’s genuinely the whole material.
A quick word about Unreal Engine 4 (and older tutorials)
If you’ve done this in UE4, you may remember a second dropdown called Decal Blend Mode with options like DBuffer Translucent Color or DBuffer Translucent Color Normal Roughness. That dropdown let you choose which G-buffer channels the decal would write to — and it’s gone in UE5.
Since UE 5.0, all deferred decals go through the DBuffer path automatically, and the engine decides which channels to write based on which pins you connect in the material graph. Connect only Base Color and Opacity, and the decal writes colour while leaving the surface’s normal and roughness untouched — which means your projected image inherits the bumps and glossiness of whatever it’s projected onto. In my case, the statue picks up the mosaic tile normals underneath, which makes it look inlaid rather than pasted on. If you do want the decal to have its own surface response, simply connect Normal and Roughness pins as well, and those channels get overridden too.
So if an older tutorial tells you to look for “DBuffer Translucent Color” and you can’t find it: you’re not going mad, it’s just built in now.
Placing the Decal
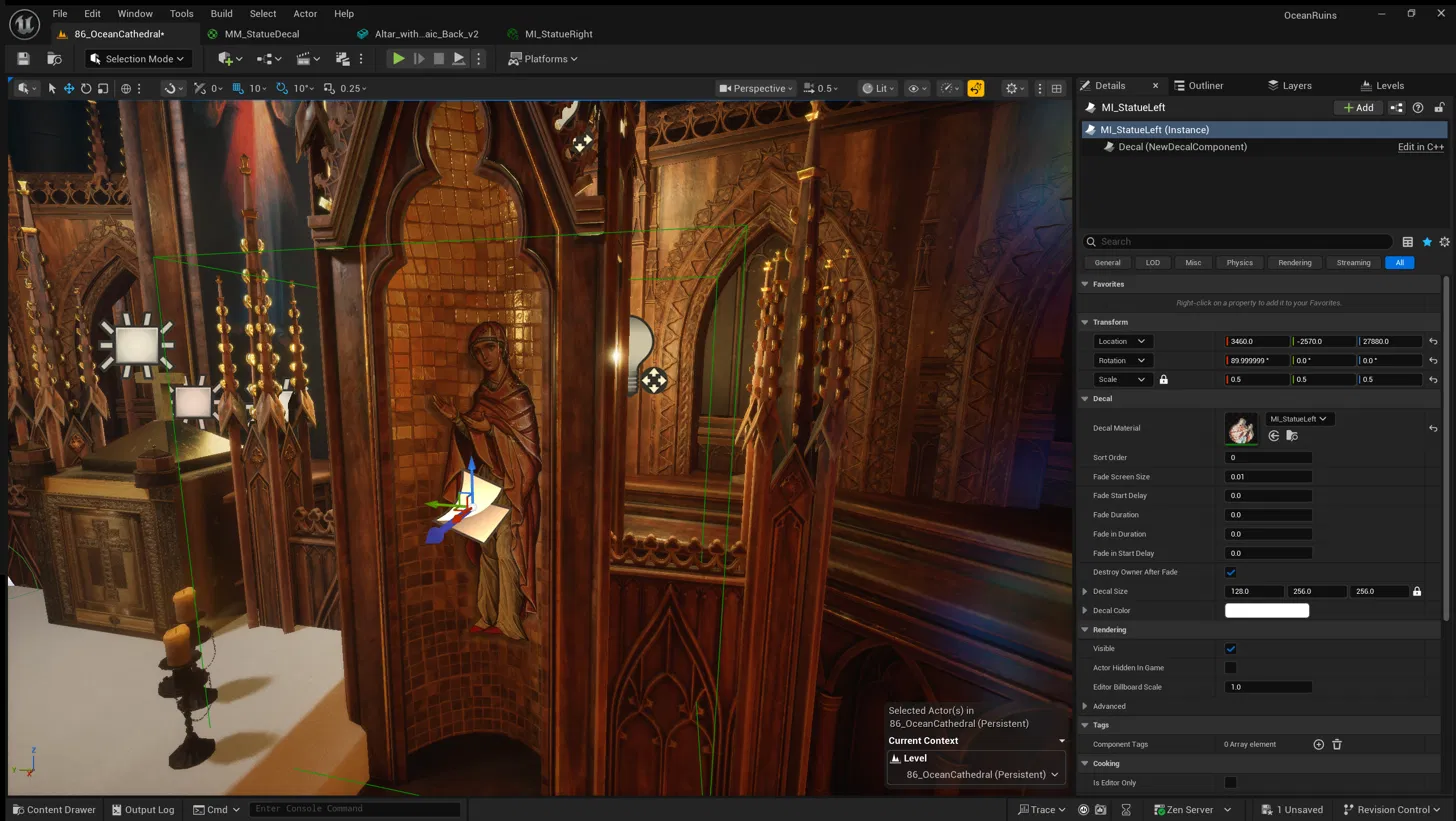
Drag a Decal Actor into your level from the Place Actors panel, or simply drag the decal material from the Content Browser onto the target surface — Unreal will spawn a decal actor for you, already roughly oriented.
A decal is a projection box, and it projects along its negative X axis. The X axis should point into the surface, roughly perpendicular to it. In the Details panel you’ll find Decal Size: the first value is the projection depth along X, the other two control the size of the projected image. Keep the depth fairly shallow so the projection doesn’t bleed onto geometry in front of or behind your target surface — but on curved surfaces, a little extra depth helps the decal hug the curvature without fading at the edges.
[Screenshot: decal actor selected showing the projection box and Decal Size values]
Things to watch out for
- Glancing angles fade decals. If the projection axis isn’t reasonably perpendicular to the surface, the image thins out or stretches.
- Receives Decals must be enabled on the target mesh. It’s on by default, but it’s the first thing to check if your decal mysteriously doesn’t show up.
- Sort Order on the Decal Actor resolves stacking when several decals overlap.
- Decals render fine in Movie Render Queue with no special handling.
When the Decal bleeds onto neighbouring geometry
Here’s a lovely example of a decal doing exactly what it’s told, just not what we want: my statue is projected perfectly onto the mosaic, but it also smears across the wooden frame in front of it. Anything inside the projection box that faces the decal will receive the image — including geometry we’d rather leave alone.

There are three ways to fix this, at three levels of granularity: on the decal itself, on the receiving mesh, or on the receiving material. Which one to pick depends on how your geometry and materials are set up:
Option 1: shrink the projection depth. Reduce the first Decal Size value (the X depth) and move the decal deeper into the niche, so the front face of the projection box sits behind the frame’s surface. The frame is then simply outside the volume and can’t receive anything. One caveat: on curved surfaces, don’t go too shallow — if the surface curves away out of the projection box, the decal starts fading at the edges, and you’ve traded one artifact for another.
Option 2: turn off Receives Decals on the offending mesh. If the frame is a separate static mesh, select it and untick Receives Decals in its Details panel (under Rendering → Advanced). The decal now passes straight through it as if it weren’t there, regardless of the projection depth. This is the same checkbox from the troubleshooting list above, used deliberately in reverse — and it can’t regress if you later move or resize the decal.
Option 3: make the material ignore decals. In my case, the frame and the mosaic are one mesh, so Option 2 was off the table — but they use two different materials, and that’s all we need. Open the receiving material (the wood, in my case), click into empty graph space so the material’s own properties show in the Details panel, and under Advanced find Decal Response (DBuffer). Set it from its default Color Normal Roughness to None, and every surface using that material becomes invisible to decals — even on a shared mesh.
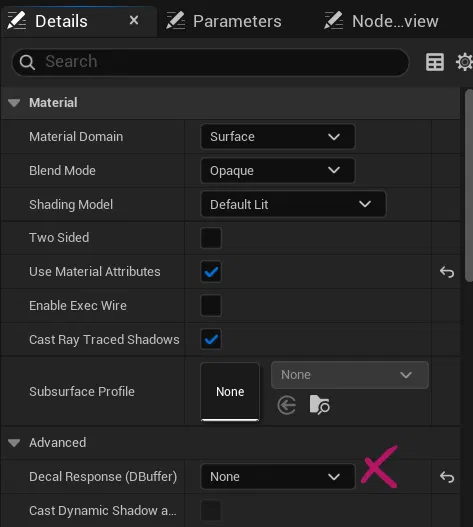
The dropdown also offers partial responses (Color only, Normal only, and so on) — a nice echo of the old UE4 Decal Blend Mode menu. That per-channel control didn’t vanish in UE5; it moved from the decal’s material to the receiving material.
Two things to keep in mind with Option 3: this is a material property, not a parameter, so it can’t be overridden in a material instance — you’re changing the parent material, and the change propagates to every instance. Which also means: check where else that material is used. If it’s a shared wood material across your whole scene, duplicate it first, set Decal Response to None on the copy, and assign that copy to just the relevant material slot on your mesh.
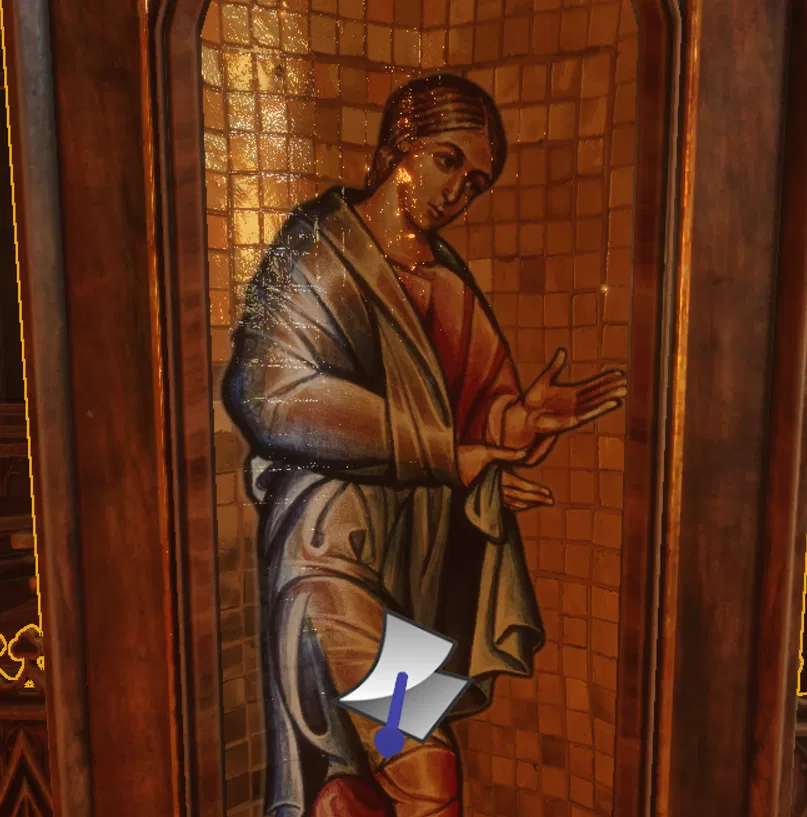
Here’s the result — the statue lands on the mosaic and passes straight through the wooden frame, one mesh and all:
And that’s it — a surprisingly quick way to add detail to a scene without touching the underlying materials.