Normally when a normal map is too strong, I’d head back into Substance Painter, adjust it there, re-export, and re-import. That works, but it’s a round-trip – and sometimes the correct strength depends on the scene, the lighting, or what the director asks for on the day. Turns out we can adjust normal map strength directly in the material graph, expose it as a parameter, and dial it in per material instance. Here’s how, with two options depending on how much control you want.
Option 1: The FlattenNormal function
Unreal ships with a material function called FlattenNormal that does the heavy lifting for us. Add it to your master material, plug the normal map’s RGB output into its Normal input, and wire a Scalar Parameter into the Flatness input. The result goes into the material’s Normal pin.
The one thing to be aware of is that the semantics are inverted: a Flatness of 0 means the normal map is applied at full strength, while 1 flattens it out completely. It works fine, but “turn the number up to make the effect weaker” never quite sits right with me. FlattenNormal also can’t boost a normal map beyond its authored strength – it only goes from full to flat.
Option 2: Roll your own (four nodes)
The alternative is to build the adjustment ourselves, which gives us intuitive semantics and the ability to push past 1.0. The trick relies on how normal maps store their data: the red and green channels encode the tilt of the surface, while blue points “outward”. Scale red and green, leave blue alone, and you scale the perceived bump strength. To do that, we multiply the normal map by a vector of (Strength, Strength, 1).
- Add a Scalar Parameter called Normal Strength with a default value of 1.0.
- Add an Append node and plug Normal Strength into both A and B (yes, two wires from the same parameter). Appending two floats produces a Vector 2: (S, S).
- Add a second Append node. Plug the first Append into A and a Constant with value 1.0 into B. Appending a Vector 2 and a float produces a Vector 3: (S, S, 1).
- Add a Multiply node. The normal map Texture Sample (RGB pin) goes into A, the second Append into B, and the output goes into the material’s Normal pin.
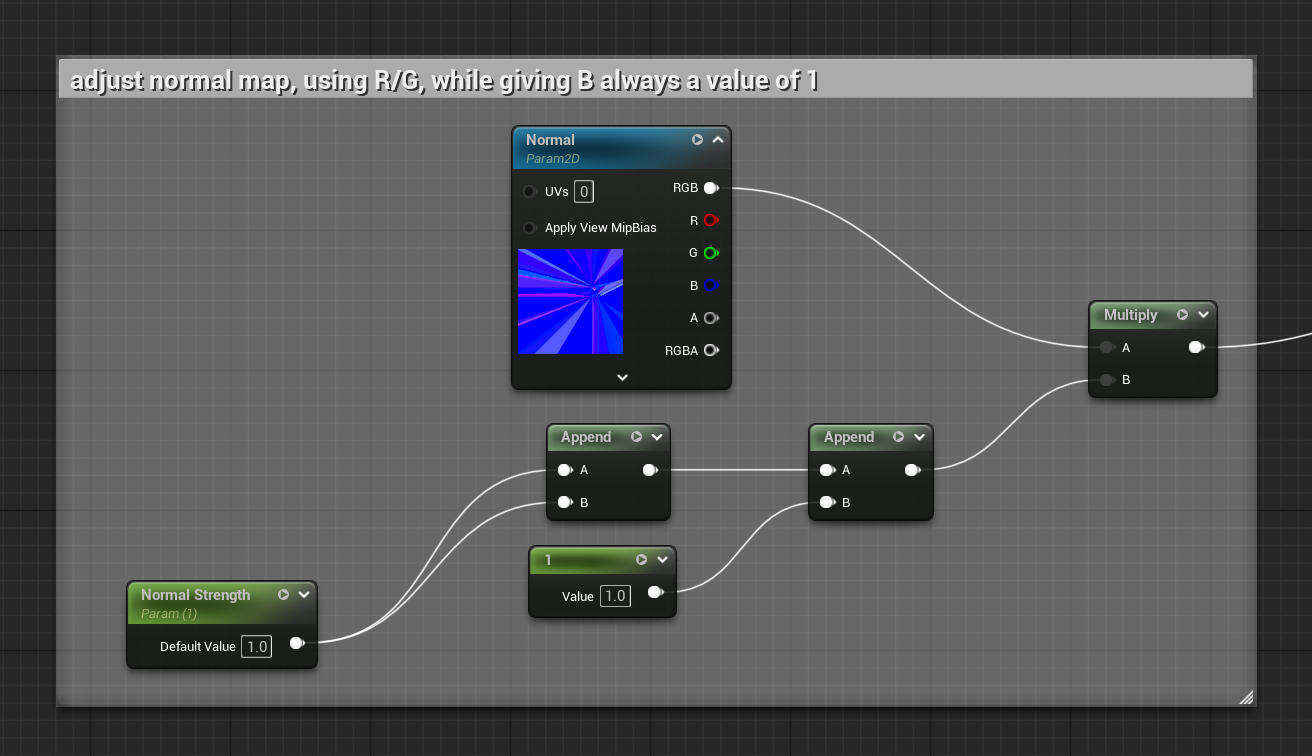
The Multiply works component-wise: red × S, green × S, blue × 1. The parameter now reads exactly the way you’d expect:
- 1.0 – the normal map as authored
- 0.5 – half strength, flatter
- 0.0 – completely flat
- 2.0 – exaggerated, crunchier bumps (something FlattenNormal can’t do)
It’s an either/or choice: use FlattenNormal for a quick one-node solution, or build the multiply version for intuitive values and headroom above 1.0. Incidentally, if you double-click FlattenNormal to peek inside, you’ll find it’s doing essentially the same maths – we’re just turning the steering wheel the way we want it.
The bonus: negative values invert the normal map
Here’s the surprise I discovered while playing with this: dial in a negative value and the normal map inverts. A negative strength flips the red and green channels, which mirrors the surface tilt – every bump reads as a dent and vice versa.
On my cloth material this actually looked better: at a slightly negative value the woven threads sink into the fabric rather than puffing outward, which reads much more like soft cloth. An unplanned feature, entirely for free, on the same slider.
[Screenshot: cloth material at positive vs negative Normal Strength]
If you’ve ever fixed a normal map that was authored in the wrong handedness (the classic DirectX vs OpenGL green-channel flip), this is a close cousin. A strength of -1 flips both red and green – a full inversion rather than a handedness swap – but it’s the same family of trick.
A note on master materials
I’m adding this to a master material that feeds many material instances, most of which shouldn’t change at all. That’s why the default value matters: with Normal Strength defaulting to 1.0, every existing instance renders exactly as before. Only the instances that opt in and override the parameter are affected. New capability, zero disruption – the way master material additions should be.