There’s a switch on the side of the camera to select your aperture:
Sunny (f16), Cloudy (f8) and “R” for “rewind the film”. Make sure you take off the rubber band before you rewind the film and set that switch to “R”. Doing so closes the always-open exposure slit so your film doesn’t get fogged.
Make sure you don’t leave that switch on “R” while you’re taking pictures! This will cause the exposure slit to be closed. You’ll easily notice this by a slient motion though – the camera should make a “zzzzzt” noise when you take a picture 😉 At the bottom of the stick is a standard tripod mount and a small attachment for the lens cap. An inscription reads “Dolphin Spinner 360”, which may have been the initial name for this camera. We can find dolphin references on the spirit level and the front of the camera too. I wonder why they changed that…
Inside the Spinner
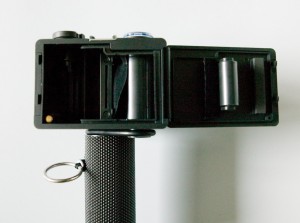
 At first glance, we find the usual components: the film feeds from the cartridge on the left to a big take-up spool on the right. A piece of cloth covers the film from any stray light caused by the always-open exposure slit in the middle of the camera.
The camera back has a pressure roller in the middle to keep the film flat during exposure and another piece of cloth to protect the film. We also find a piece of black foam to hold the cartridge in place. Fairly simple, yet effective.
Make sure those cloth pieces don’t get caught underneath the take up spool or pressure roller! Otherwise, you’ll risk foggy filmage.
How does it work?
Believe me, that was the first question I’ve asked myself even before I got my hands on it. As usual, it’s MUCH simpler than my brain would comprehend. I was thinking of an accurately controlled panning mechanism, forgetting that essentially we’re dealing with a plastic “rubber band” camera here. Forget accuracy!
Imagine a shutter that’s open at all times, as if constantly in bulb mode. When you wind the film, you expose it. It’s that simple.
The grip is spring loaded on the inside and will turn the camera, which in turn winds the film. When you pull the ring, you pull the spring – like a wind-up car from a Kinder Surprise Egg. When you let go of the string, the camera turns 360 degrees on its own axis while transporting the film. You’re usually in the picture, unless you hold the Spinner above your head.
When I say “the camera turns 360 degrees”, I should use this term rather loosely – because it’s not an exact science. You may take a picture of 180 degrees, you make take one of 400+ degrees. It all depends on how quickly and forcefully you let go of the metal ring.
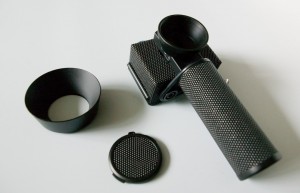
Heavy Metal Lens Hood and Filters
 It looks like the lens hood was an after thought. I didn’t even know I could detach it – but the non-fitting lens-cap kept me up many sleepless nights. Then I found out that you just turn it counter-clockweise and it comes off with ease (remember: righty-tighty, lefty-lucy… thanks to Catherine Willows from CSI for this!)
Apart from keeping those angry stray rays at bay, the lens hood serves another more important purpose: balance. Without it, the Spinner wobbles while you take a picture, and it spins much smoother then it’s attached to the front. Forget the lens cap!
You can attach standard 52mm filters to the Spinner. If you do so, detach the lens hood, attach the filter, and then attach the lens hood again carefully… I don’t think those filter threads are made for a heavy piece like that.
Scanning your pictures
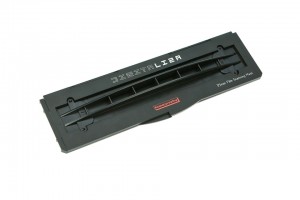
Flatbed scanners are usually capable of scanning anything up to 30cm in length, which means you’ll be OK with an A4 flatbed. Those cheap-o “35mm only” scanners aren’t suitable for this venture… sorry!
 Your negatives will fit into your 35mm holders, however these will cut off the exposed perforations. If you’d like to scan those in, you’ll either have to tape your film onto the scanner or to something like a wet scanning attachment (comes with my Epson Perfection V750 for example).
I’m sure it will –
they usually come with a mask that scans four strips, and on those strips you can select as many pictures as you like. You’ll manage to scan between 20 and 24 “normal” 35mm pictures.
I am SO PLEASED you explained on your website what was up with the lens cover. Day after day I sat with the Spinner in one hand and the lens cover in the other hand thinking, there’s got to be a way to make this work. Whew. And it sounds like it’s not worth doing, taking off the lens hood to do that. Just protect the camera in other ways. Good to know though that filters can be used. I got the Fisheye and Spinner as presents and it’s been a lot of fun. As you say, it is about the fun. Happy is in us. Grat blog. Carry on.
Pam
Hi Pam,
glad I could clear that up 😉
Happy shooting with both the Spinner and the Fisheye – they’re two of my all time favourite cameras. You’ll love your output!
I’ve just been given a Lomography 360 spinner/dolphin and have been desperately trying to scan my images onto my computer using an Epson V350.
I LOVE the spinner! It’s alot of fun to use and the few images which I have managed to scan (at great expense) have come out great!
But I just can’t afford to take them in to a specialist everytime I need them scanned.
My V350 automatically segments the film when scanning and I don’t have the programmes needed to manually stitch them back together.
I love this camera so mych but I’m beginning to think that I can’t afford the cost of scanning my images… 🙁
Help!!!
I totally understand that: you’ve got the camera, you’ve got the scanner, why spend more money and be less creative?
I think the scanner isn’t the issue, it’s probably the software you’re using. I remember my v750 came with Epson Scan, and that always tried to automatically cut my images up into standard sizes. No good for me.
There is an option to switch auto detection off though, can’t remember where but it’s in the settings somewhere.
I assume you’re using a DigtaLiza?
Does anyone know of anywhere that will scan spinner photos professionally?
I think the Lomography Lab in London does that (at Spitalfield’s Market). I’ve also heard that Lomography have a mail order processing service, I’d imagine they offer Spinner scanning as well but I’m not sure.
Good negative scanners start at £99 – it may be a well worth investment, depending how much sprocket shooting and scanning you do.
Hope this helps 😉
Thanks Jay! I talked to someone at Lomography today, and along with giving me local recommendations, she also told me what scanner they use for all their sample images (Epson Perfection V700).
Glad to hear it. That’s the same scanner I use, and it works really well.
Hi!
I just wanna know if the sprockets always show? Or does it have a detachable frame-thingy like in the Sprocket Rocket? Thanks! 🙂
Great article by the way! I just bought my very own and I’m pretty excited to use it, a little nervous, too, though.
Hi Nine,
thanks – glad you liked the article. The Spinner takes a lot of getting used to, but it can produce some stunning results. It doesn’t come with a frame behind the lens so the sprockets are always exposed (it’s basically just an open slit behind which you pull the film, causing exposure).
Have fun with your new Spinner 😉